Full dentures at the highest esthetic level
A contribution to the 13th International CANDULOR KunstZahnWerk Competition 2023
Skender Ramadani, Switzerland
There are many reasons for the computer-aided fabrication of dental restorations. However, when it comes to fabricating full dentures which differ from the ordinary due to their individuality and natural beauty, then conventional fabrication techniques often remain superior to this day. They offer users greater flexibility and enable them to apply their own creativity as well as dental technical skills in a more targeted manner. This results in restorations that even help patients with the highest esthetic demands to achieve a better quality of life.
Such a restoration was to be fabricated as part of the 13th International CANDULOR KunstZahnWerk Competition 2023: the challenge was to fabricate a mucosa-supported maxillary and mandibular full denture based on a detailed model analysis. A choice could be made between a tooth-to-tooth or a tooth-to-two-tooth setup for the dynamic occlusion concept which was to be applied. Detailed information on the initial situation was provided (summarized in the following section Case Description), as well as the matching maxillary and mandibular plaster models, the physiognomic bite key and the denture teeth: PhysioSelect TCR (maxilla) / shape 674, shade A3, PhysioSelect TCR (mandible) / shape 64, shade A3 and BonSelect TCR (maxilla and mandible) / shape 04, shade A3 (Fig. 1). In addition, the briefing included an image of the interim denture, recent extraoral images of the patient with the denture in place, and a youth photograph (Figs. 2 to 5). It was also mentioned that the labial lip contact of the maxillary anterior teeth and the buccal cheek contact of the posterior teeth correspond to the bite key. The condylar path inclination was given as 45 degrees on the right and 47 degrees on the left, the relationship: Camper's plane = occlusal plane.
Case description
The female patient was 69 years old at the beginning of treatment and had already been provided with full dentures for 15 years. Whereas teeth 21, 22 and 23* as well as 35 to 42 and 46* could initially be preserved and were restored with double crowns, the teeth in the maxilla had been extracted over time. Subsequently, the teeth in the mandible also had to be extracted due to advanced periodontitis. The patient had been wearing an interim restoration for two years.
No general medical conditions relevant to treatment were known at the start of treatment. Clinical examination revealed pronounced atrophy of the mandible. Also noteworthy were a slightly pronounced flabby ridge in region 32 to 42* as well as leukoplakia crestally in region 35*. A new restoration with mucosa-supported full dentures was indicated due to both unsatisfactory esthetics as well as unsatisfactory function. The esthetic deficiencies included the unsightly resin of the interim restoration (Fig. 2) as well as the fact that the anterior teeth in the maxilla and mandible were not sufficiently visible (Fig. 3). In addition, the lower third of the face clearly appeared too small when the jaw was closed in the resting position. This gave the chin a more "pointed" appearance than is usual (Figs. 4 and 5). The unsatisfactory function was due to insufficient denture retention, which only allowed food comminution in conjunction with the use of adhesive cream. However, it remains questionable whether it is at all possible to achieve satisfactory prosthetic function in the mandible into old age without implants (Marburg "Concept 75+" Dr. H. Gloerfeld/Dr. D. Weber, Marburg).
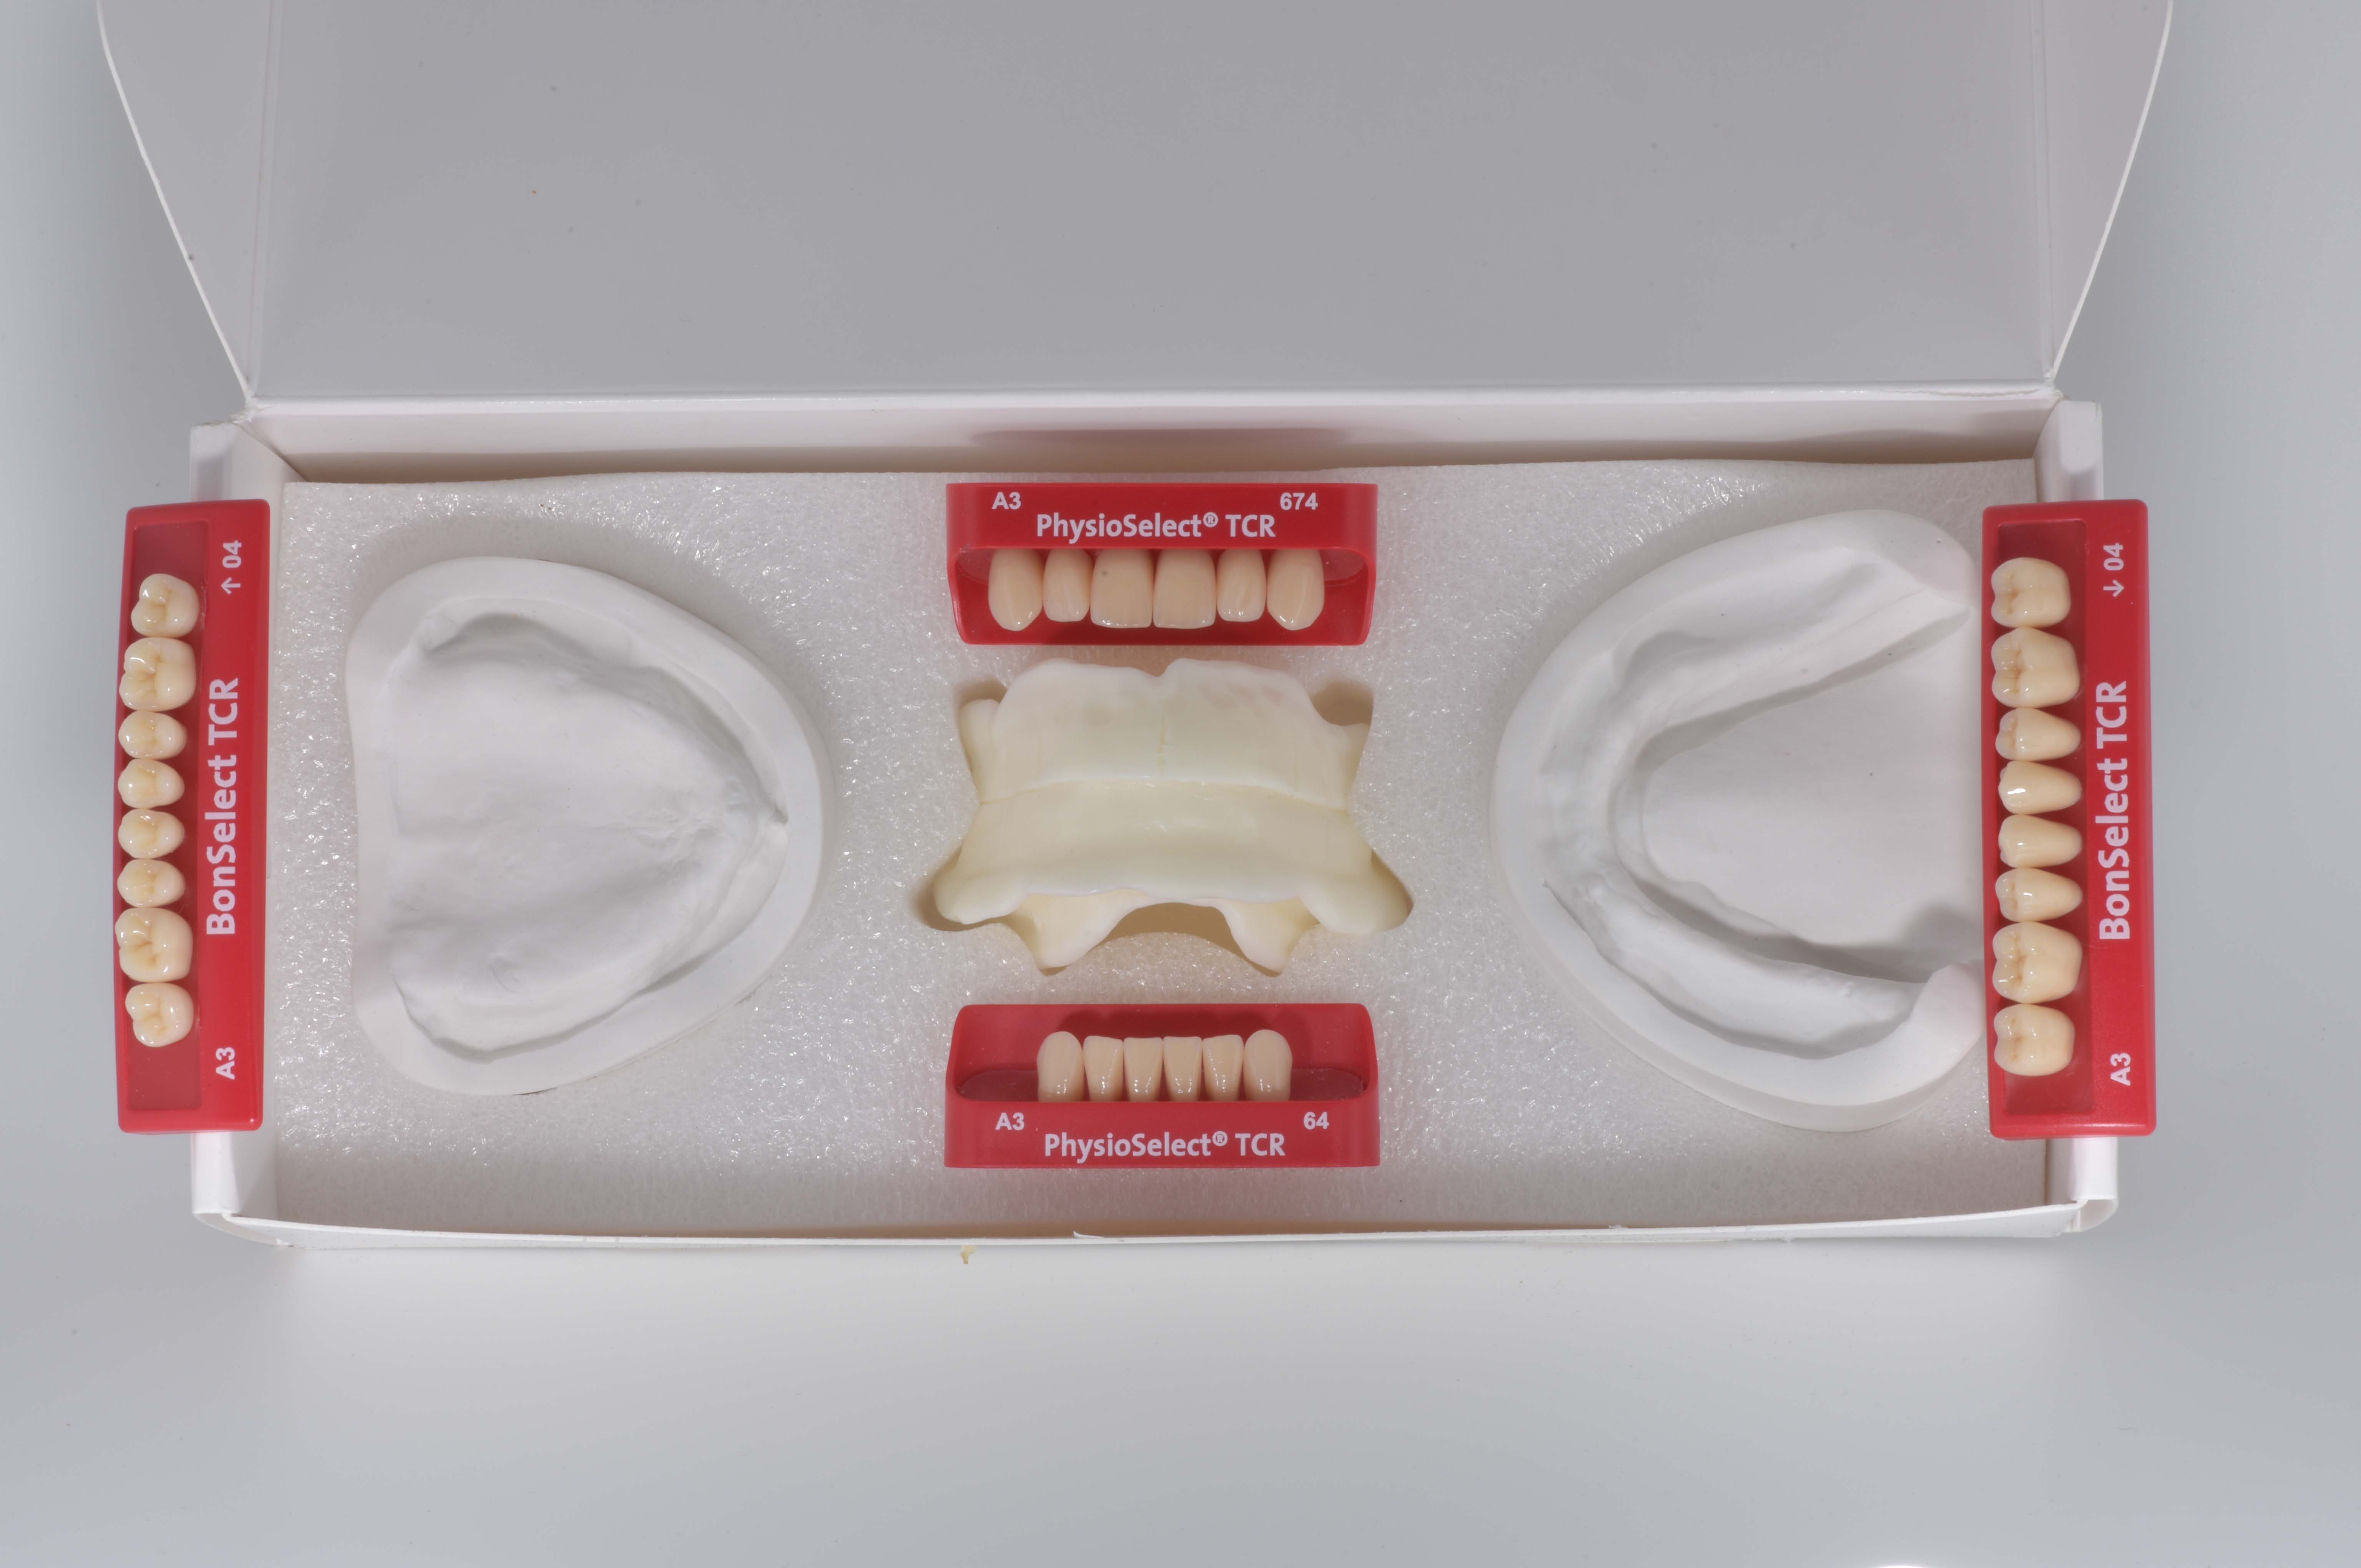
Fig. 1: Set with plaster models, bite key and denture teeth.
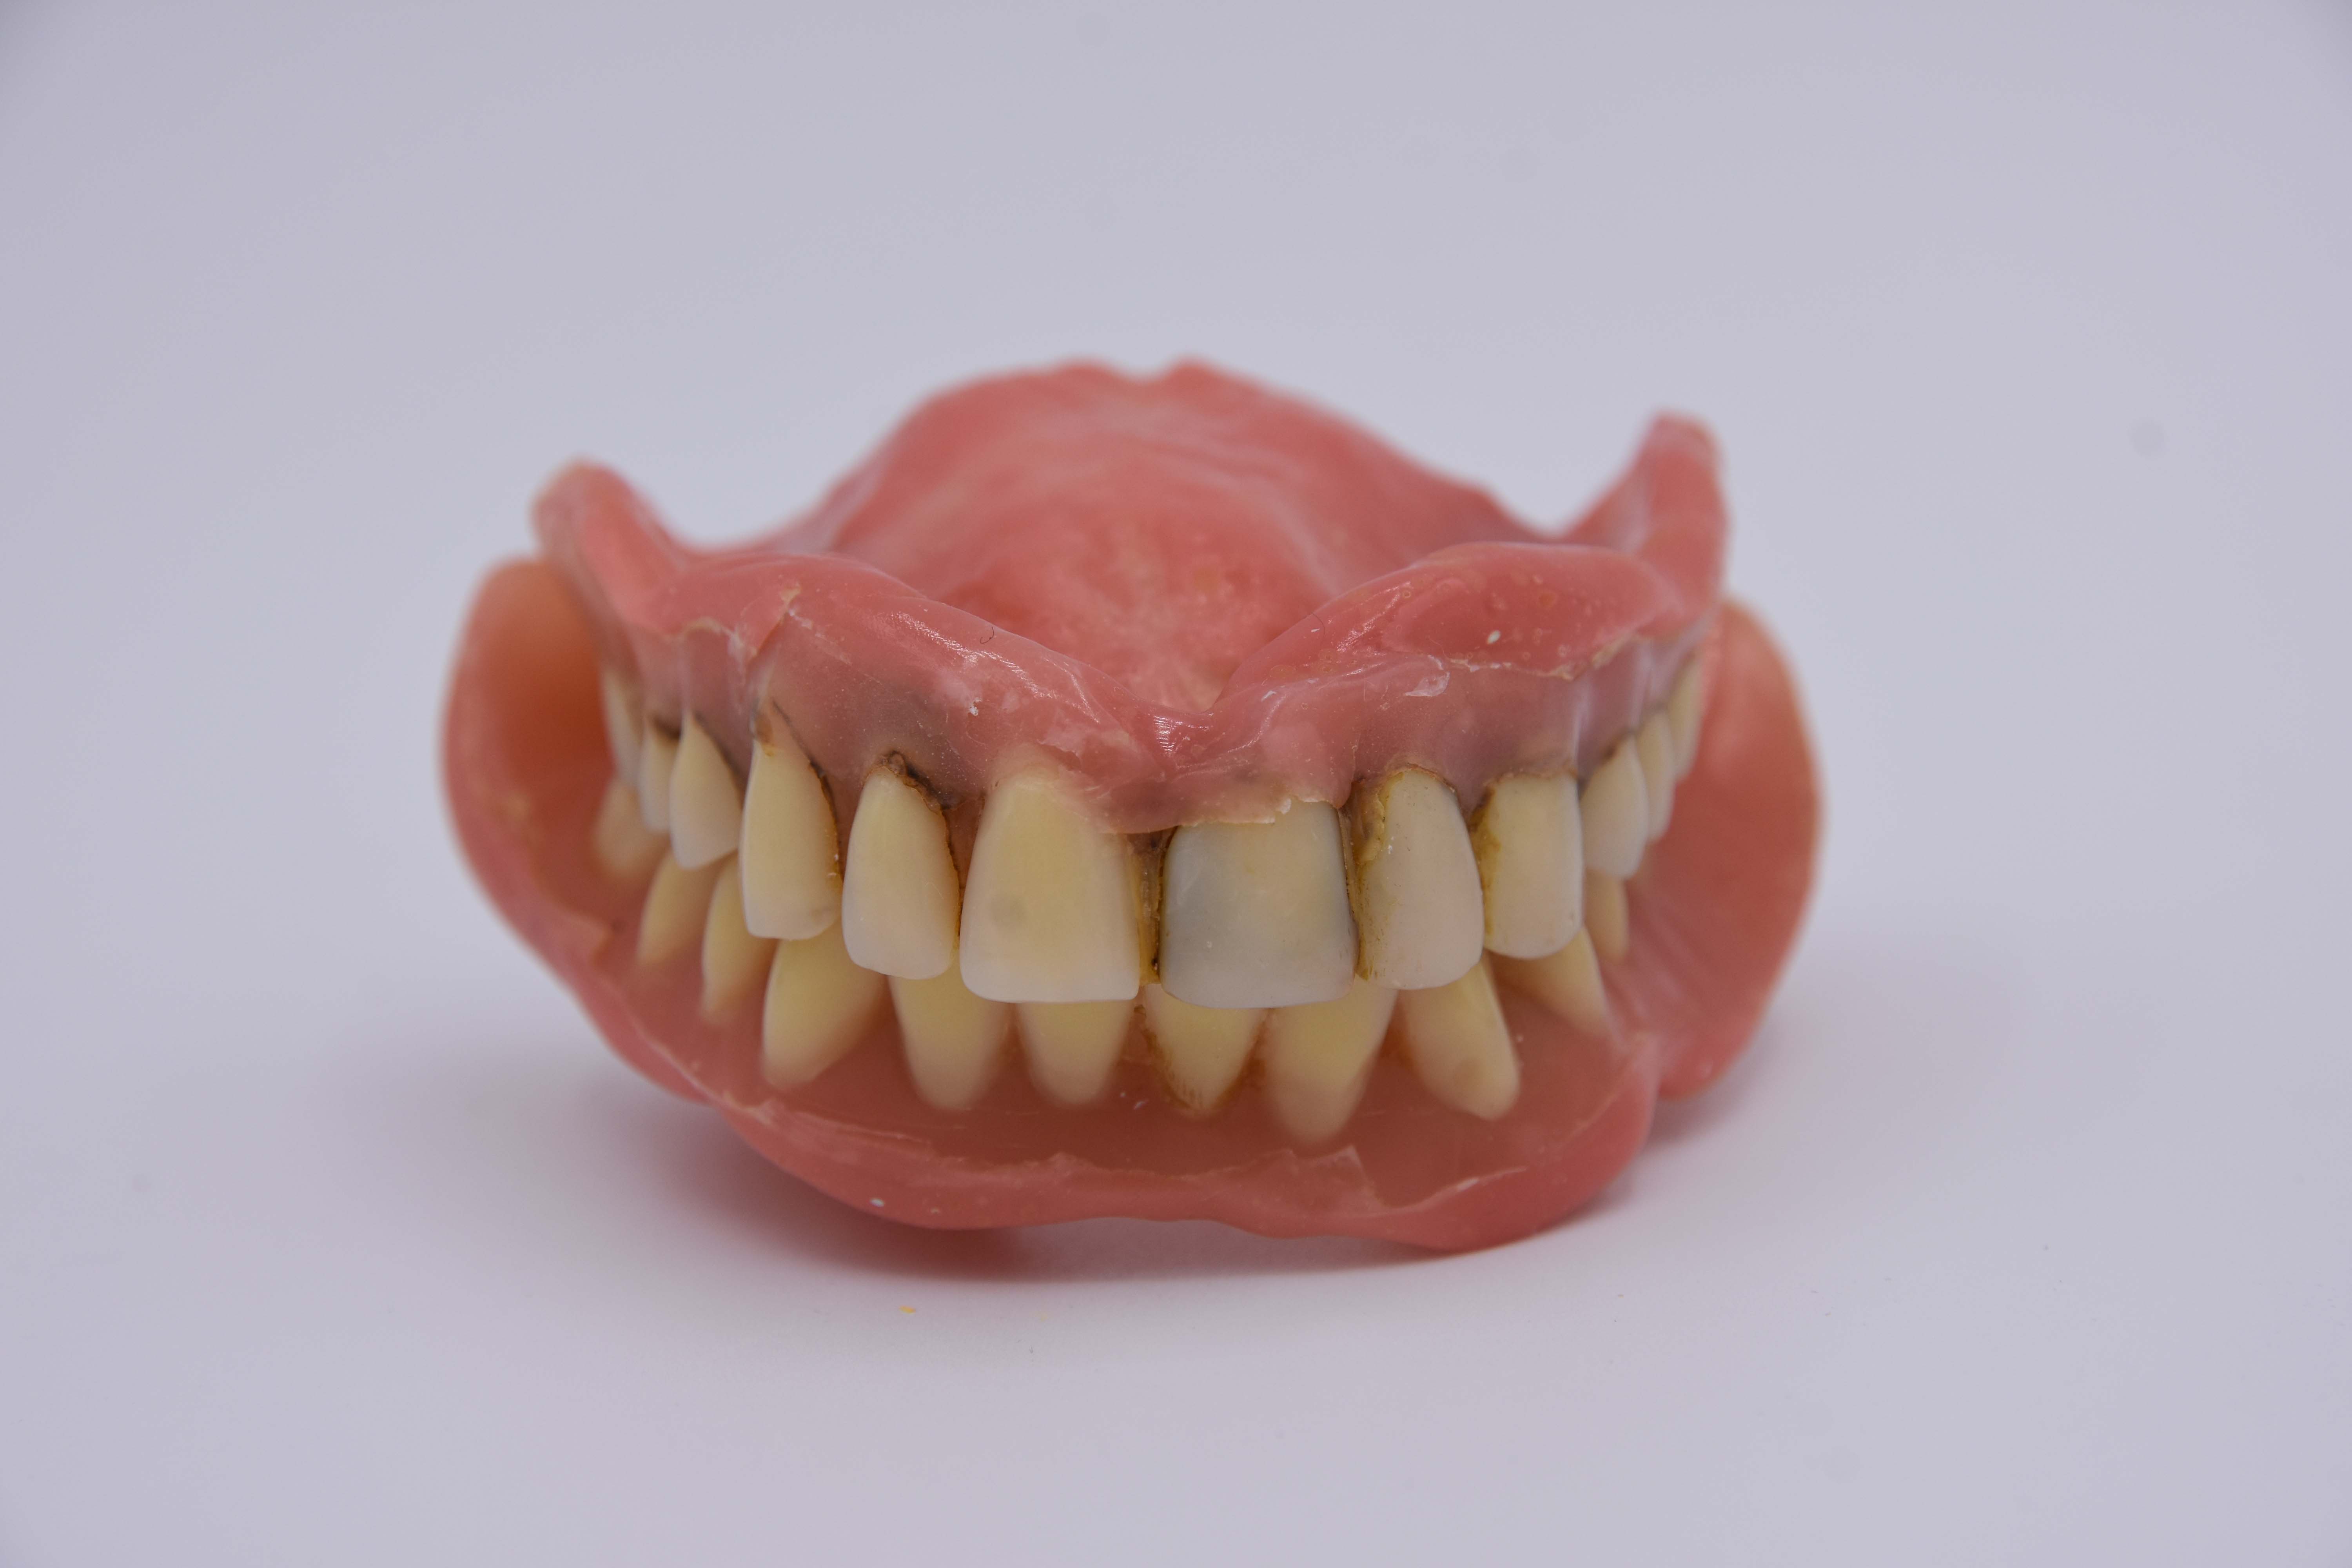
Fig. 2: Interim restoration with unsightly resin.
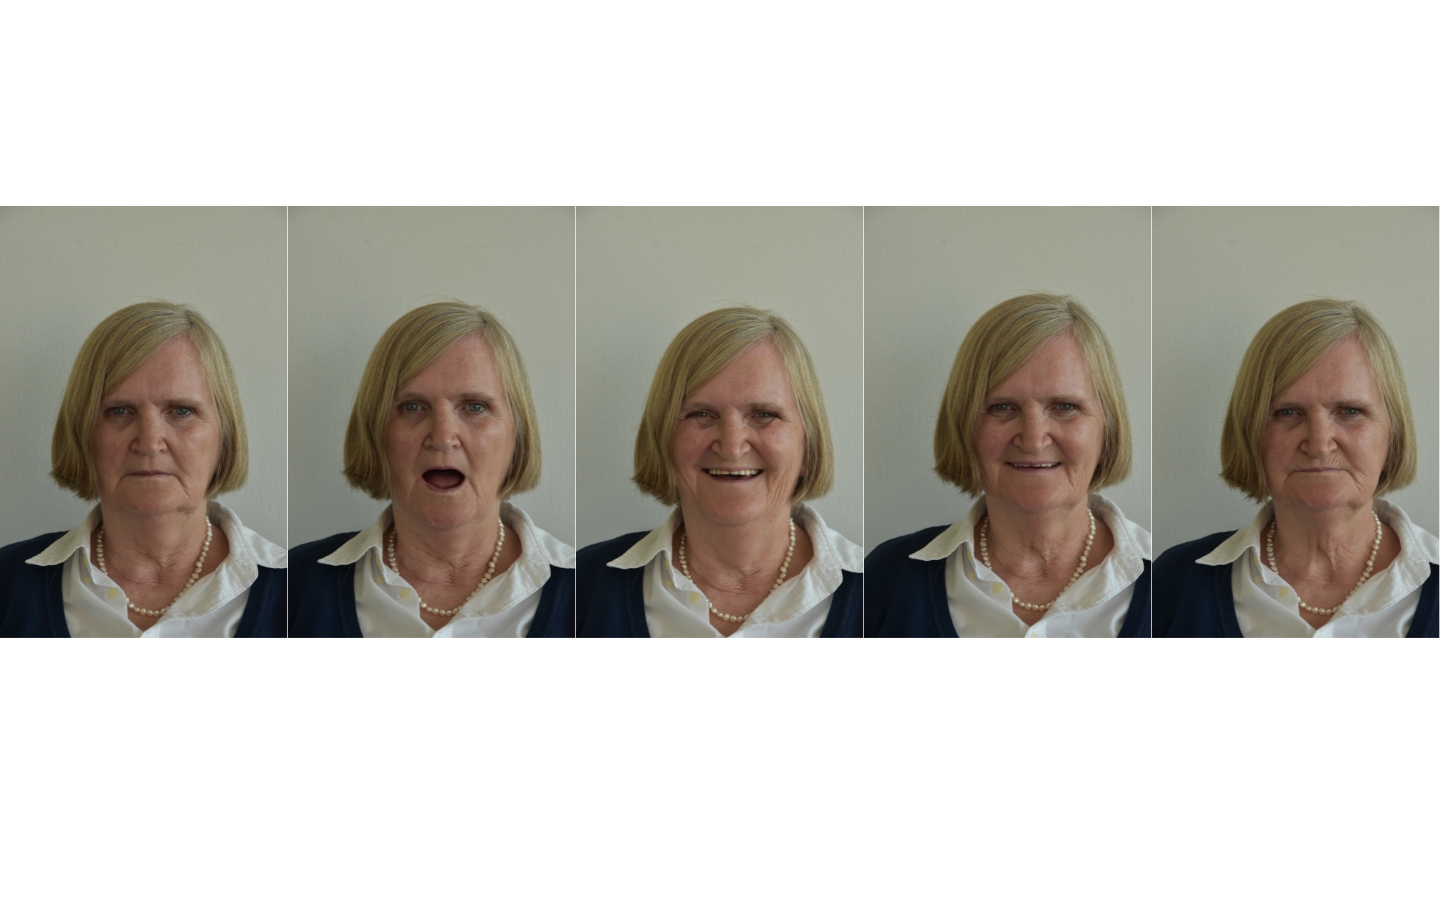
Fig. 3: Frontal image of the patient with closed mouth at rest position, open mouth, laughing, smiling and with closed mouth at jaw occlusion.
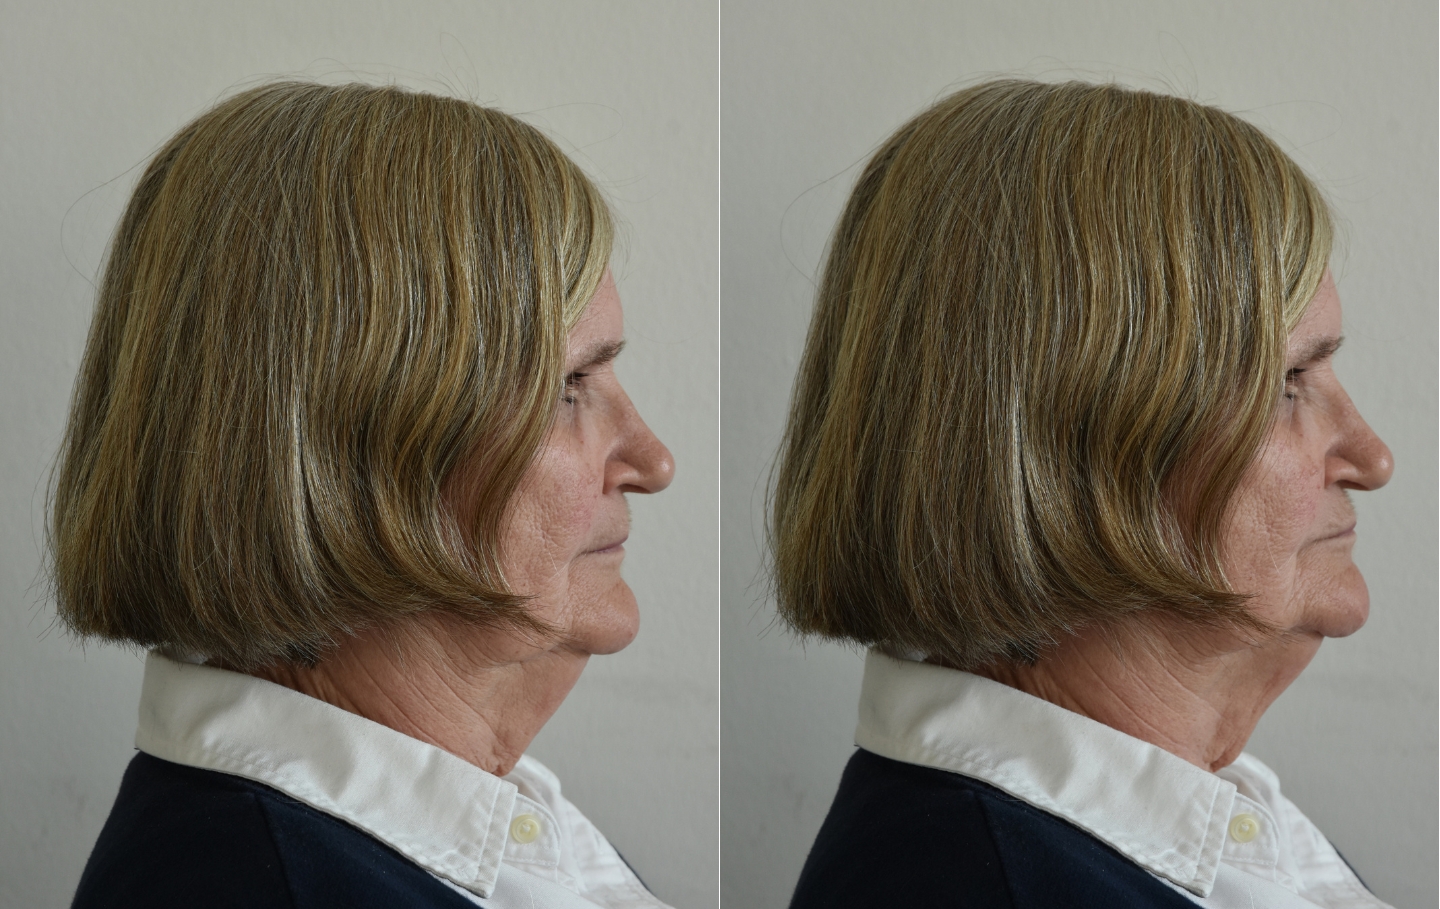
Fig. 4: Profile view of the patient with closed mouth in rest position and with jaw occlusion.
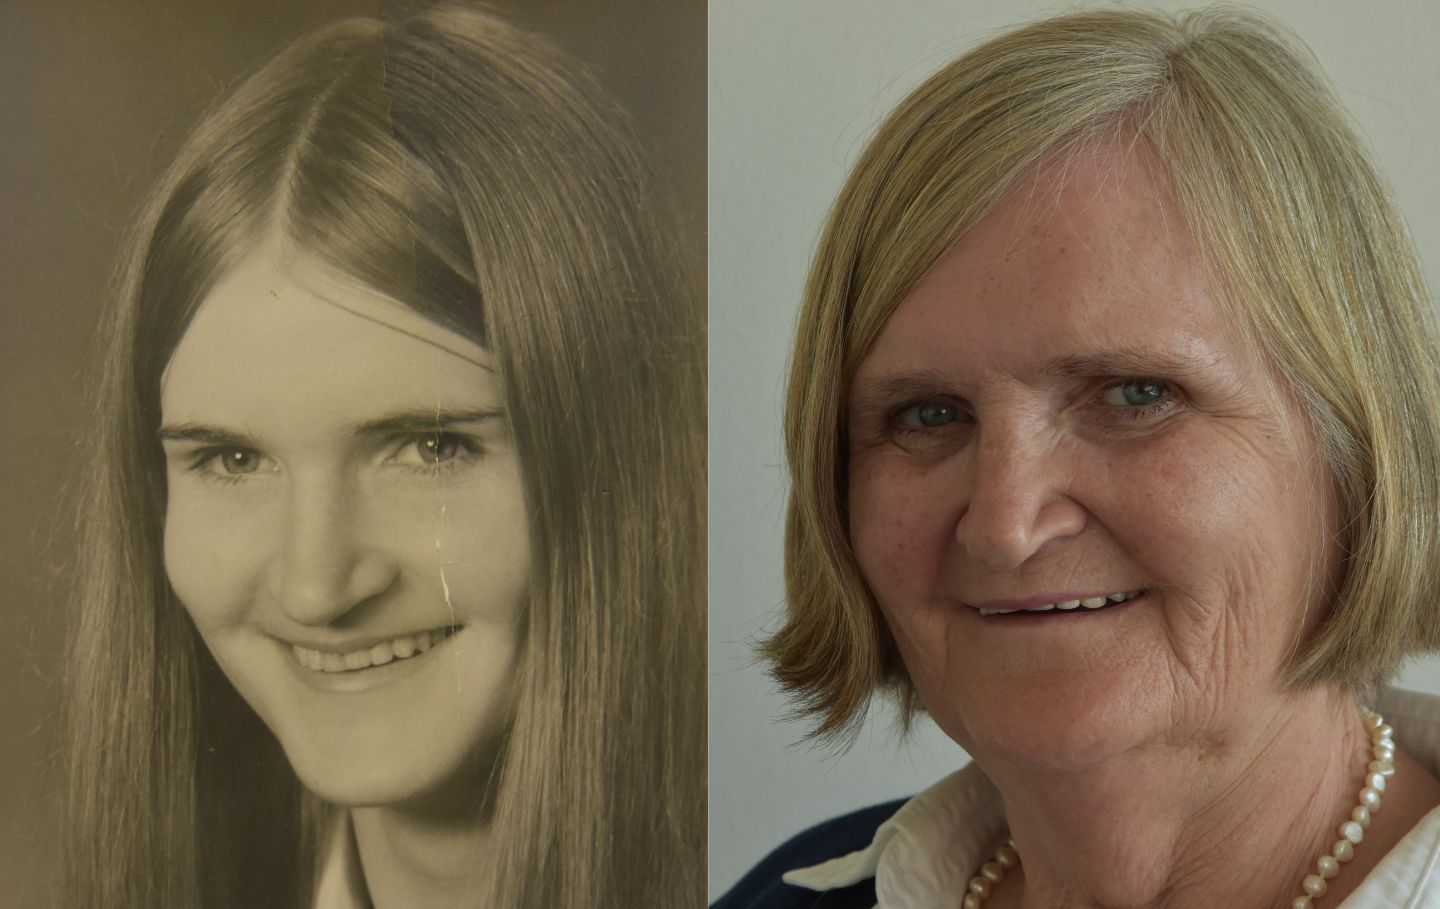
Fig. 5: Comparison of a youth photo of the patient with a current image.
Treatment goals
The patient's wishes were also taken into account when defining the treatment goals. Her main concerns were better retention as well as better chewing performance. Furthermore, the anterior teeth should be more visible in both the upper and lower jaws and the chin was to appear less "pointed". In terms of shape, position and color of the teeth, the patient wanted a natural appearance that was in keeping with her age, even somewhat irregular was welcome.
Taking these wishes into account, it was planned to fabricate a mucosa-supported maxillary and mandibular full denture with an individual design. Attention was to be paid to the highest possible wearing comfort and secure retention, excellent chewing performance and, of course, a perfect function of speech. To slightly correct the protruding chin, an elevation of the vertical jaw relation was planned. A look at the youth photo (Fig. 5) confirmed the assumption that stronger padding of the lower lip would not lead to the desired result in the present case. However, elevation would also optimize visibility of the maxillary anterior teeth in particular. In the context of these measures, attention had to be paid to preserving speech function.
Model assembly
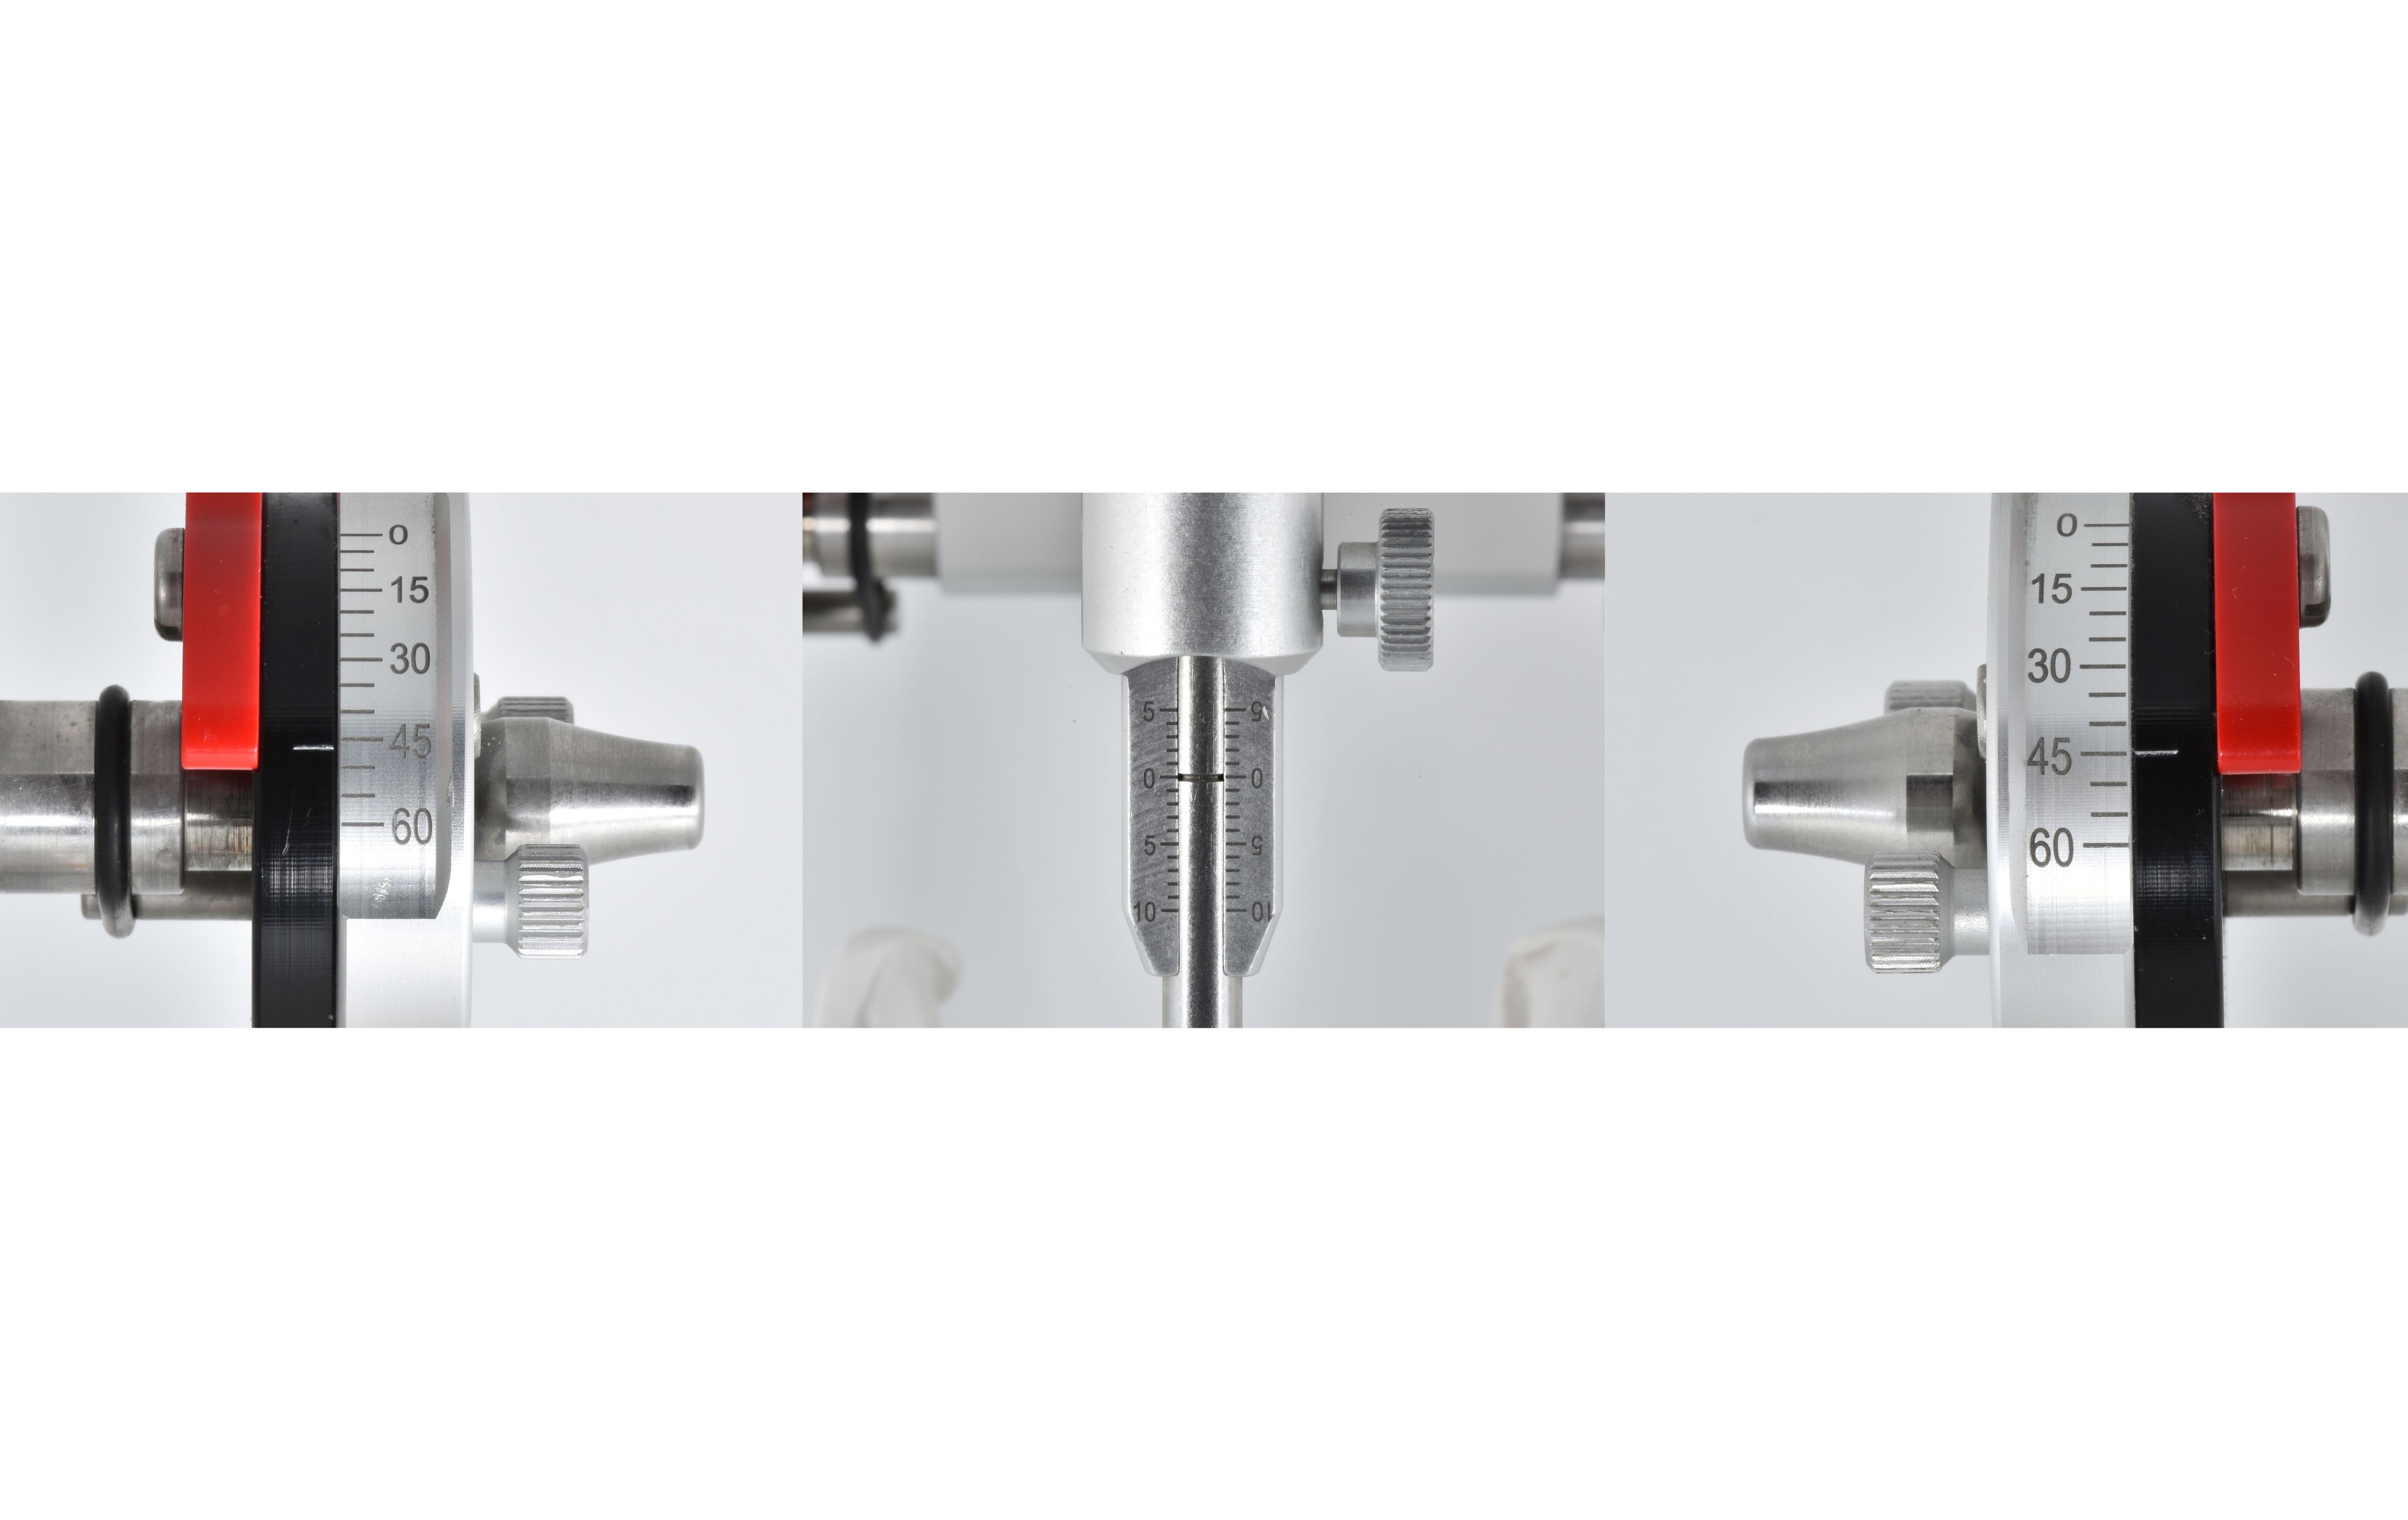
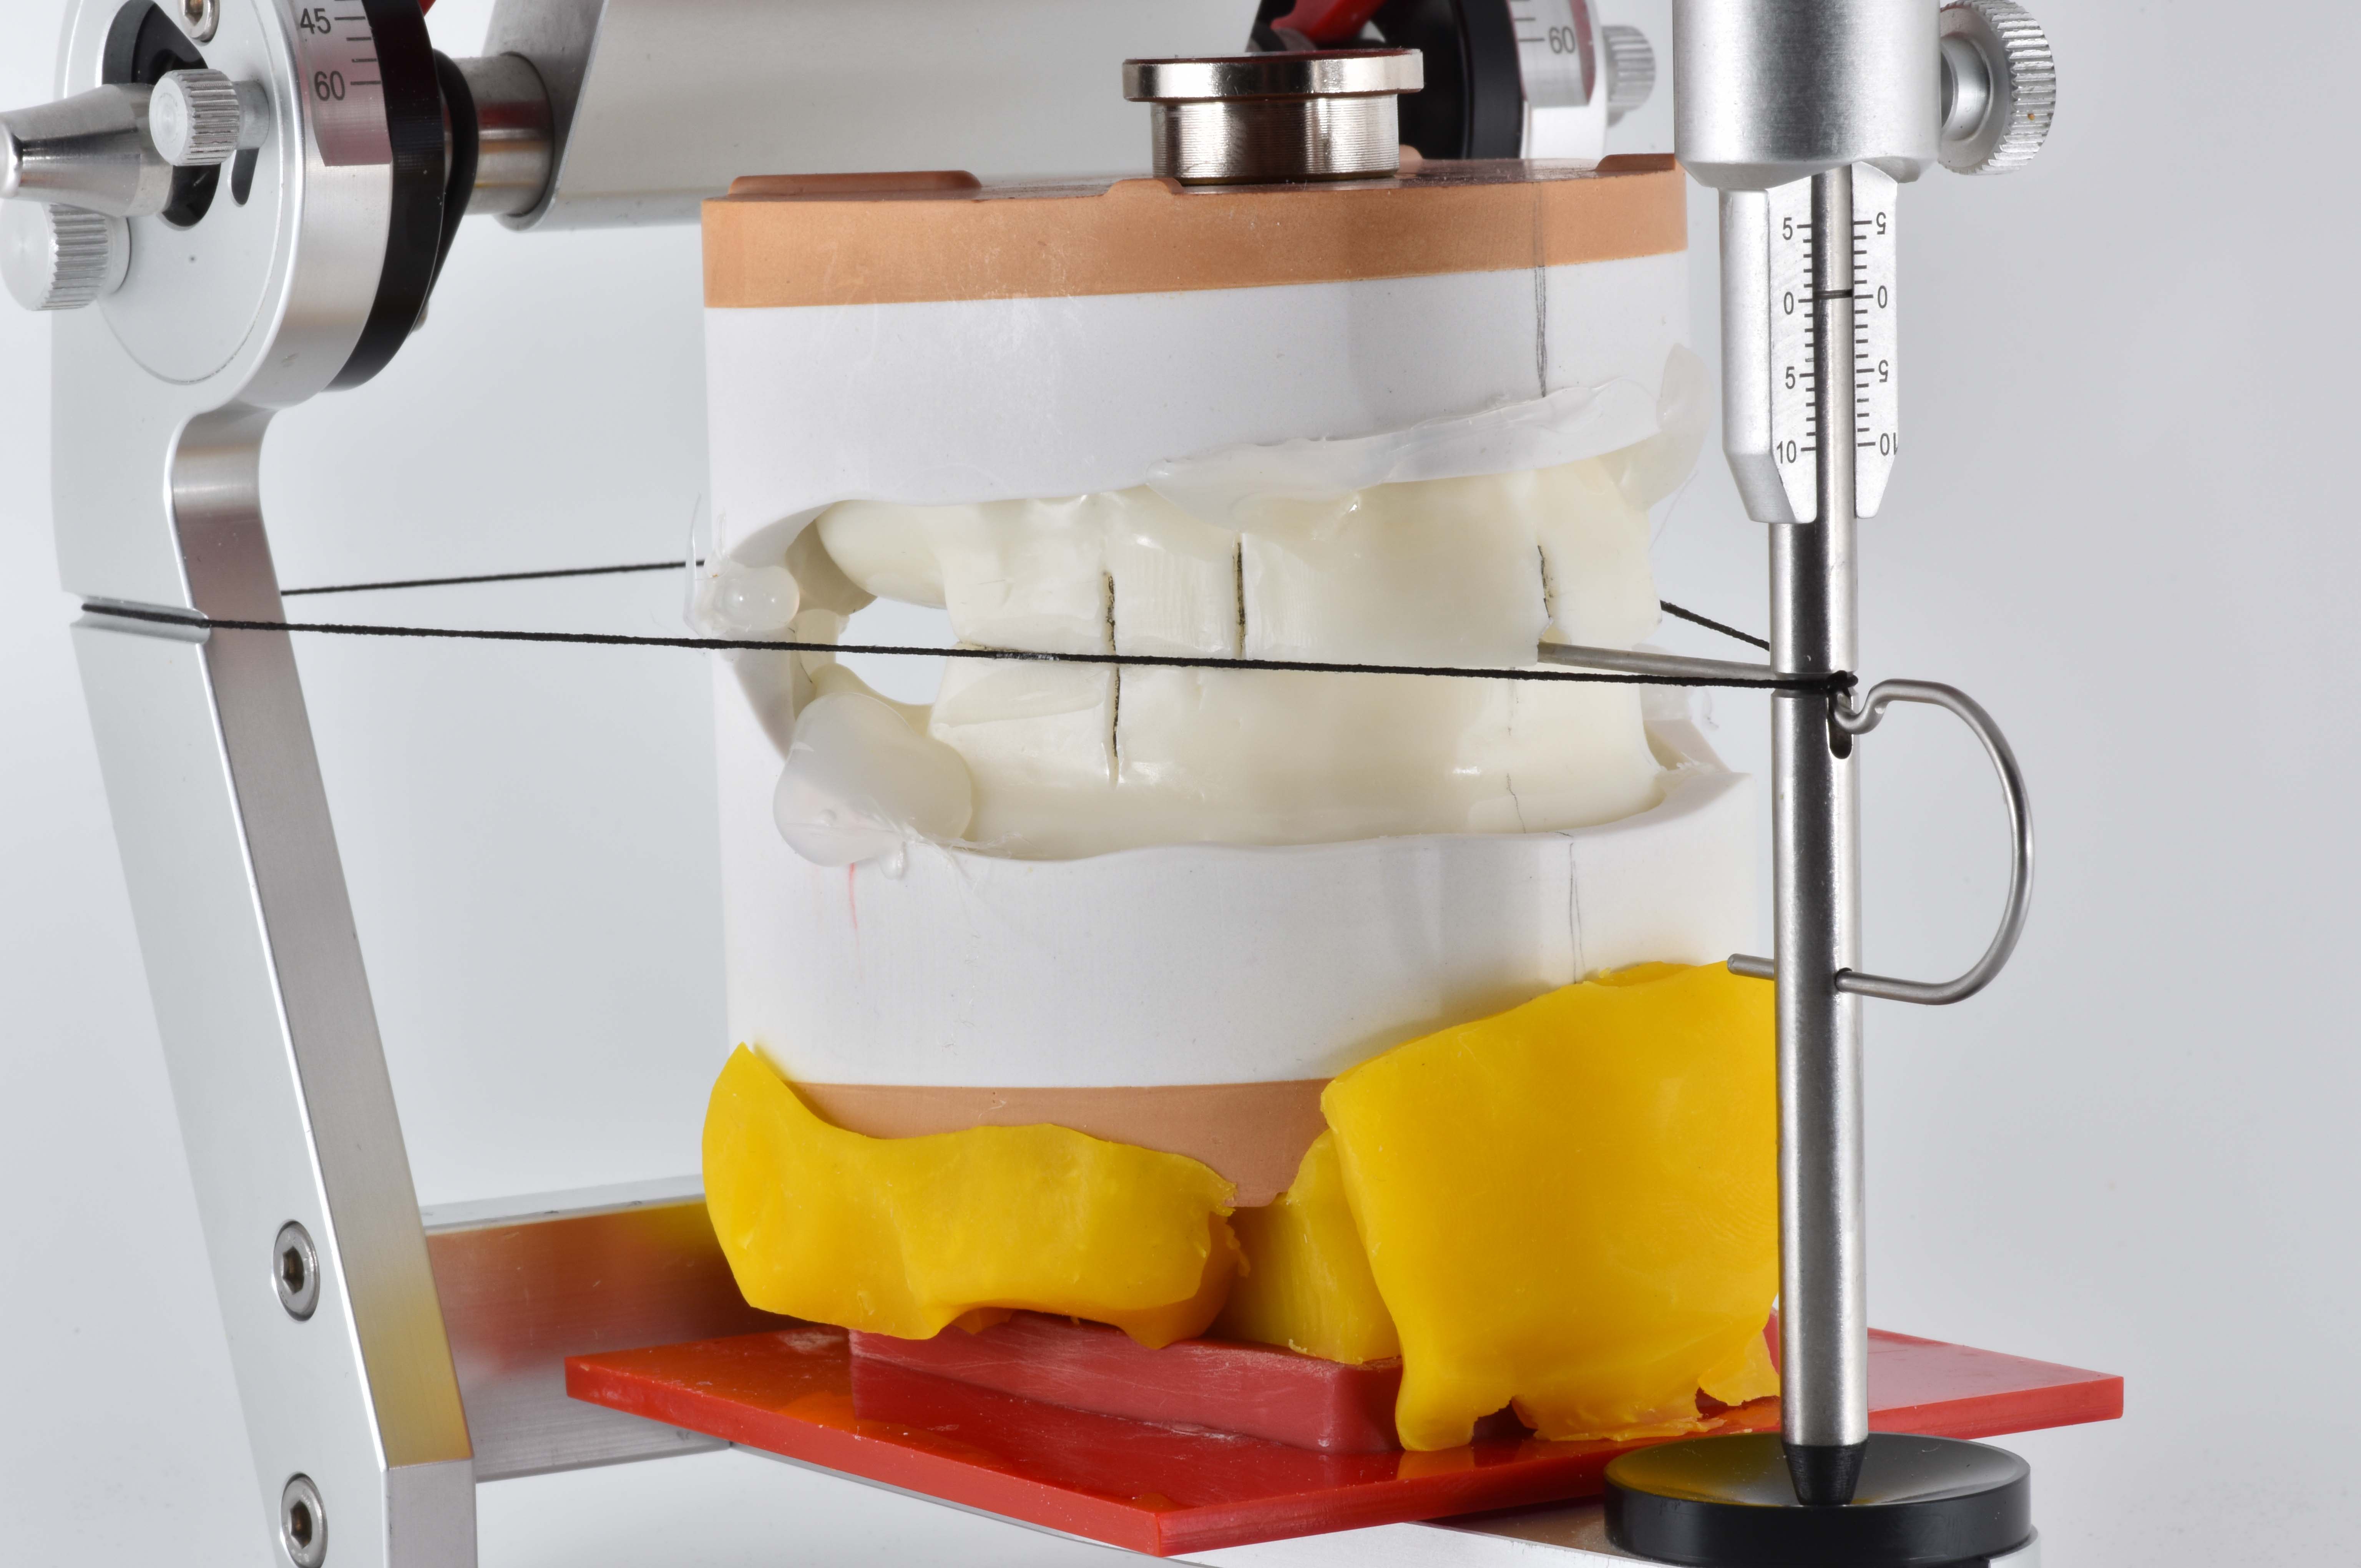
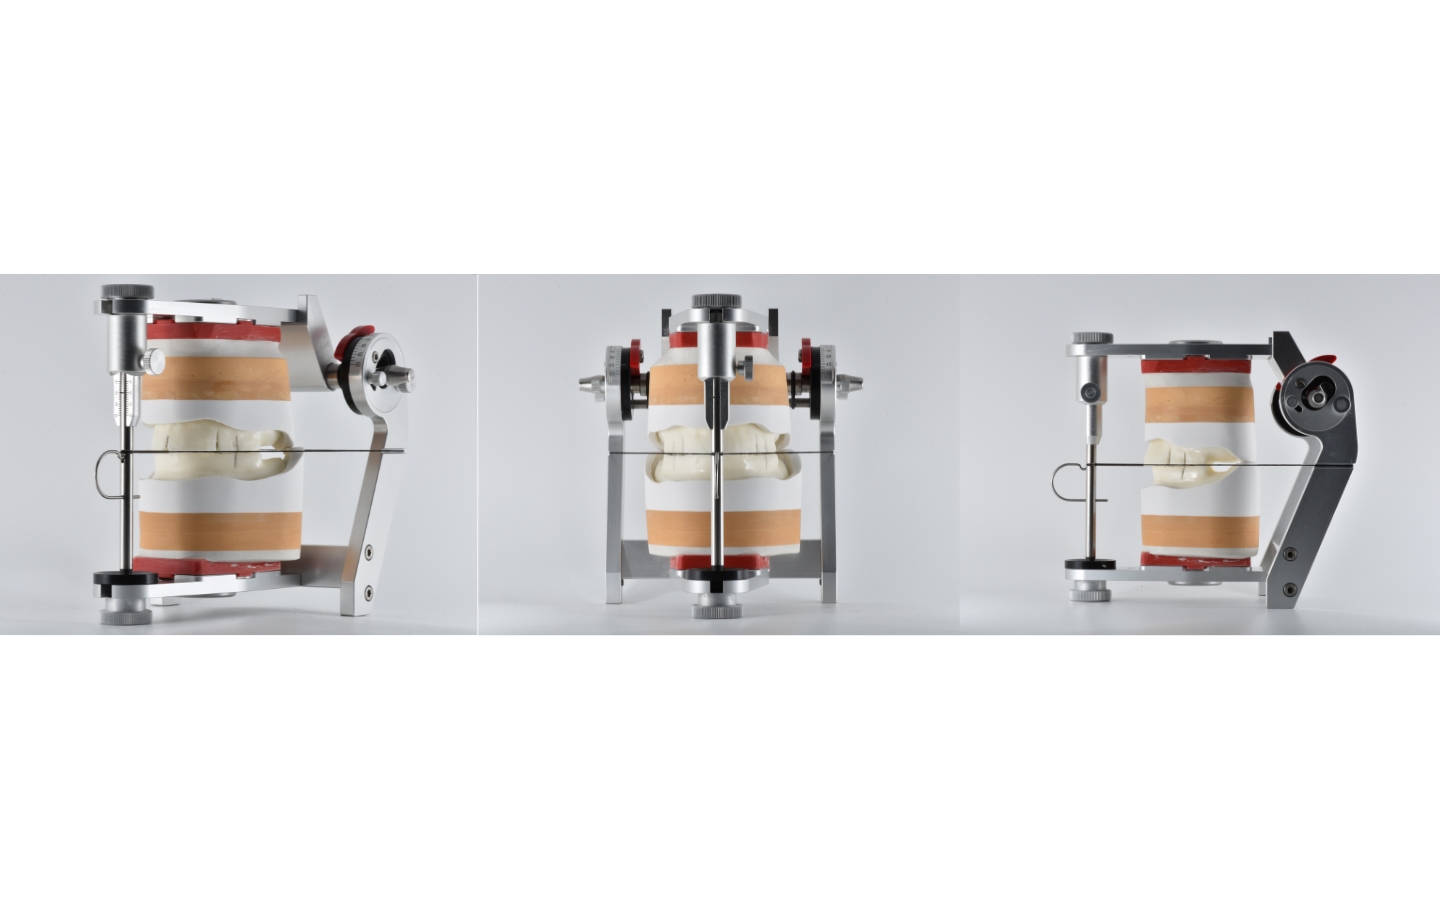
The provided models and the bite keys were first duplicated to be able to start with model analysis and planning the details. Then the models were articulated at mean value. For this purpose, the support pin of the articulator (Candulor articulator CA 3.0) was set to zero. The condylar path inclination was also set according to the specifications (45 degrees on the right and 47 degrees on the left side; Fig. 6). The incisal pin was then positioned centrally at the bite height of the mandibular bite key. This later served as an important landmark for the setup of the central incisors, which are to be set incisally at the bite height and mesially next to the incisal pin. A silicone anterior tooth key is suitable for transferring the overbite. Visualization of the Camper's plane, which coincided with the occlusal plane, was performed to transfer the jaw relation registered in the practice as well as the vertical dimension to the model with the known rubber band (Fig. 7). With this aid, the bite key could be aligned correctly. To position the models in the Bonwill triangle, it is advisable to draw in the median lines and alveolar ridge centers. It is recommended to use dimensionally stable plastic putty for model assembly, which ensures both safety and facilitates the demanding task of accurate articulation (Fig. 8).
Model analysis
A careful analysis of the anatomical conditions using the provided models is one of the most important prerequisites for properly functioning full dentures. This provides valuable information about the positions of the natural teeth and thus enables the reliable determination of statically favorable areas for setting up the denture teeth. This ensures that the denture can meet high functional as well as esthetic demands; dysfunctional denture movements can, on the other hand, be safely avoided.
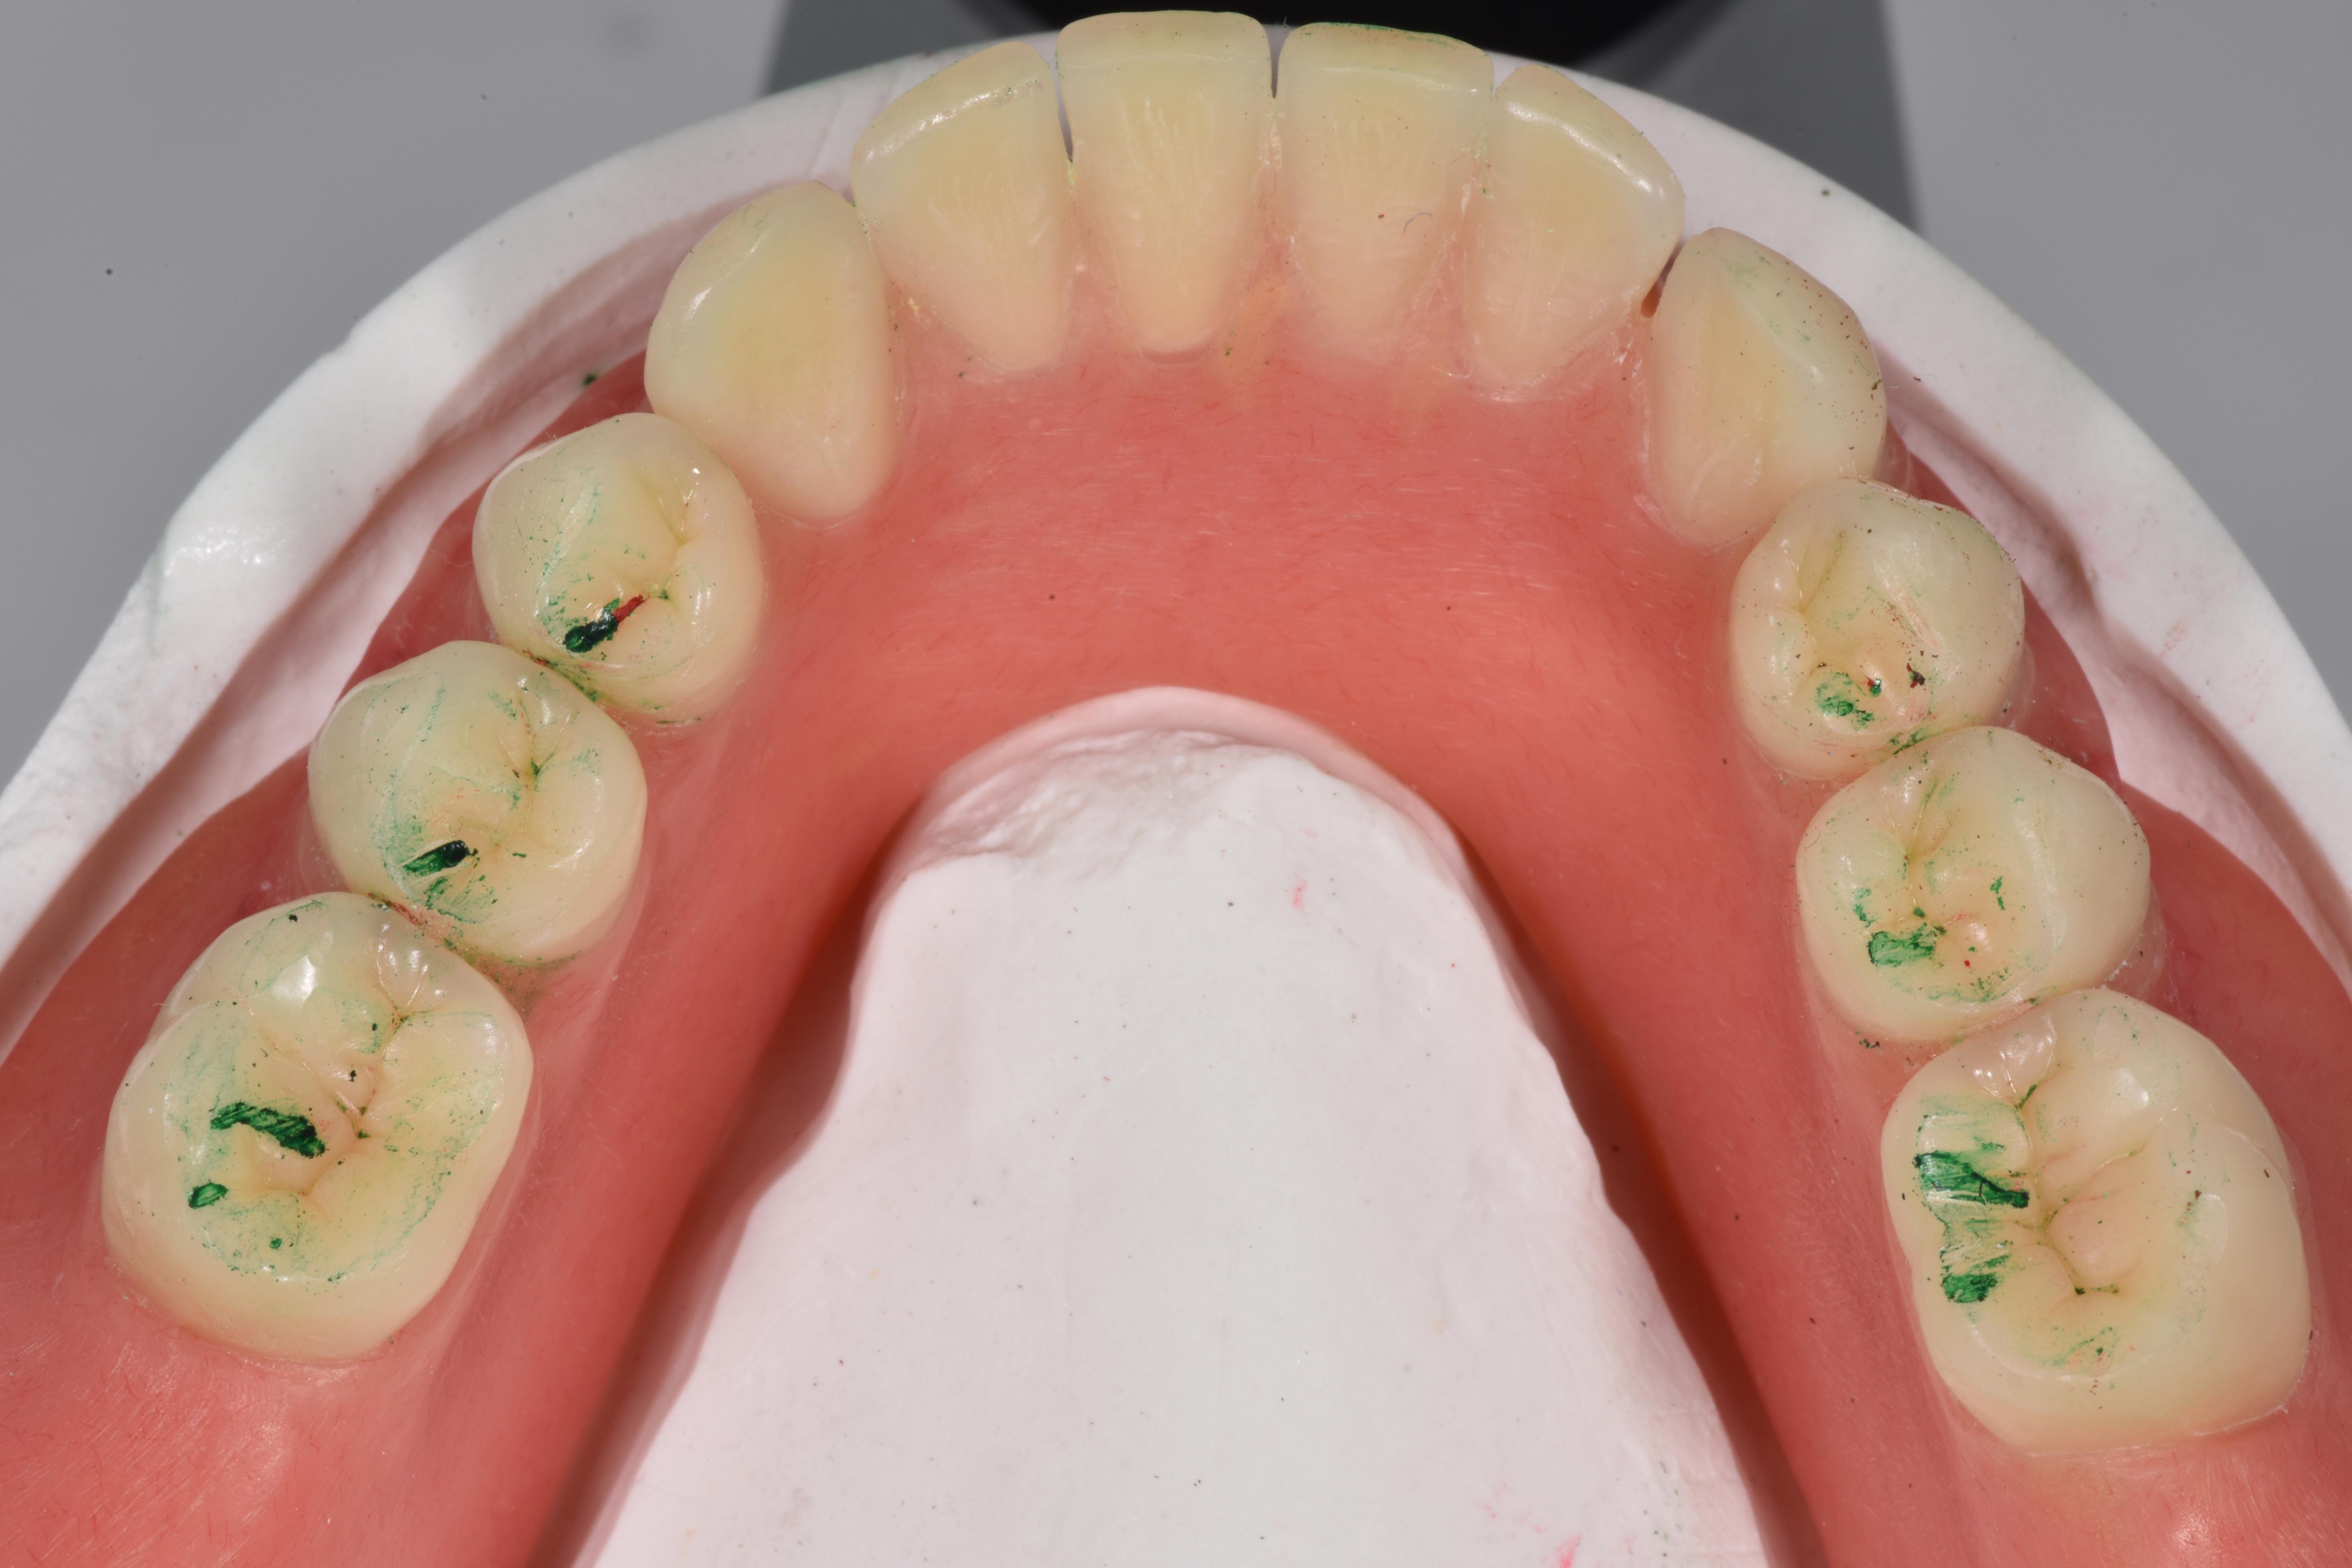
In the present case, model analysis was performed based on the concept of Prof. Dr. Albert Gerber. In the first step, a laser beam was used, which was set up at a 90-degree angle and parallel to the tabletop (Fig. 9). This instrument was used to determine the setup line. With the subsequently used cross-section measuring instrument, it is possible to map and record every cross-section. This makes it easy to check the profile of the dental arch. The alveolar ridge was then drawn in with the aid of the tried-and-tested profile compass. However, the question arises as to whether the lateral alveolar ridge profile or the cross-section of the alveolar ridge center profile (which can be determined with the cross-section instrument) should be taken into consideration for model analysis. Ideally, the contact points should be located on the midline of the alveolar ridge to create a uniform image. Depending on the case, orientation to the lateral alveolar ridge (profile compasses) can favor an irregular result and thus make the ideal setup more difficult. The alveolar ridge centerline, on the other hand, provides an unbiased orientation guide.
As shown in Figures 10 to 12, the important lines and points were plotted step by step on both the occlusal surface as well as the outer surface of the model. The more details are recorded on the models, the easier it will be in the subsequent steps to identify the ideal position for each tooth and to act accordingly during setup. This contributes to the predictability of the entire process.
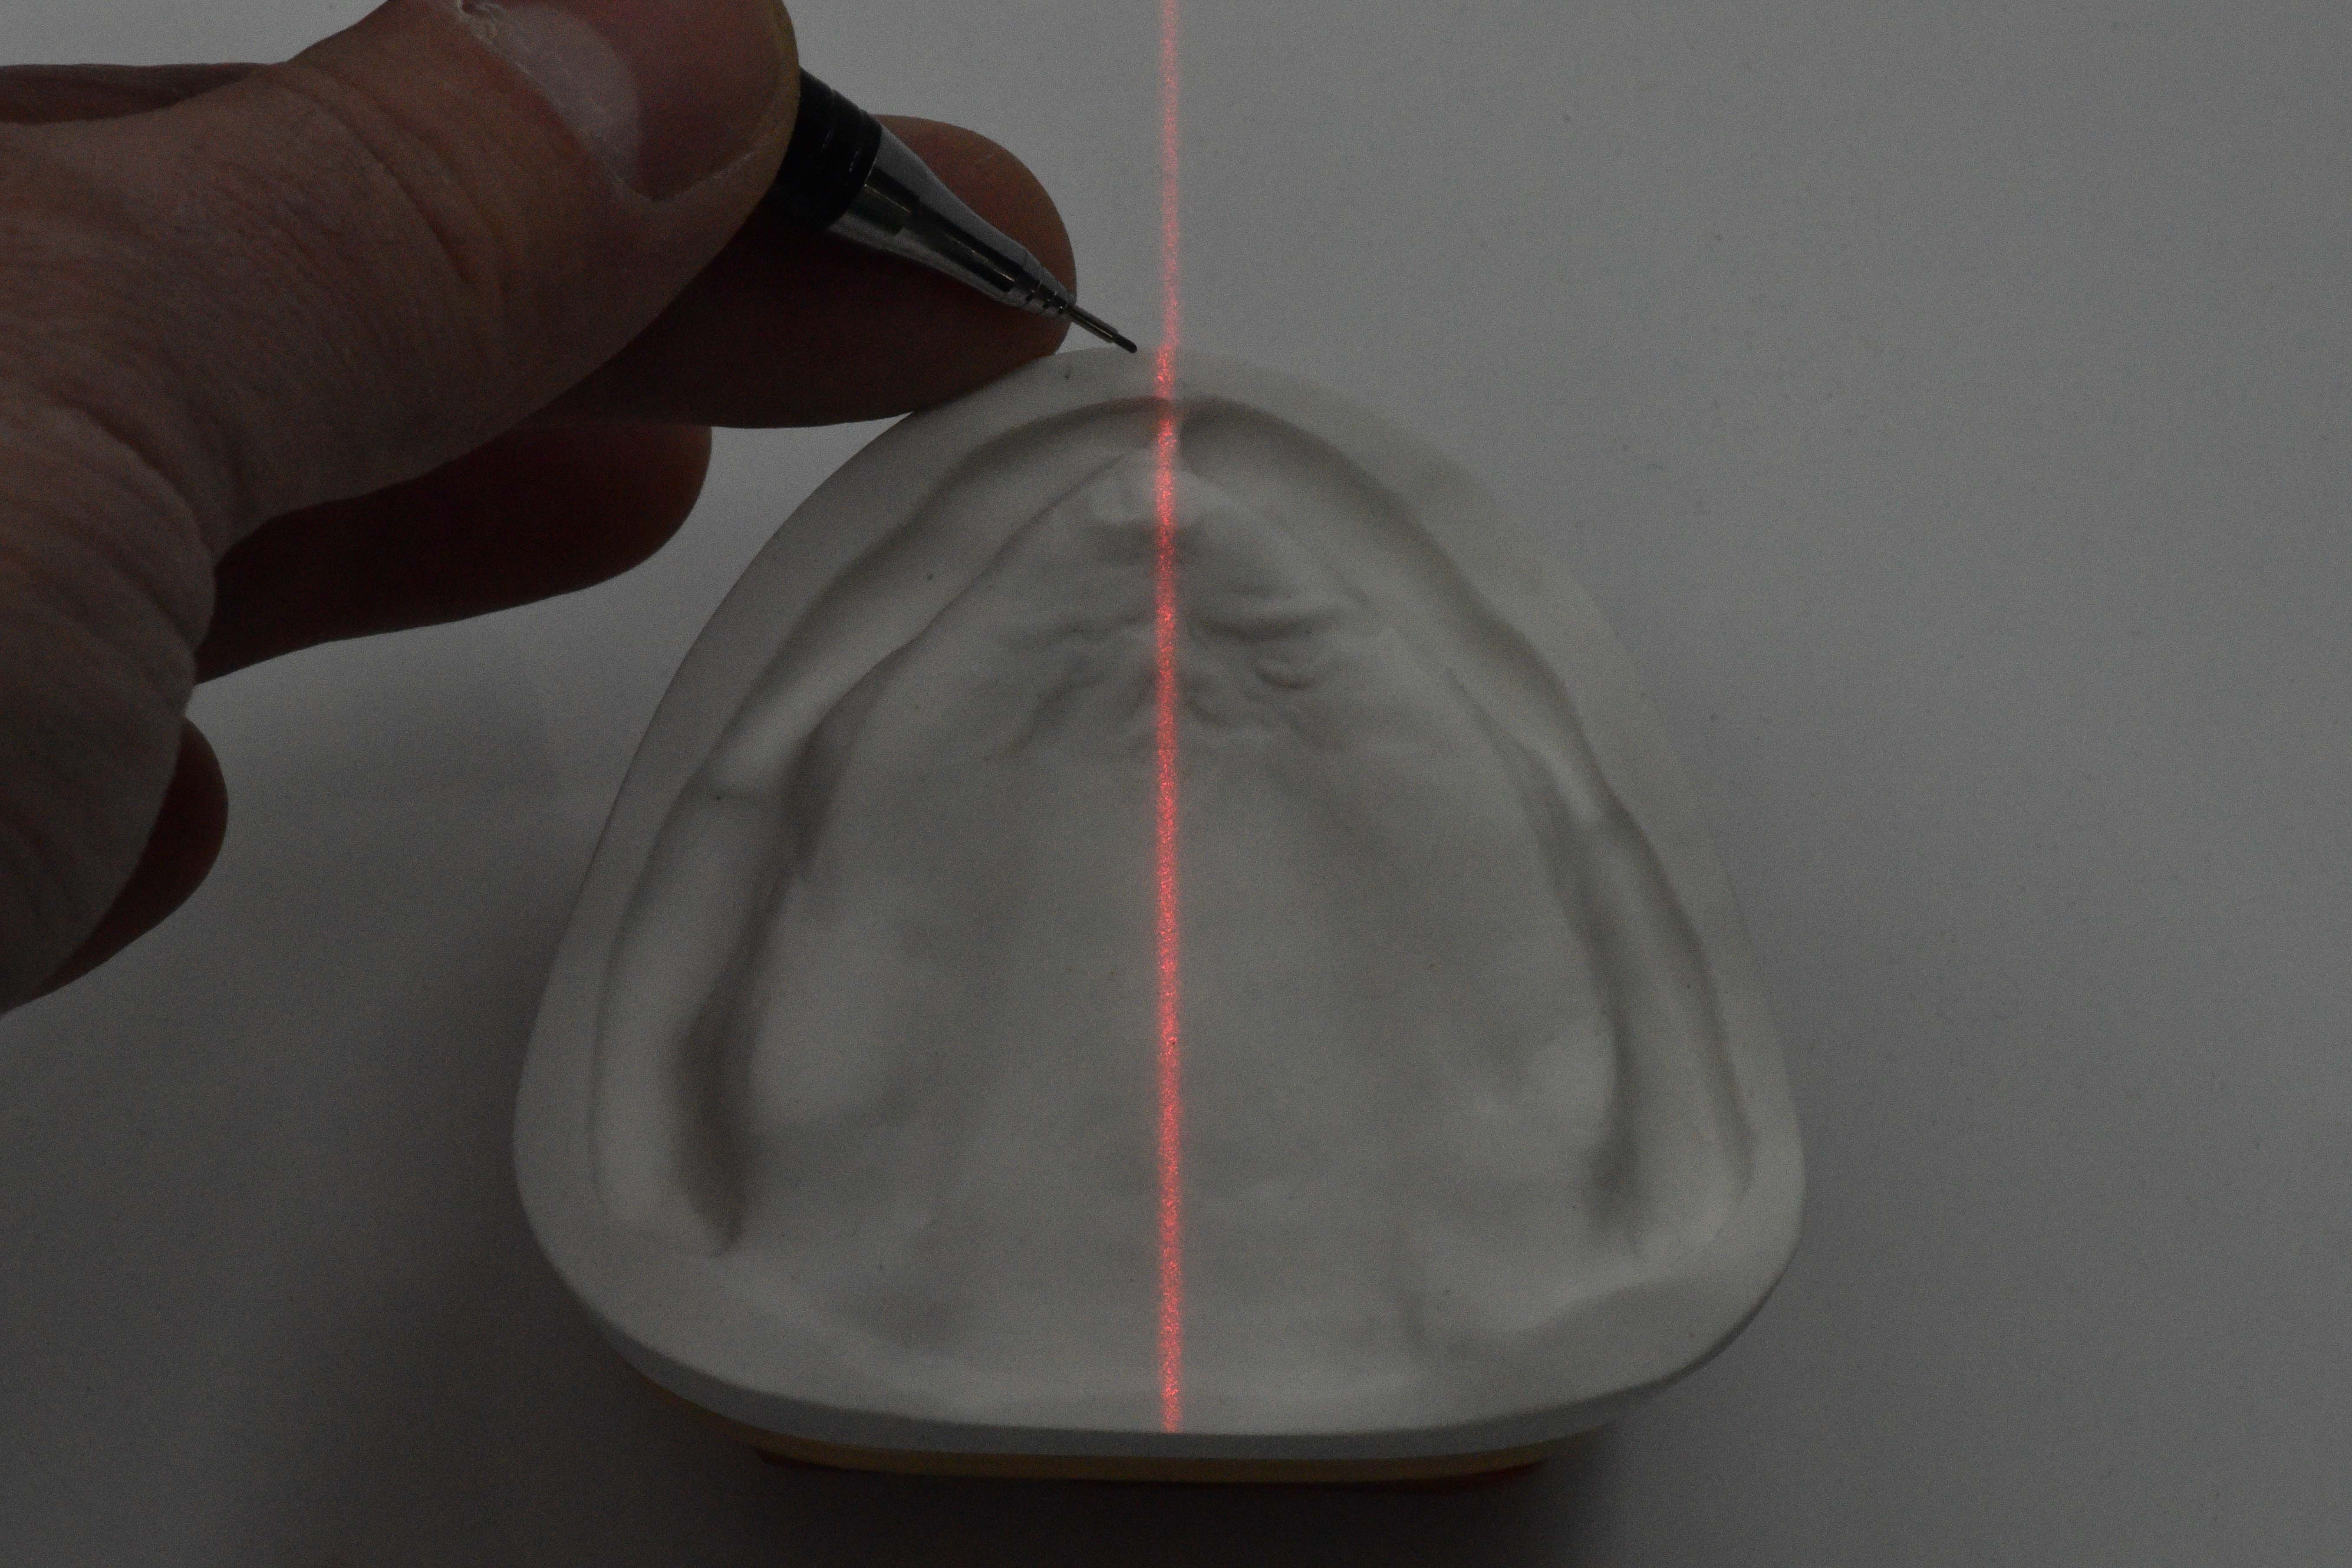
Figure 9: Use of the laser in model analysis.
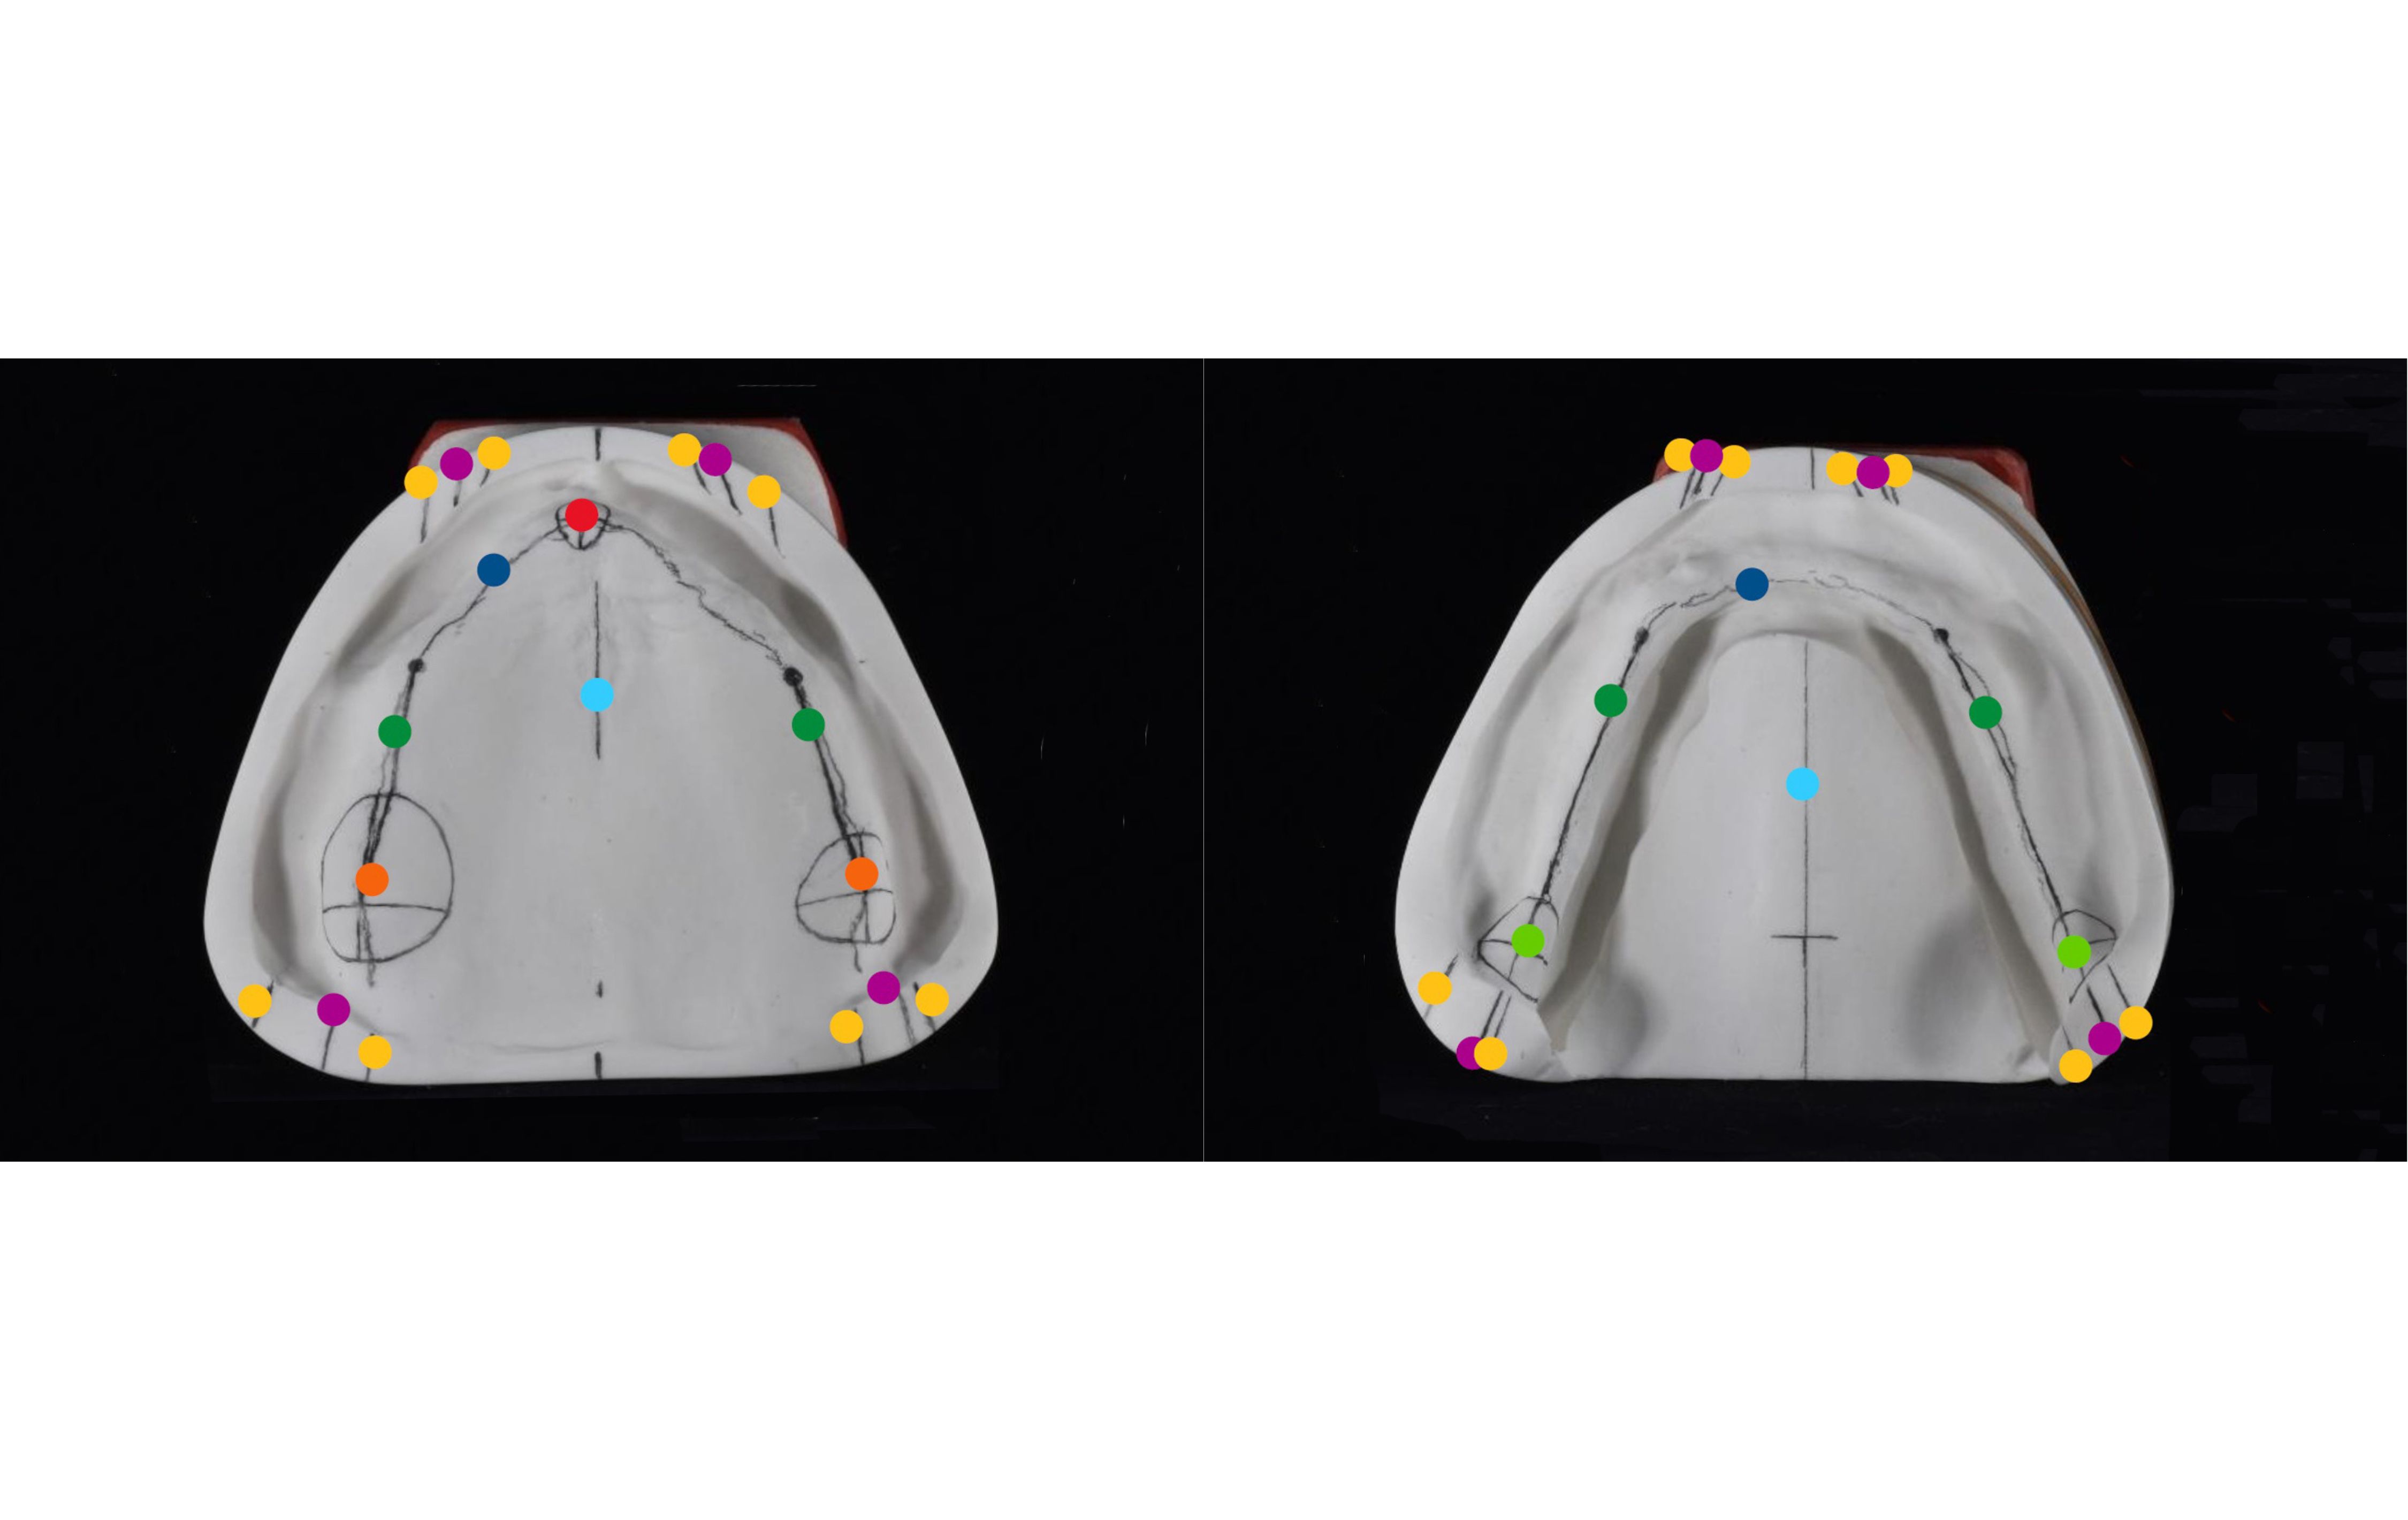
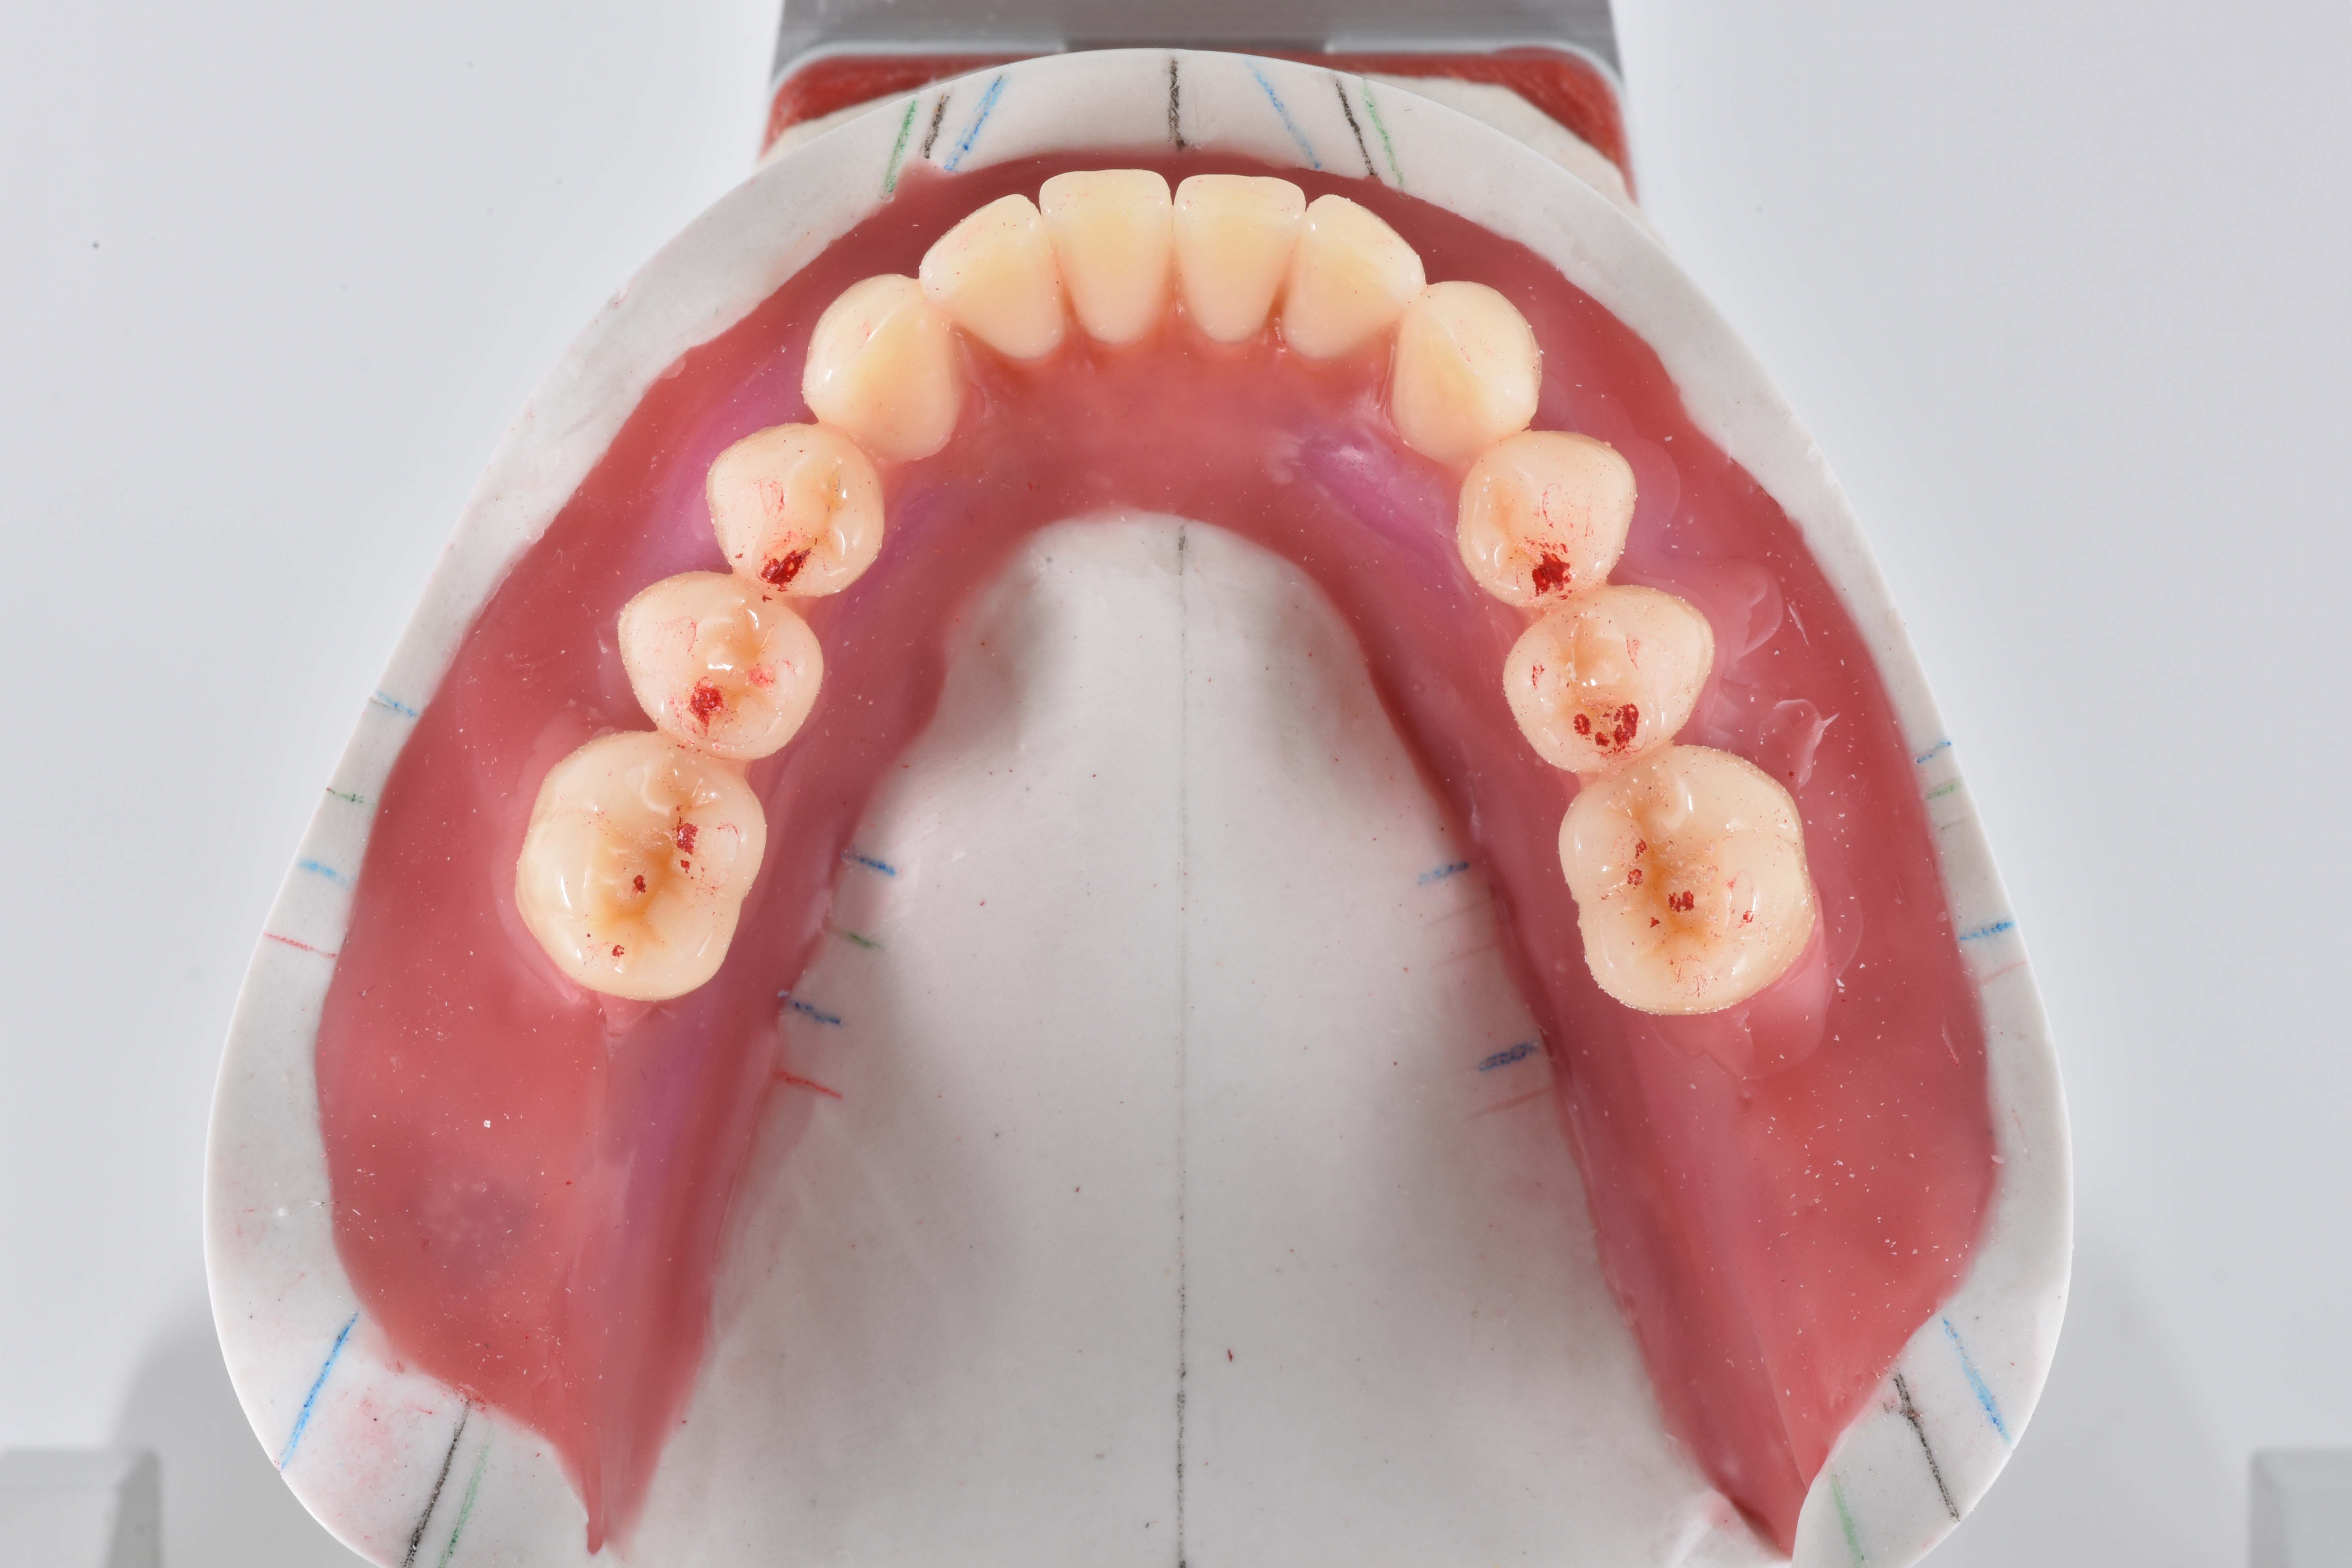
Fig. 10: Lines and points drawn with a pencil. Color-coded: papilla incisiva: red, alveolar ridge profile: dark blue, alveolar ridge center profile: dark green, tuber maxilla: orange, setup line: purple, model center: light blue, inner and outer correction: yellow, tuberculum retromolare: light green.
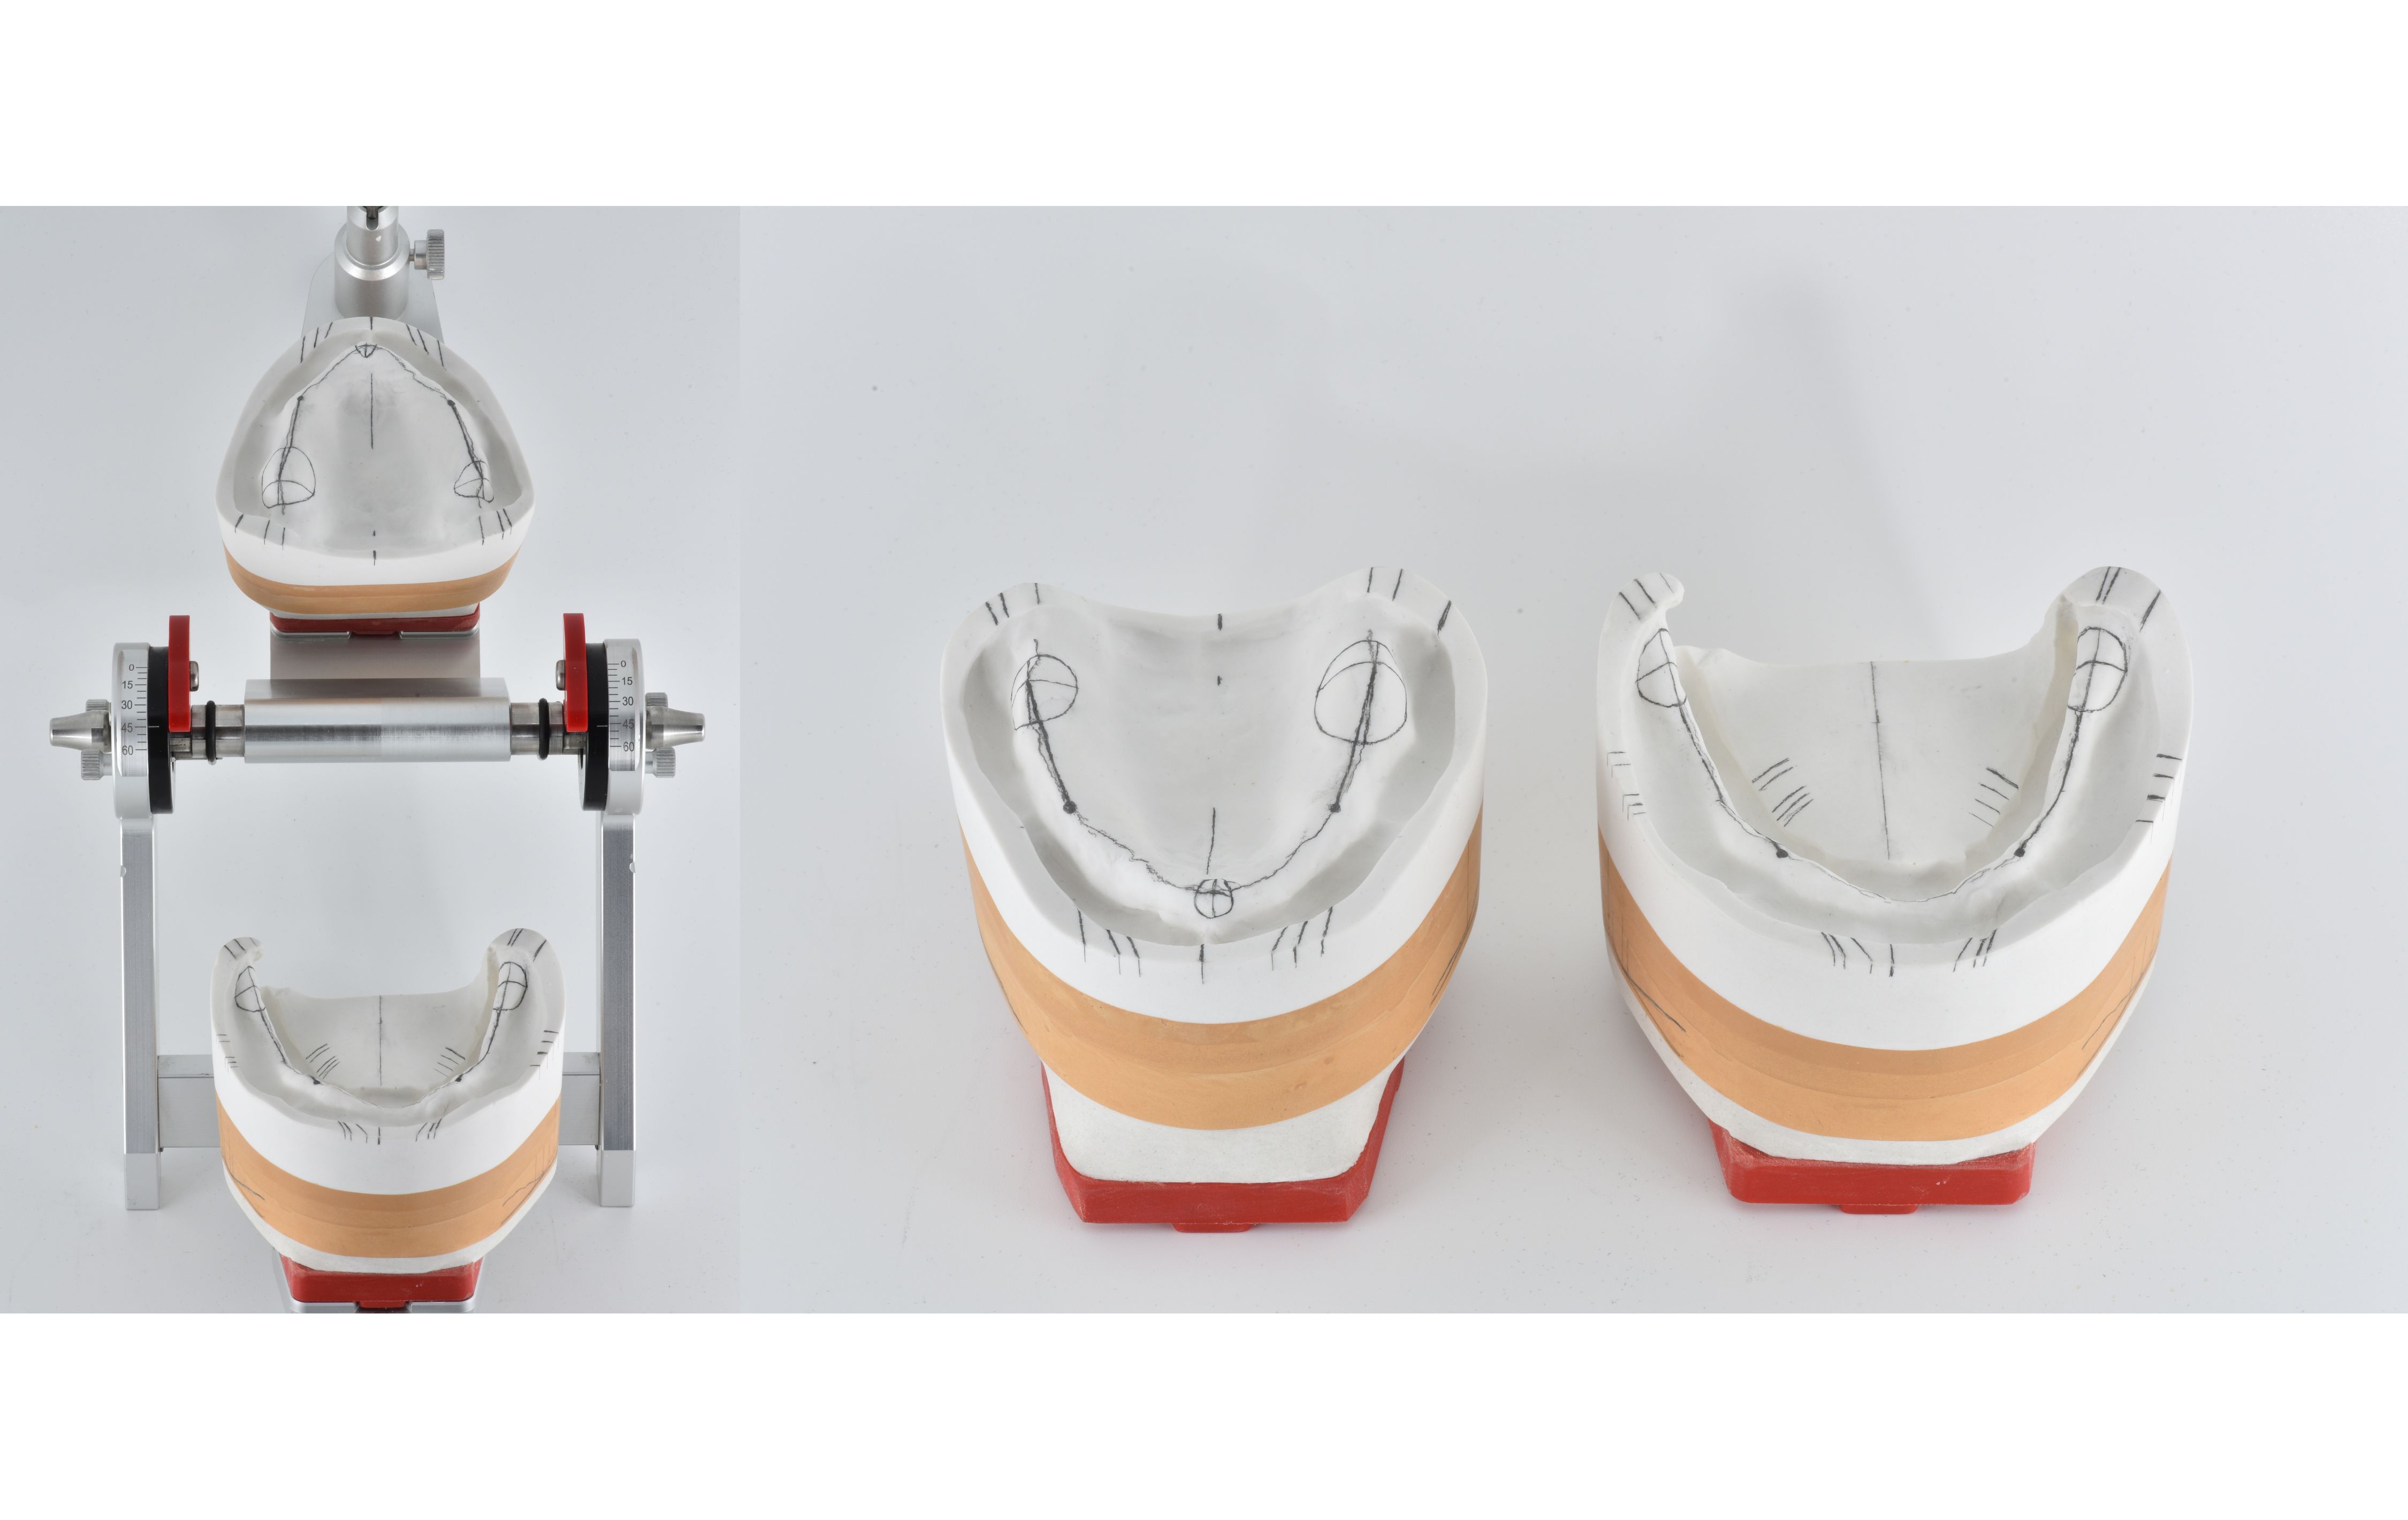
Fig. 11: Models with orientation lines and points drawn in as well as next to the articulator.
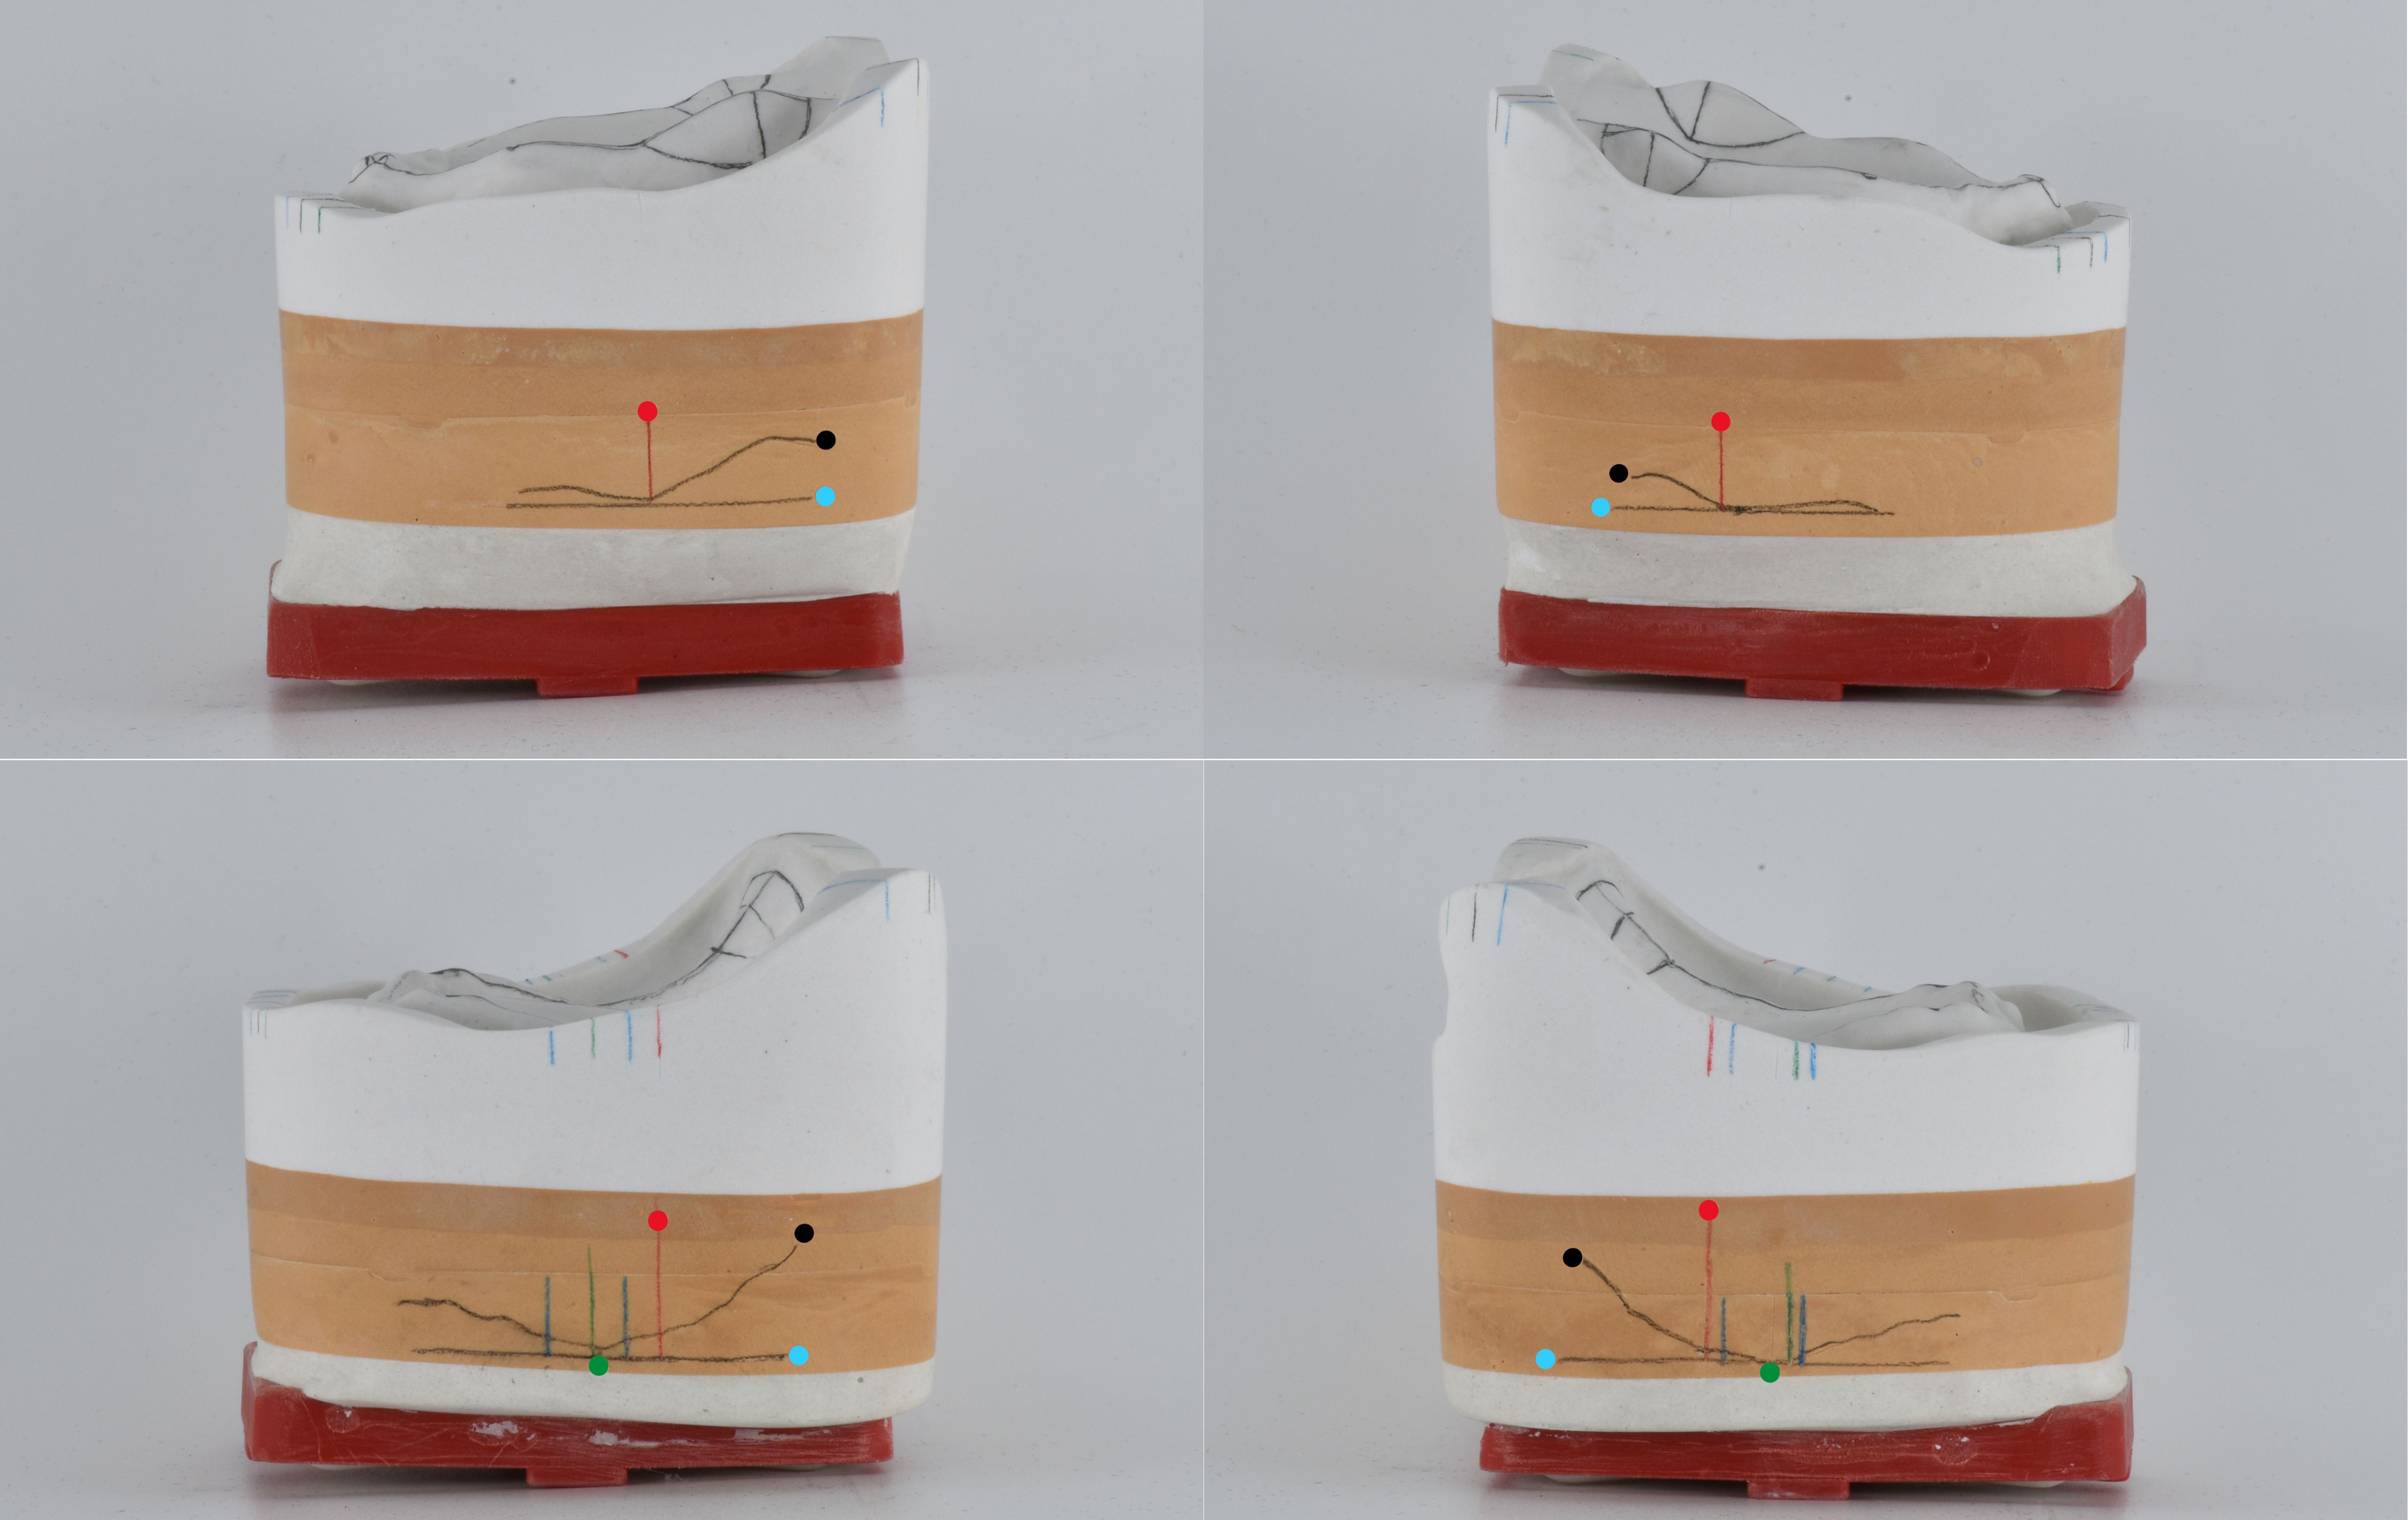
Fig. 12: Lateral view of the models of the maxilla and mandible: lateral alveolar ridge profile on model outer surface: black, parallel tangent to occlusal plane: light blue, position of largest chewing unit on center of alveolar ridge with tolerance range: dark green and stop line (beginning of inclined plane): red.
Setup of the anterior teeth
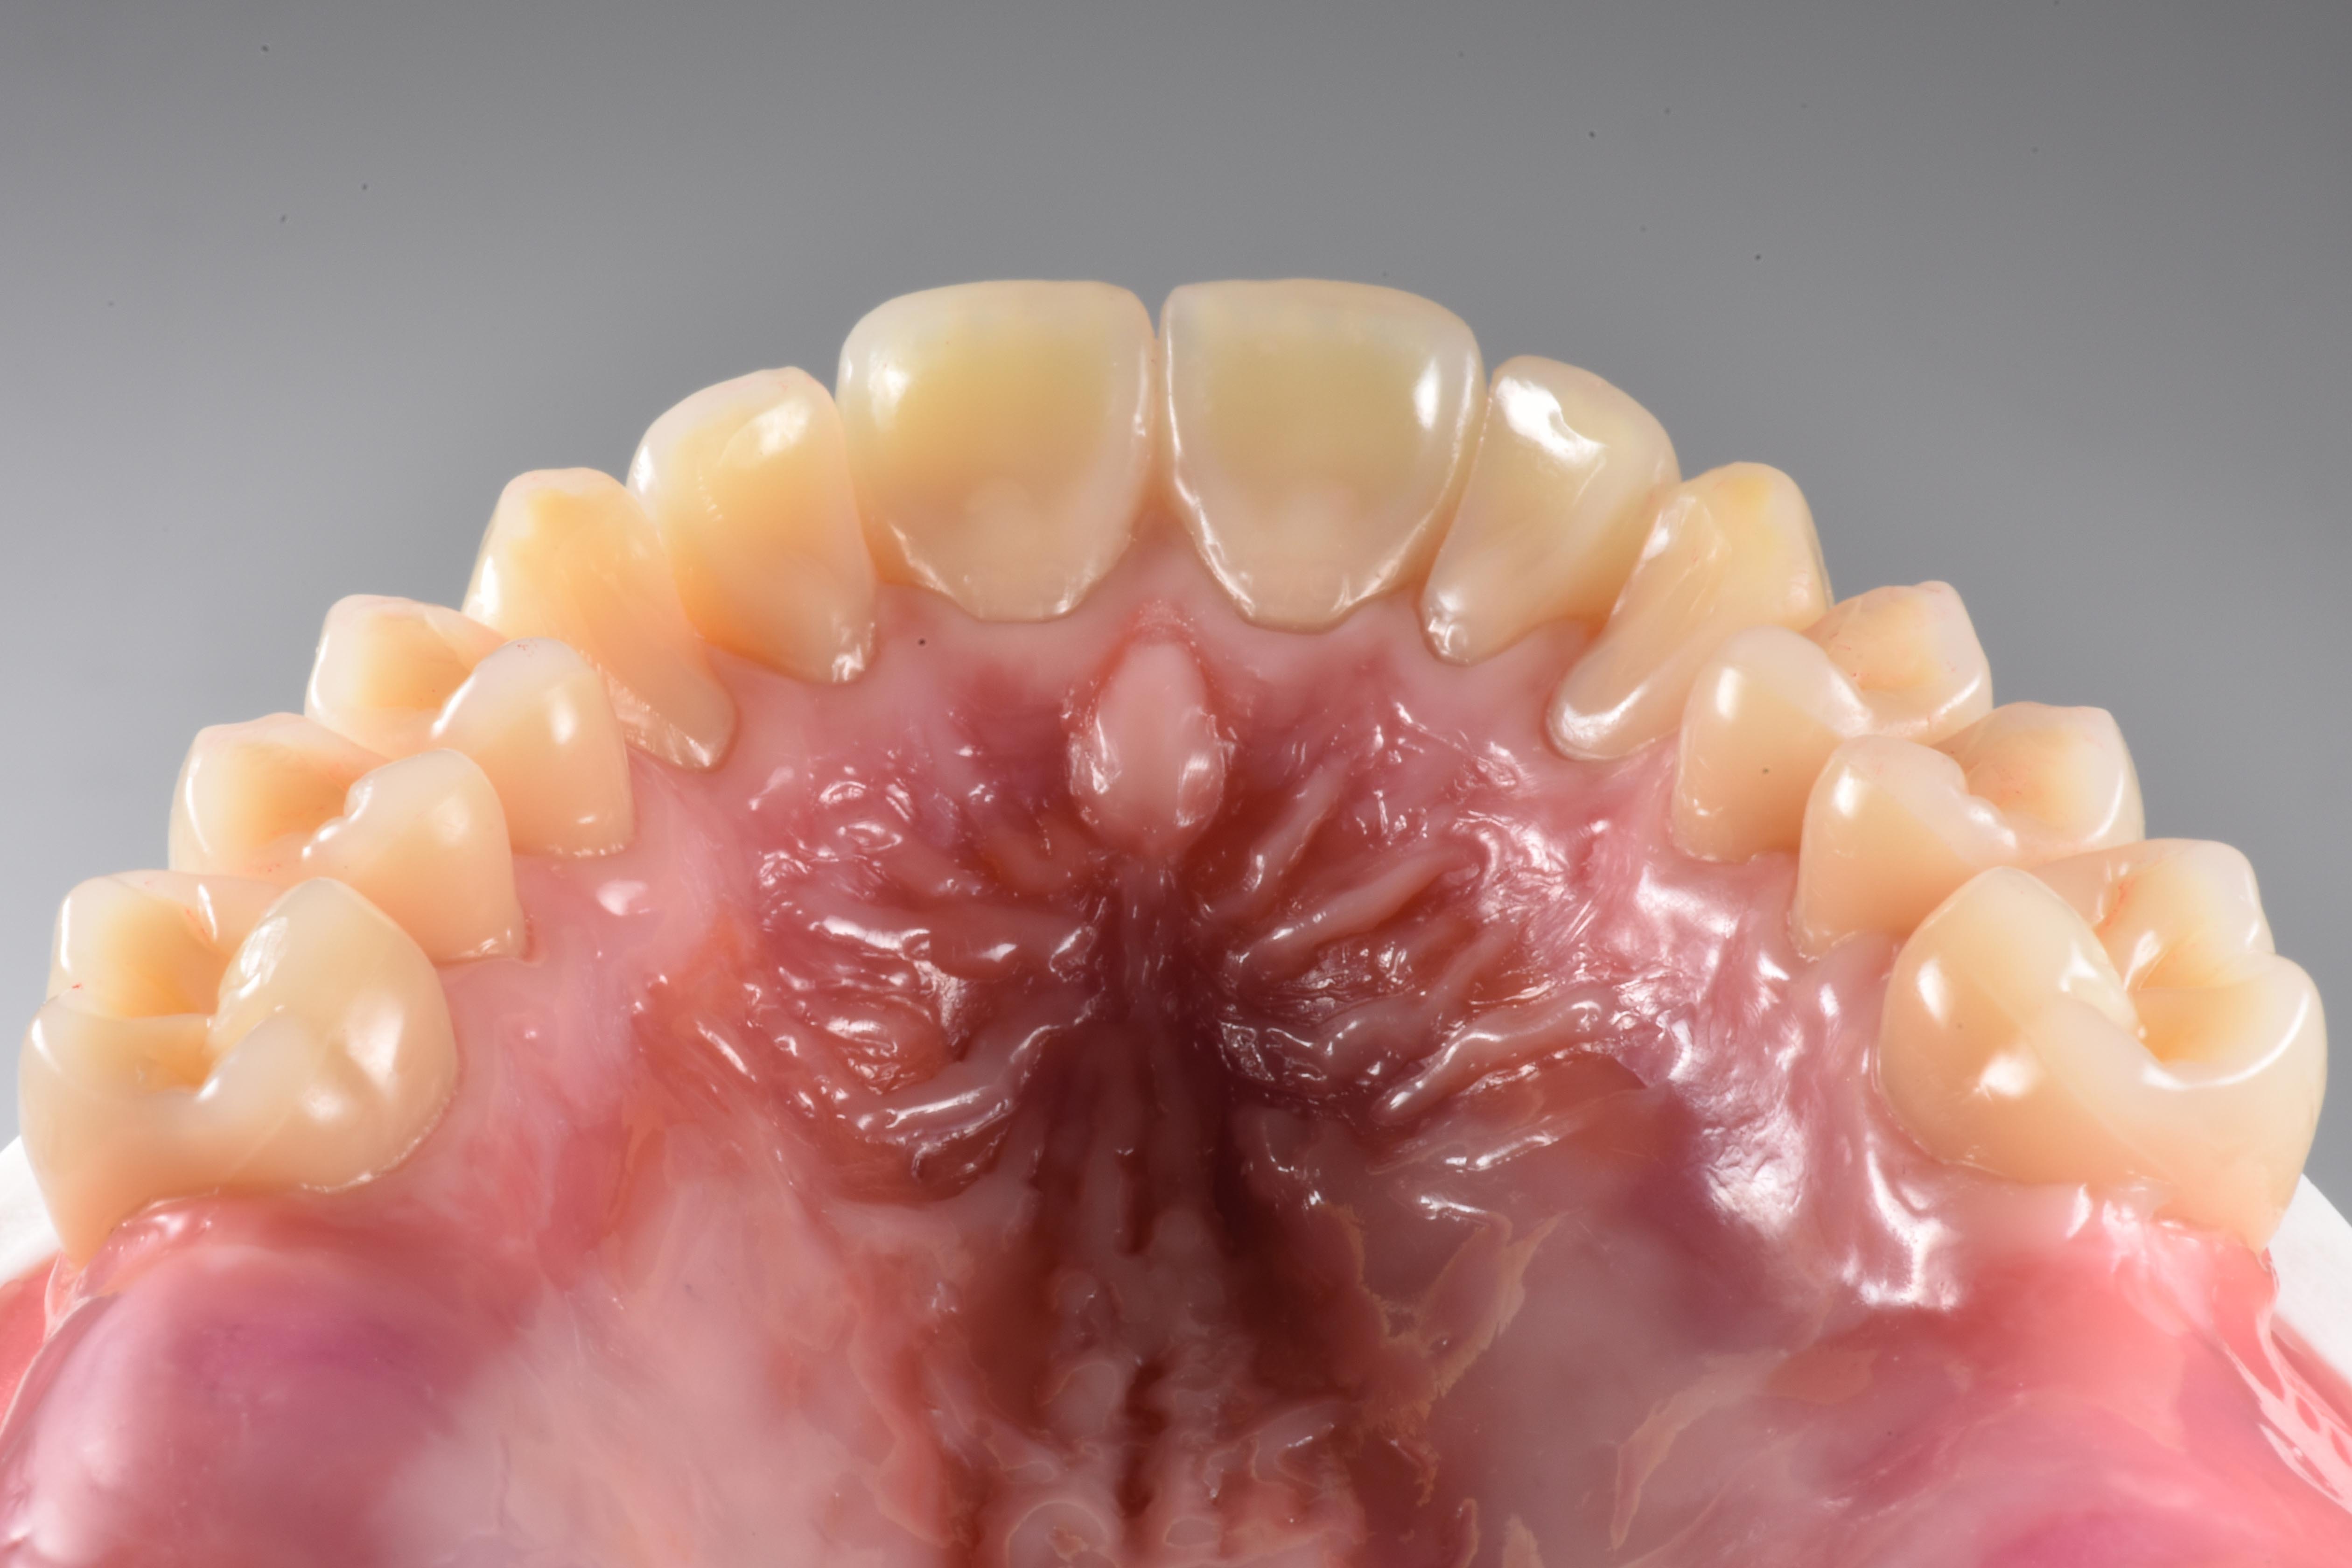
In preparation for setting up the denture teeth, a wax base for the maxilla and mandible was first created from the copy of the bite key. The models with wax bases were then reduced in the articulator and the incisal pin was opened by 2 mm. This measure was to ensure that the anterior teeth in the maxilla would become more visible by 1 mm when the vertical relation was later raised by 1 mm. First, the anterior teeth in the maxilla were set up with the aid of the bite key, which also determined the position of the mid line (Figs. 13 and 14). The selected denture teeth - PhysioSelect TCR in shape 674 and shade A3 - with their slightly translucent incisal edges with discreet mamelons and translucent marginal ridge effects were specifically designed for young-at-heart patients. From orientation according to the bite key, it quickly became apparent that the teeth were a little too wide and needed to be ground narrower: with optimal positioning without grinding, the dental arch was too long. This would lead to undesirable distalization in the posterior region and thus to irregular dentition. To subsequently set up the anterior teeth in the mandible (PhysioSelect TCR, shape 64 and shade A3) at the correct bite height, the incisal pin was set to +1 mm relative to the occlusal plane level. In the first step, the incisal pin served as a guide for positioning teeth 31 and 41* (Fig. 15). This was followed by the lateral incisors and the canines (Figs. 16 and 17). The dental arch as well as the lip contact were repeatedly checked with the bite key.
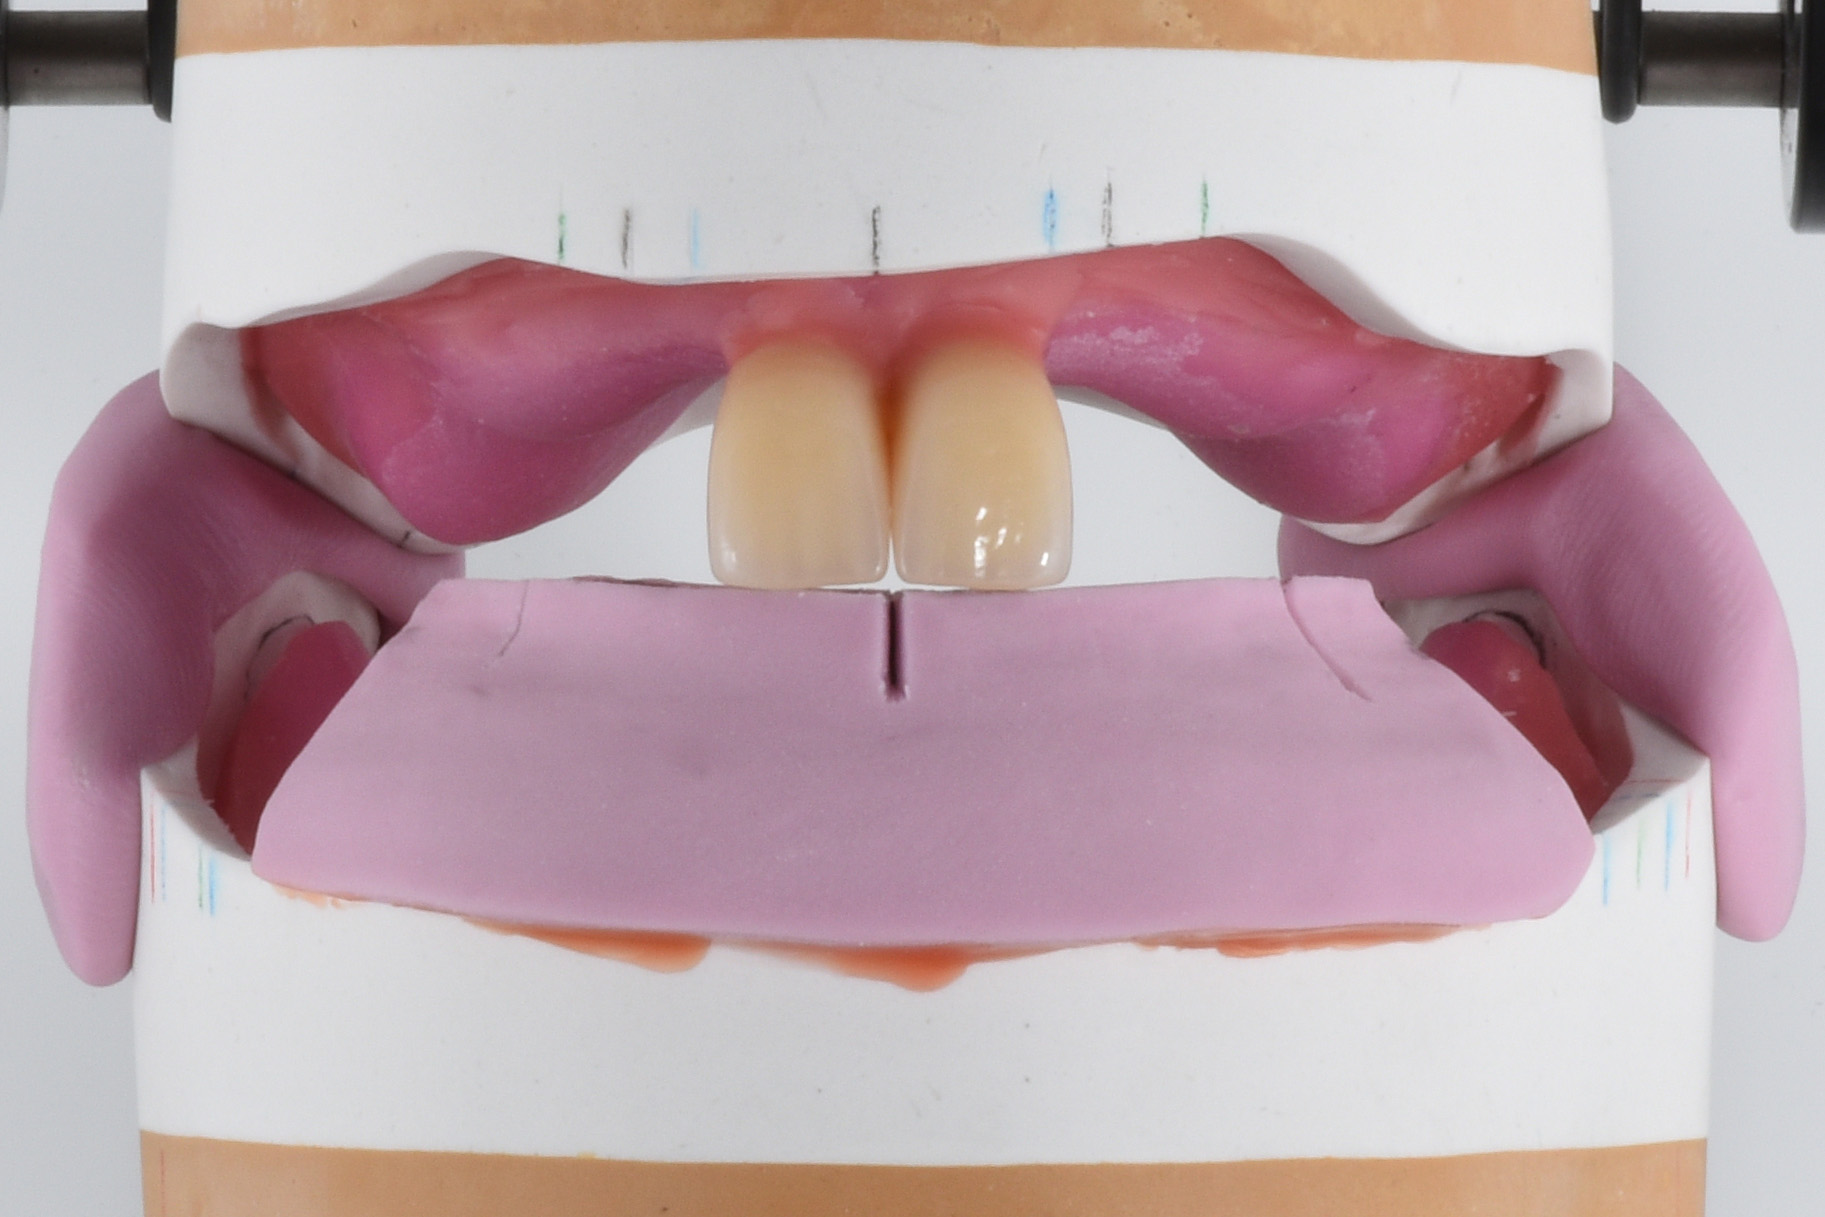
Fig. 13: Setup of the central incisors in the maxilla.
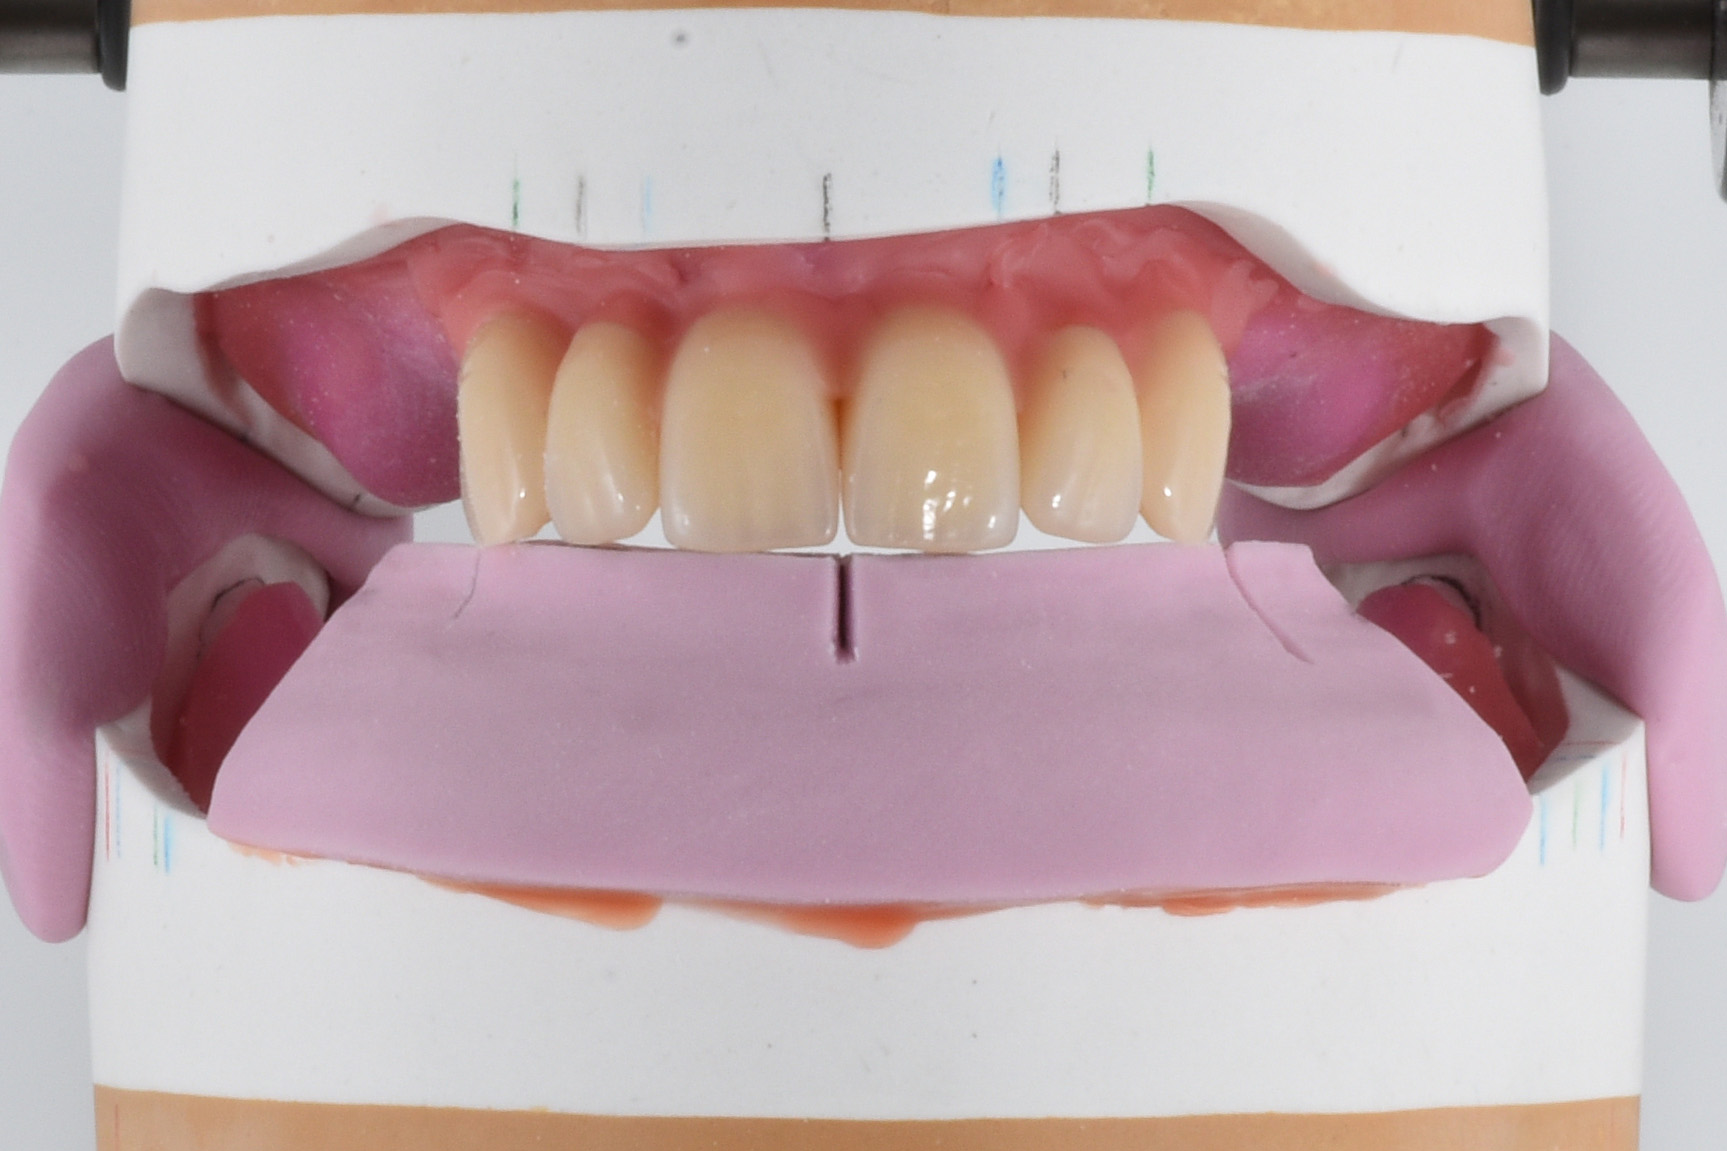
Fig. 14: Setup of all anterior teeth in the maxilla.
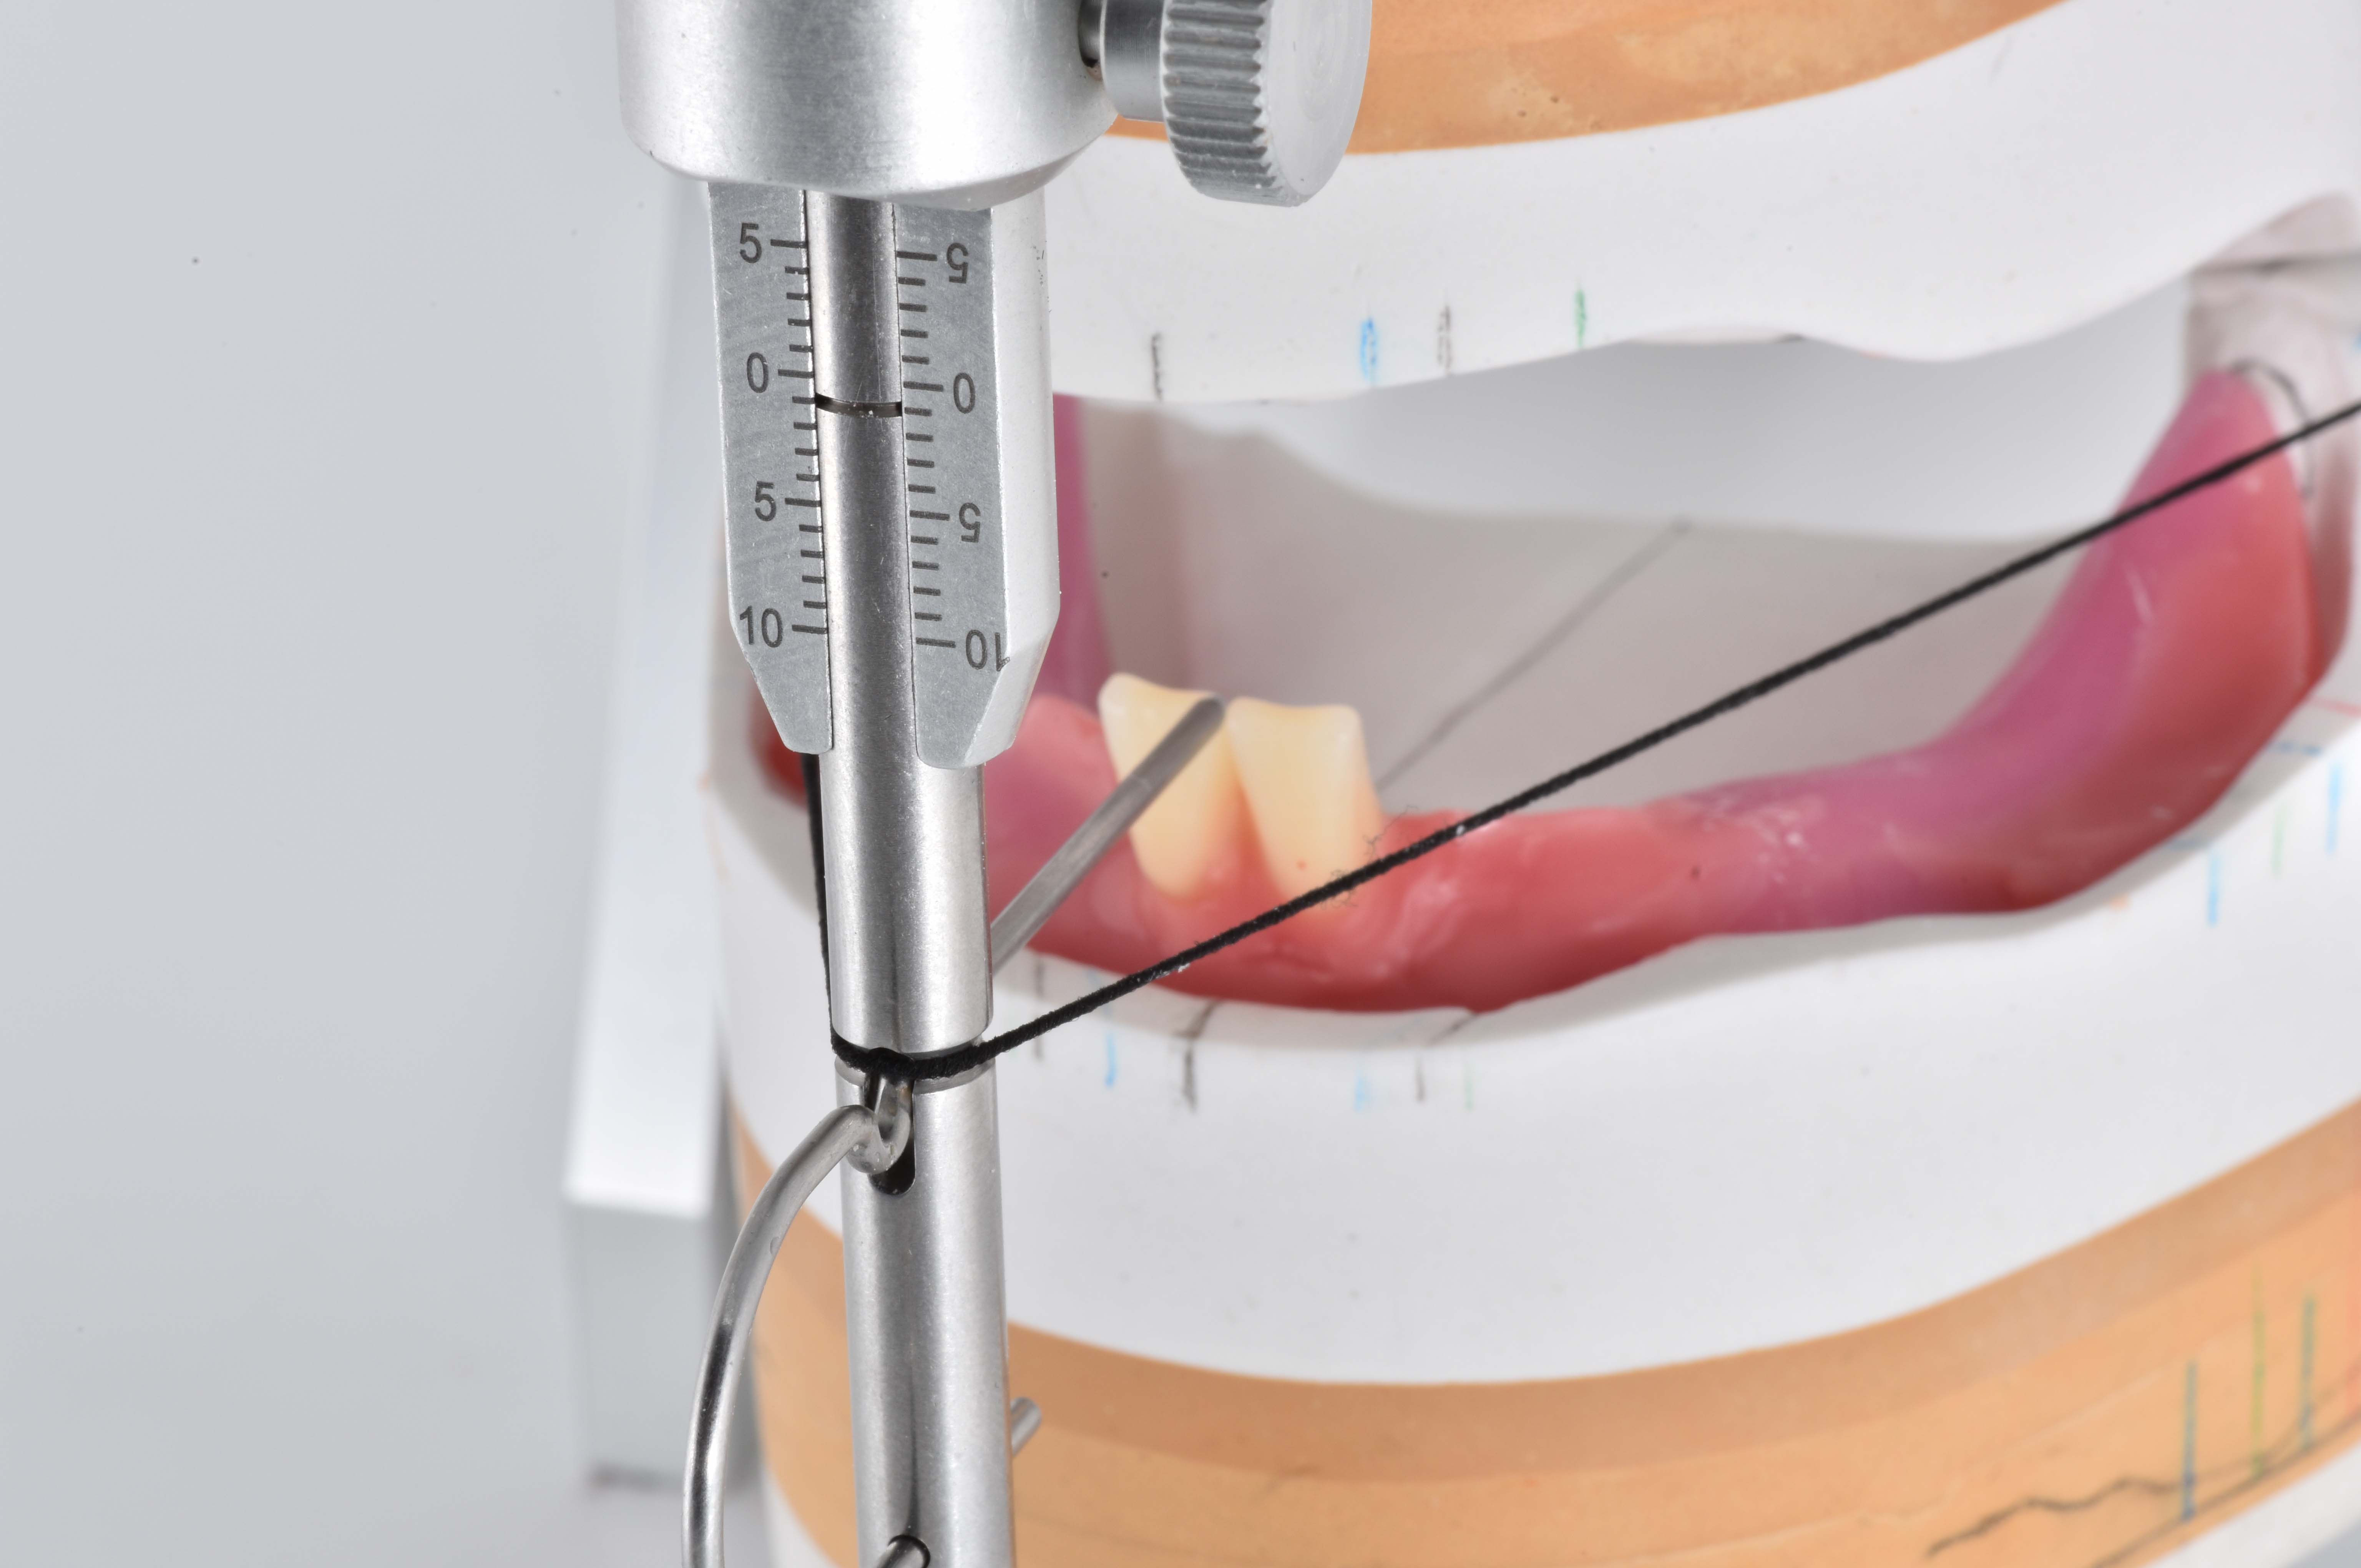
Fig. 15: Setup of teeth 31 and 41* with orientation relative to the incisal pin.
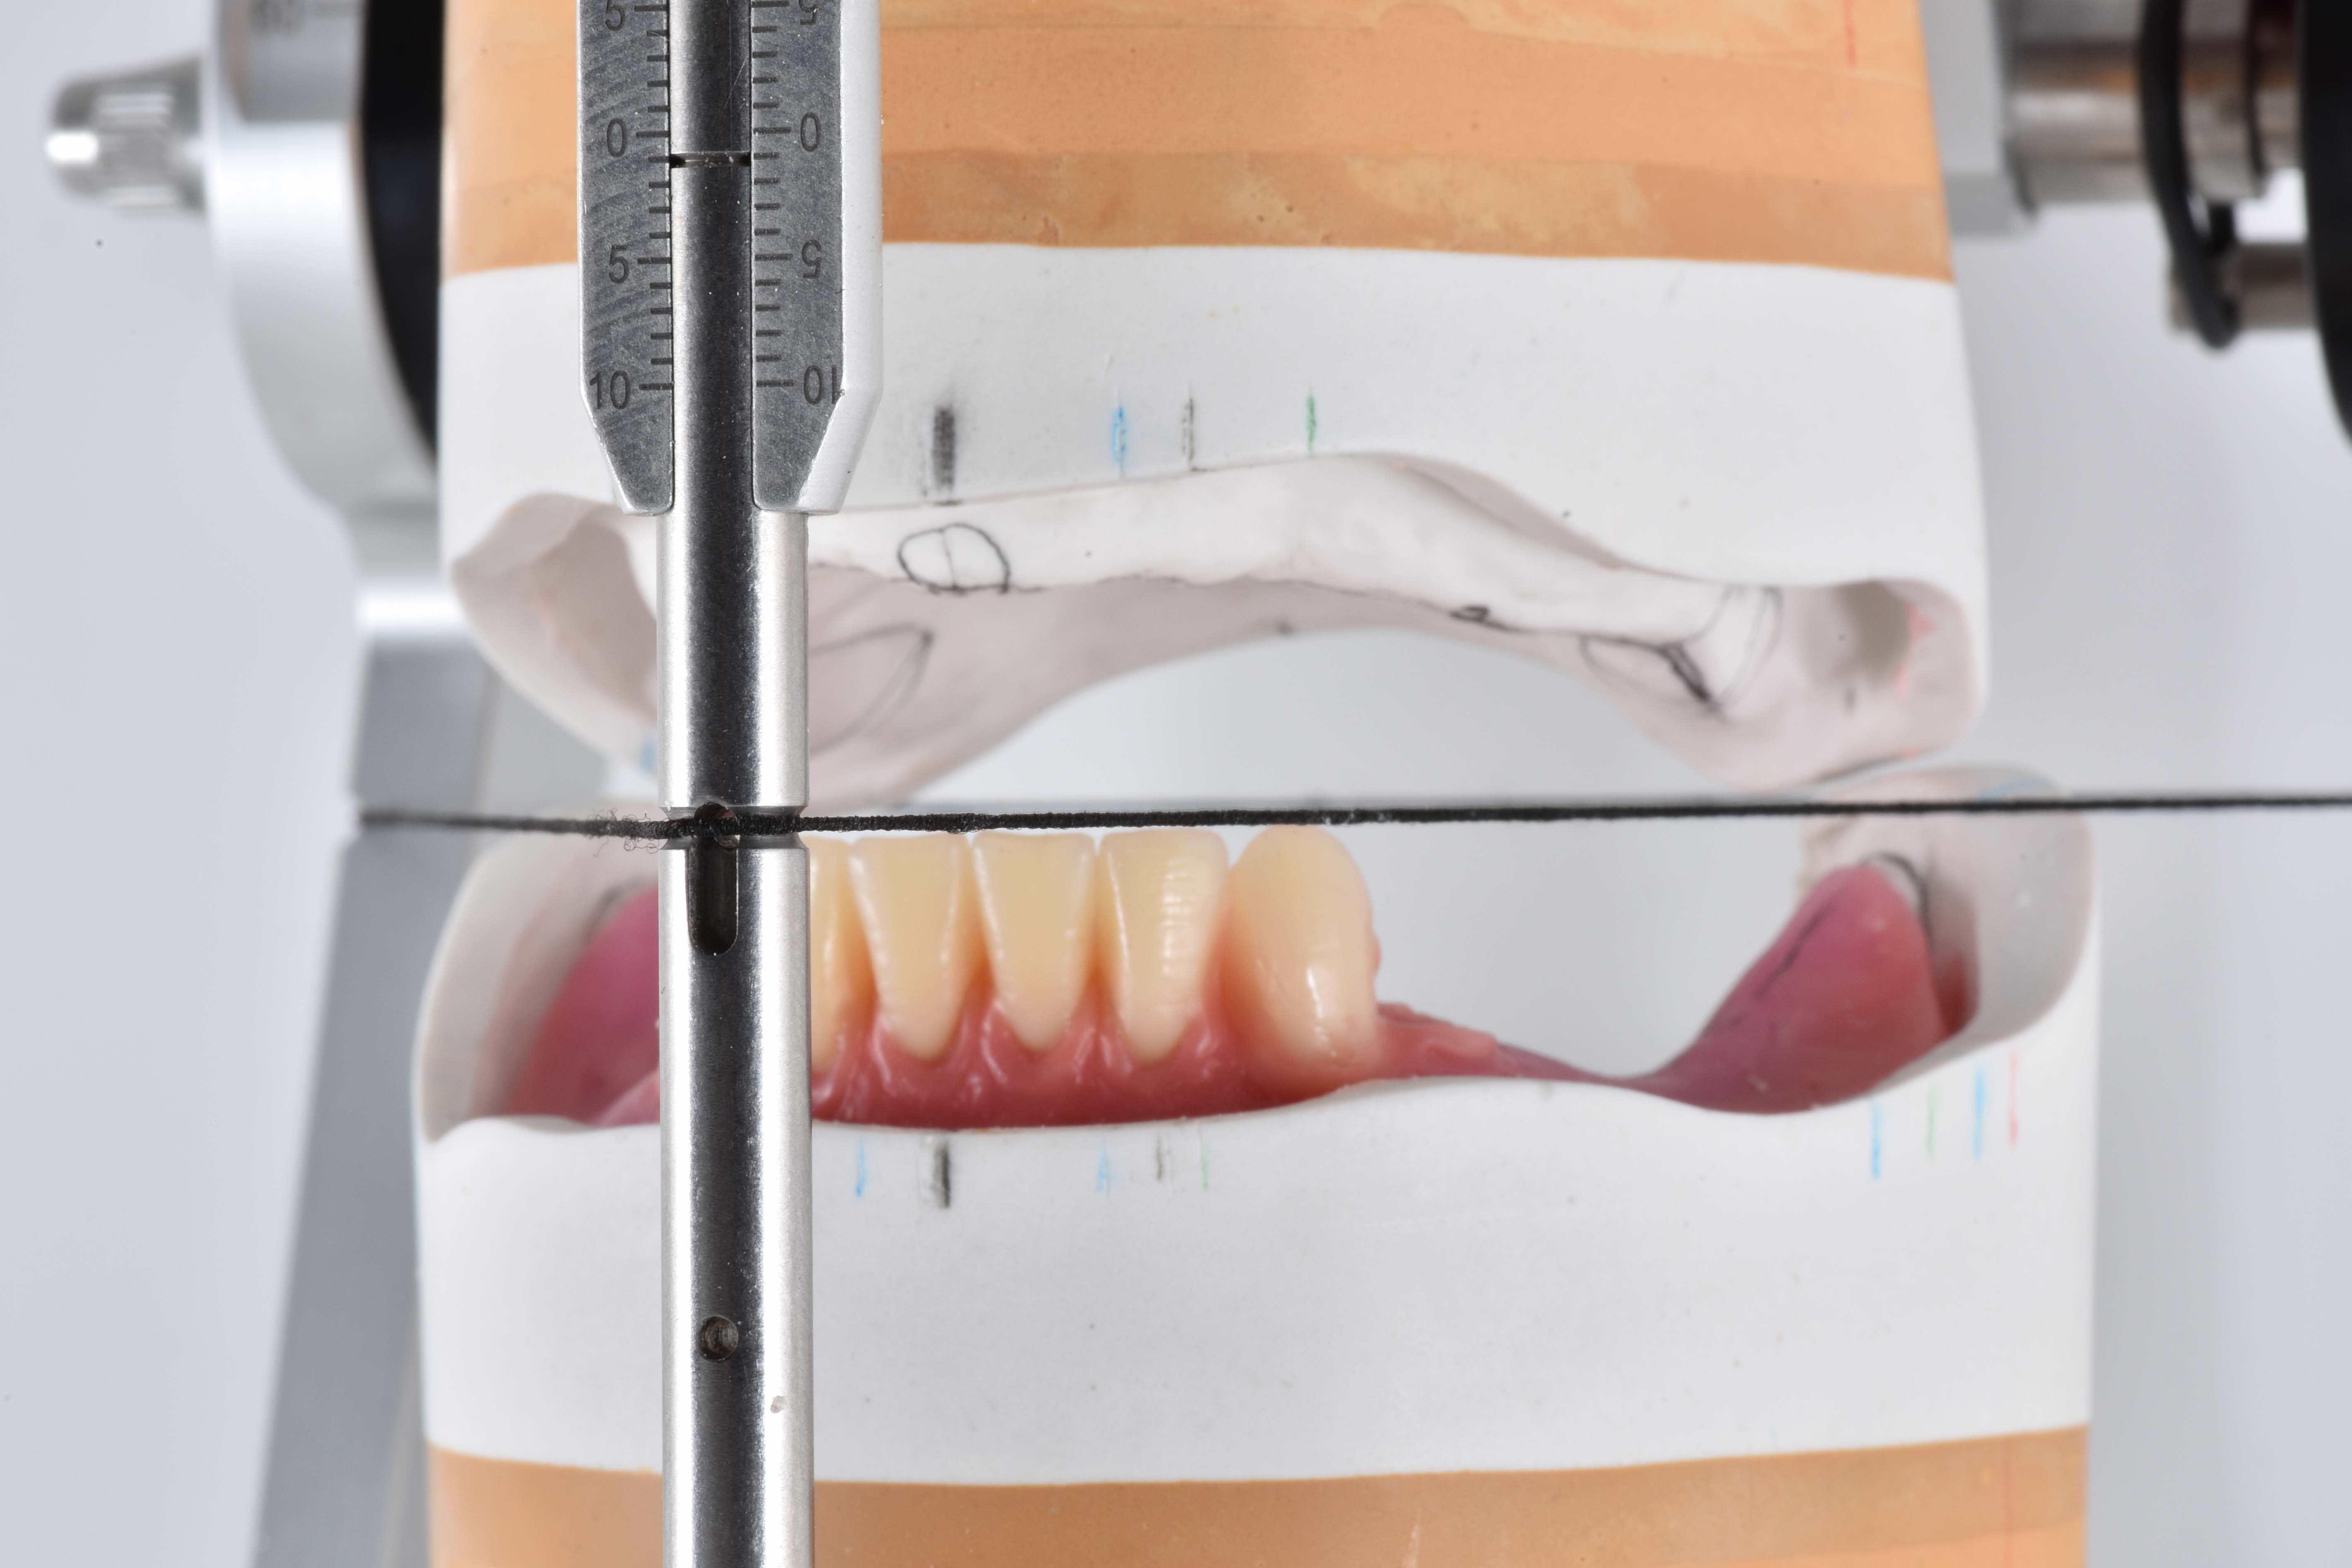
Fig. 16: Setup of the anterior teeth in the mandible.
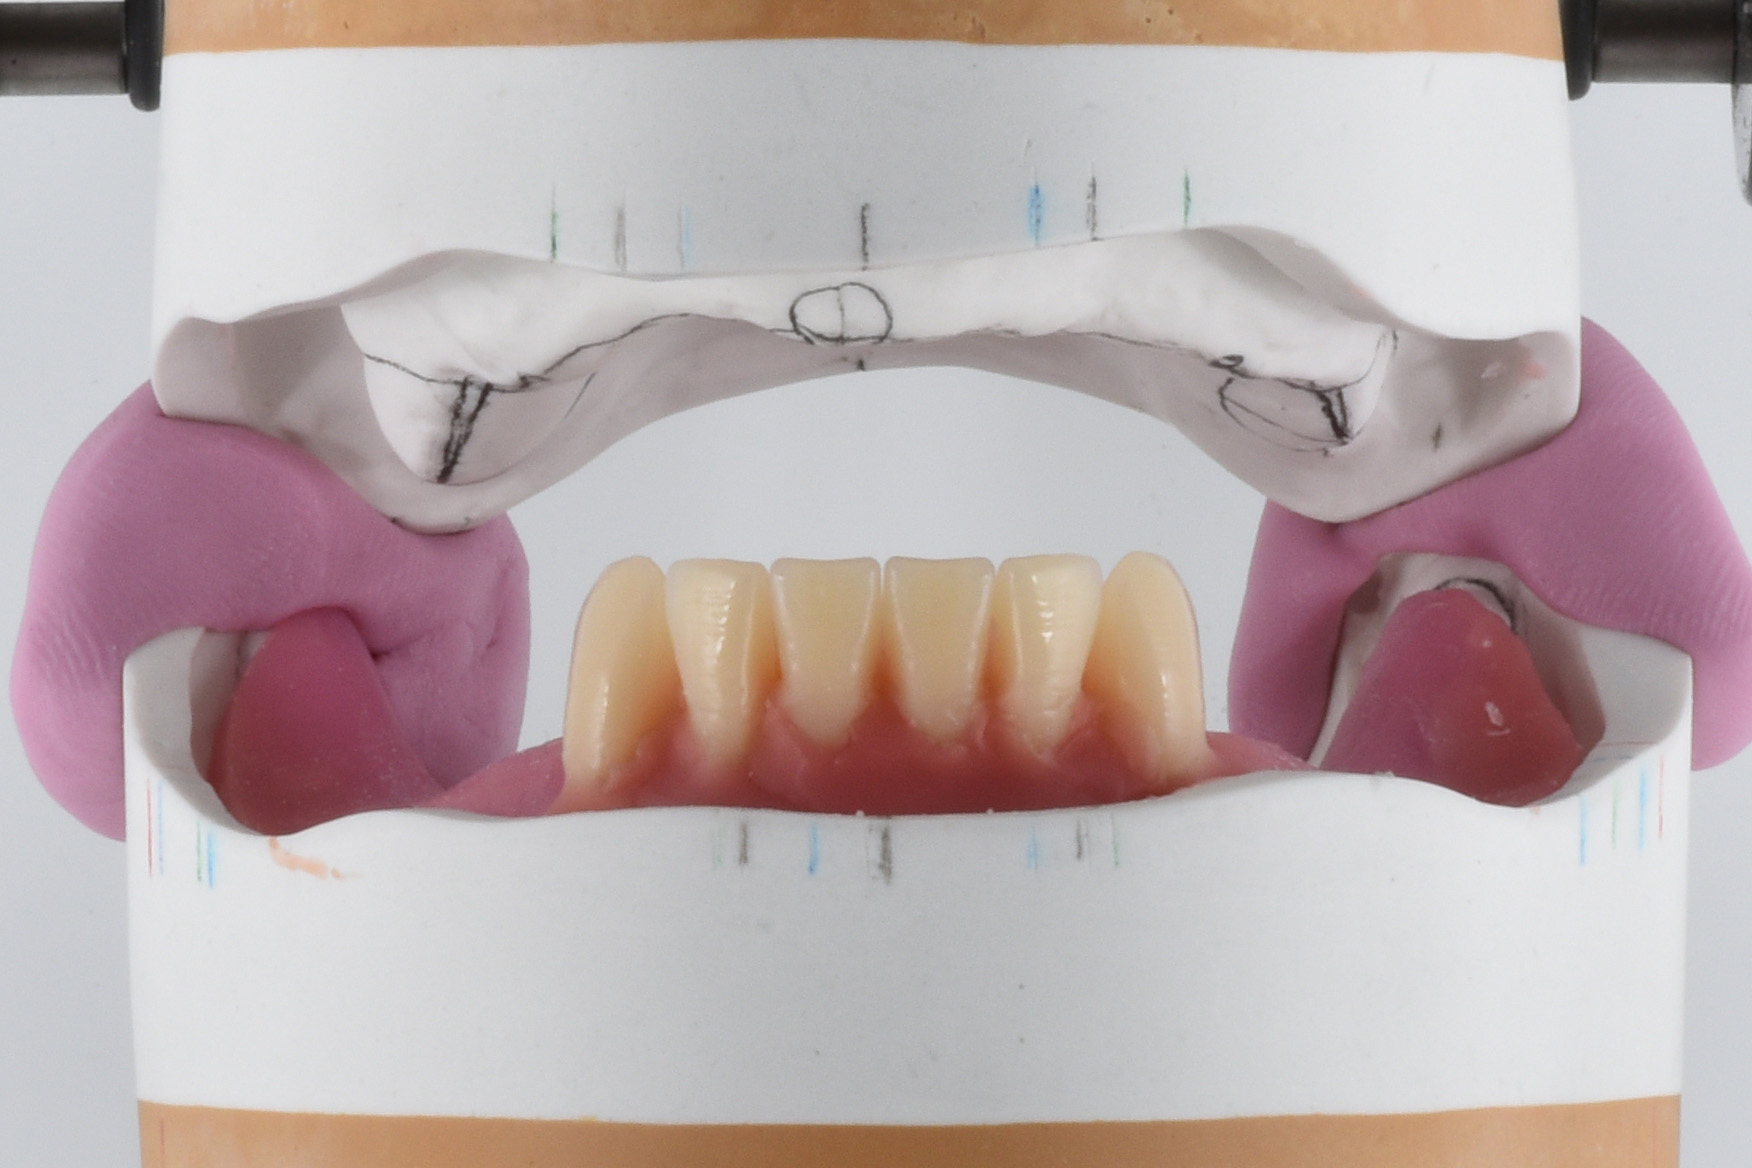
Fig. 17: Complete setup of the anterior teeth in the mandible.
Setup of the posterior teeth
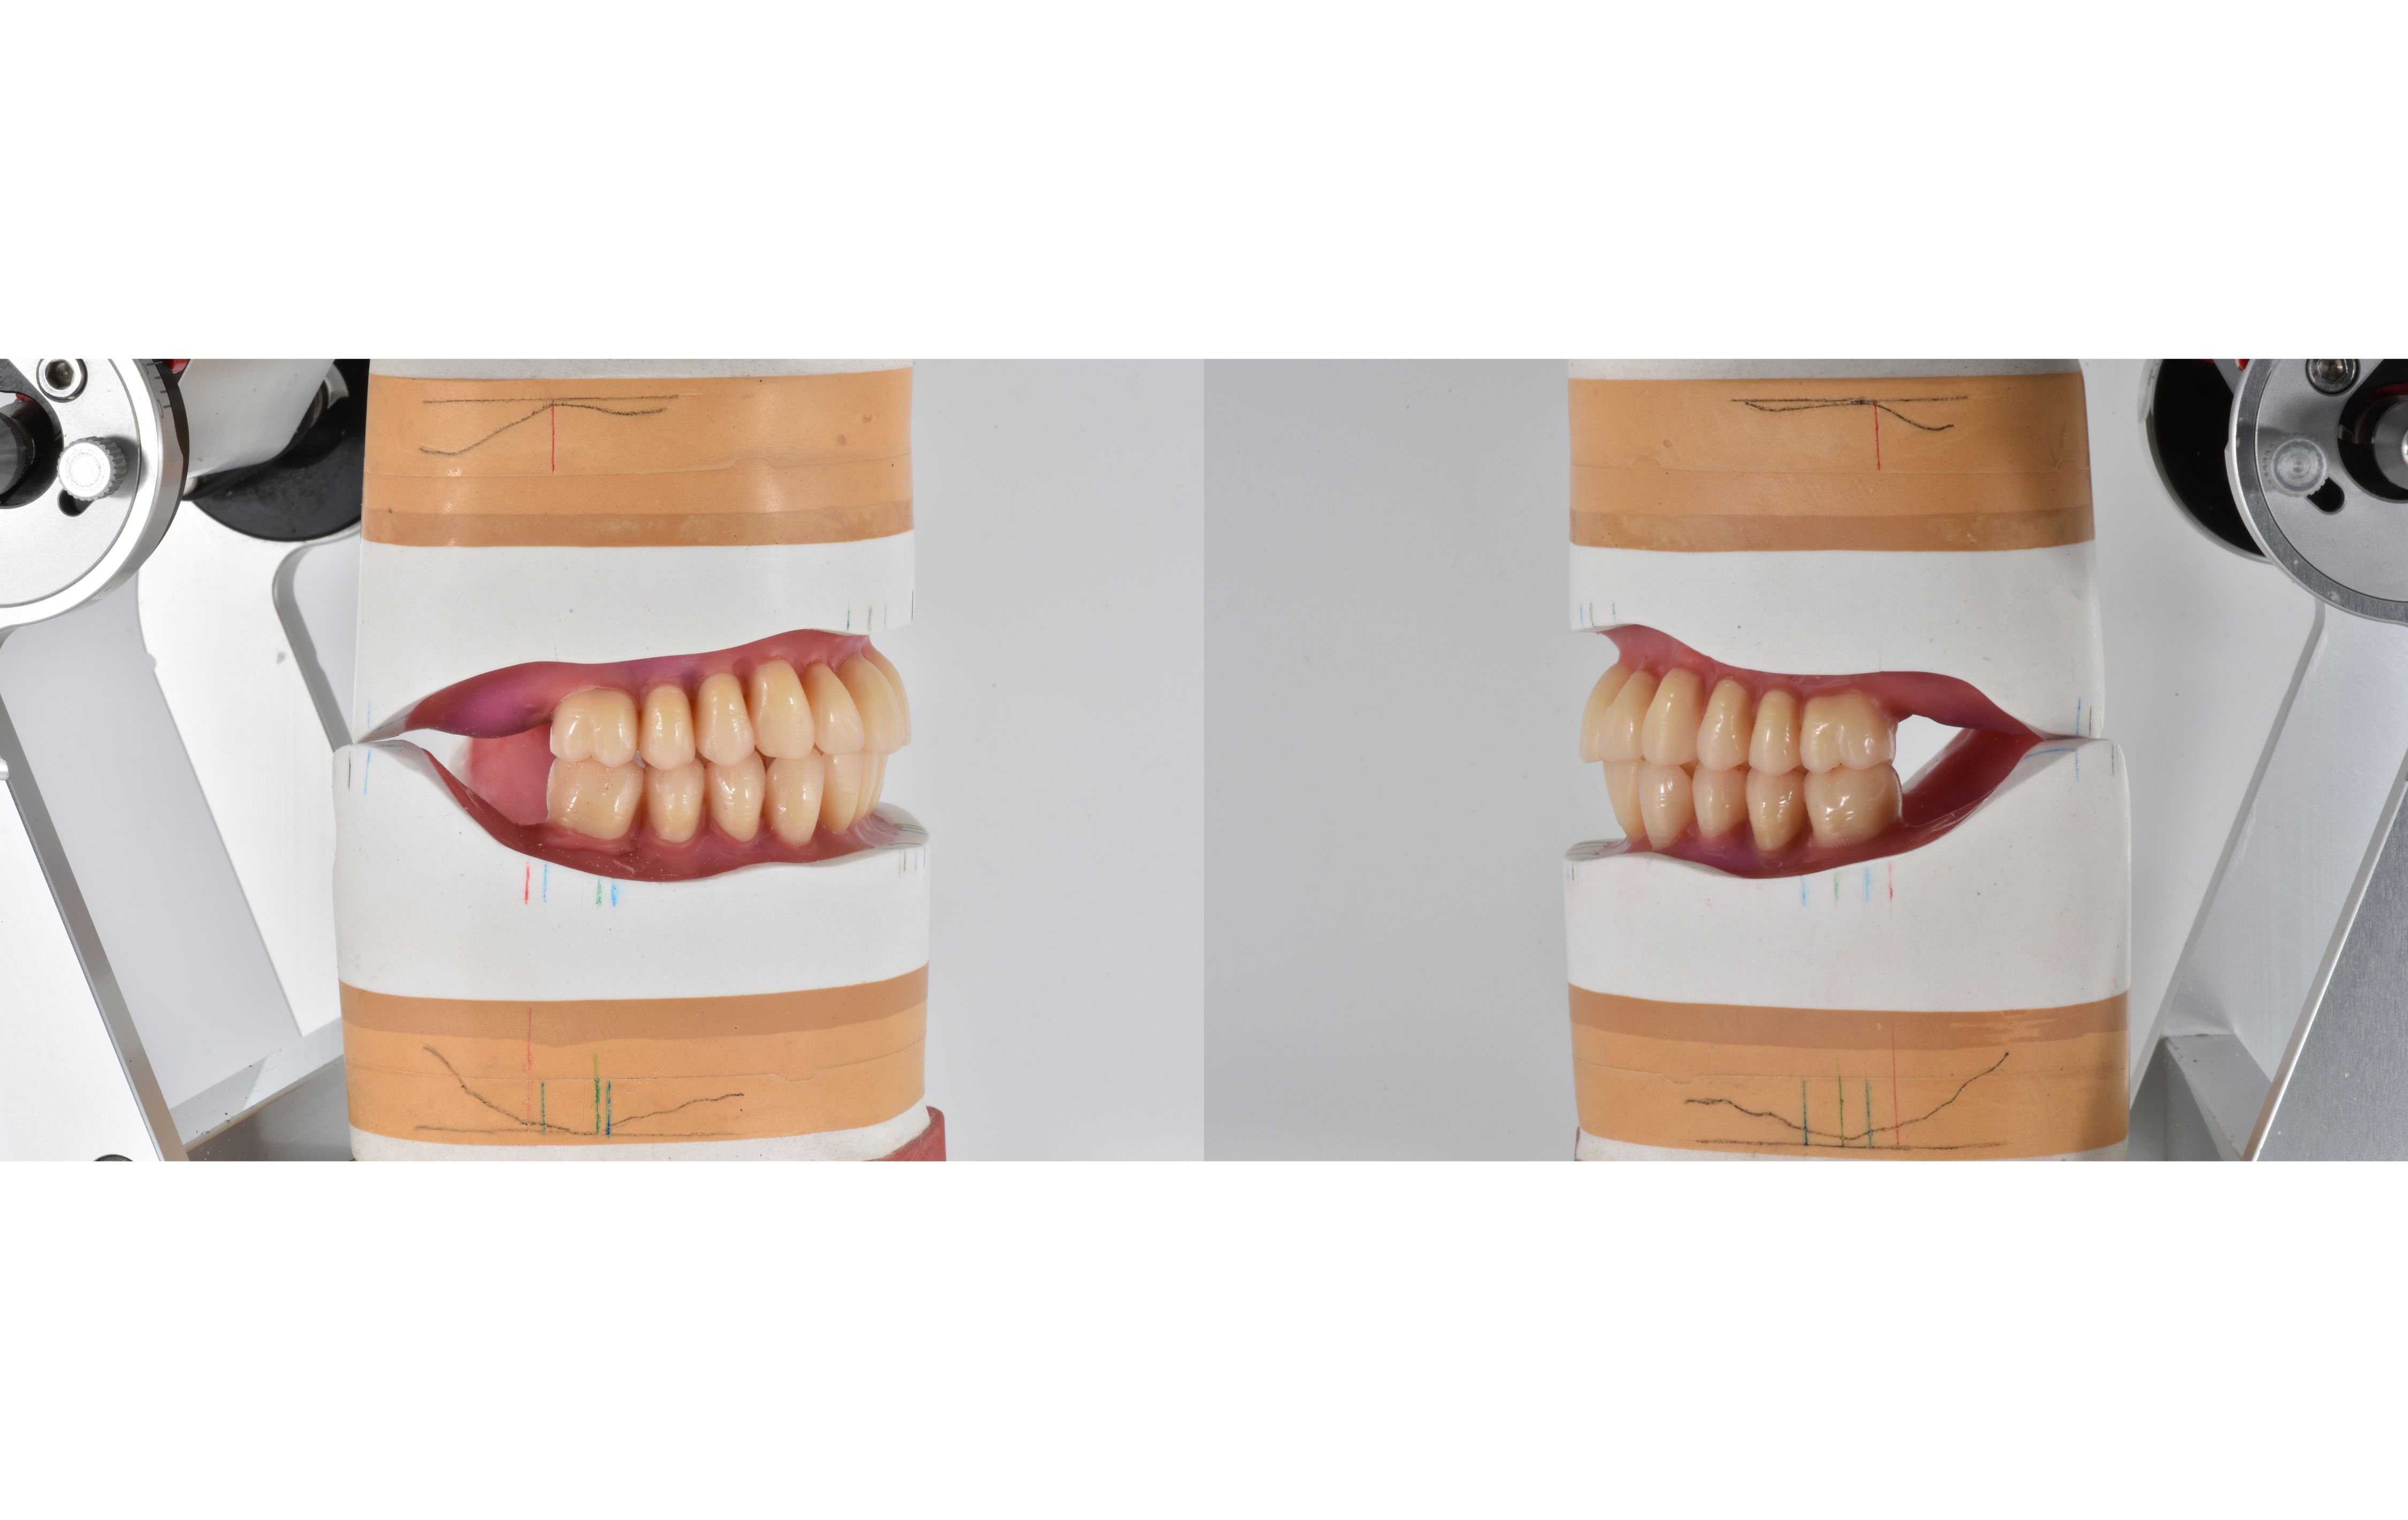
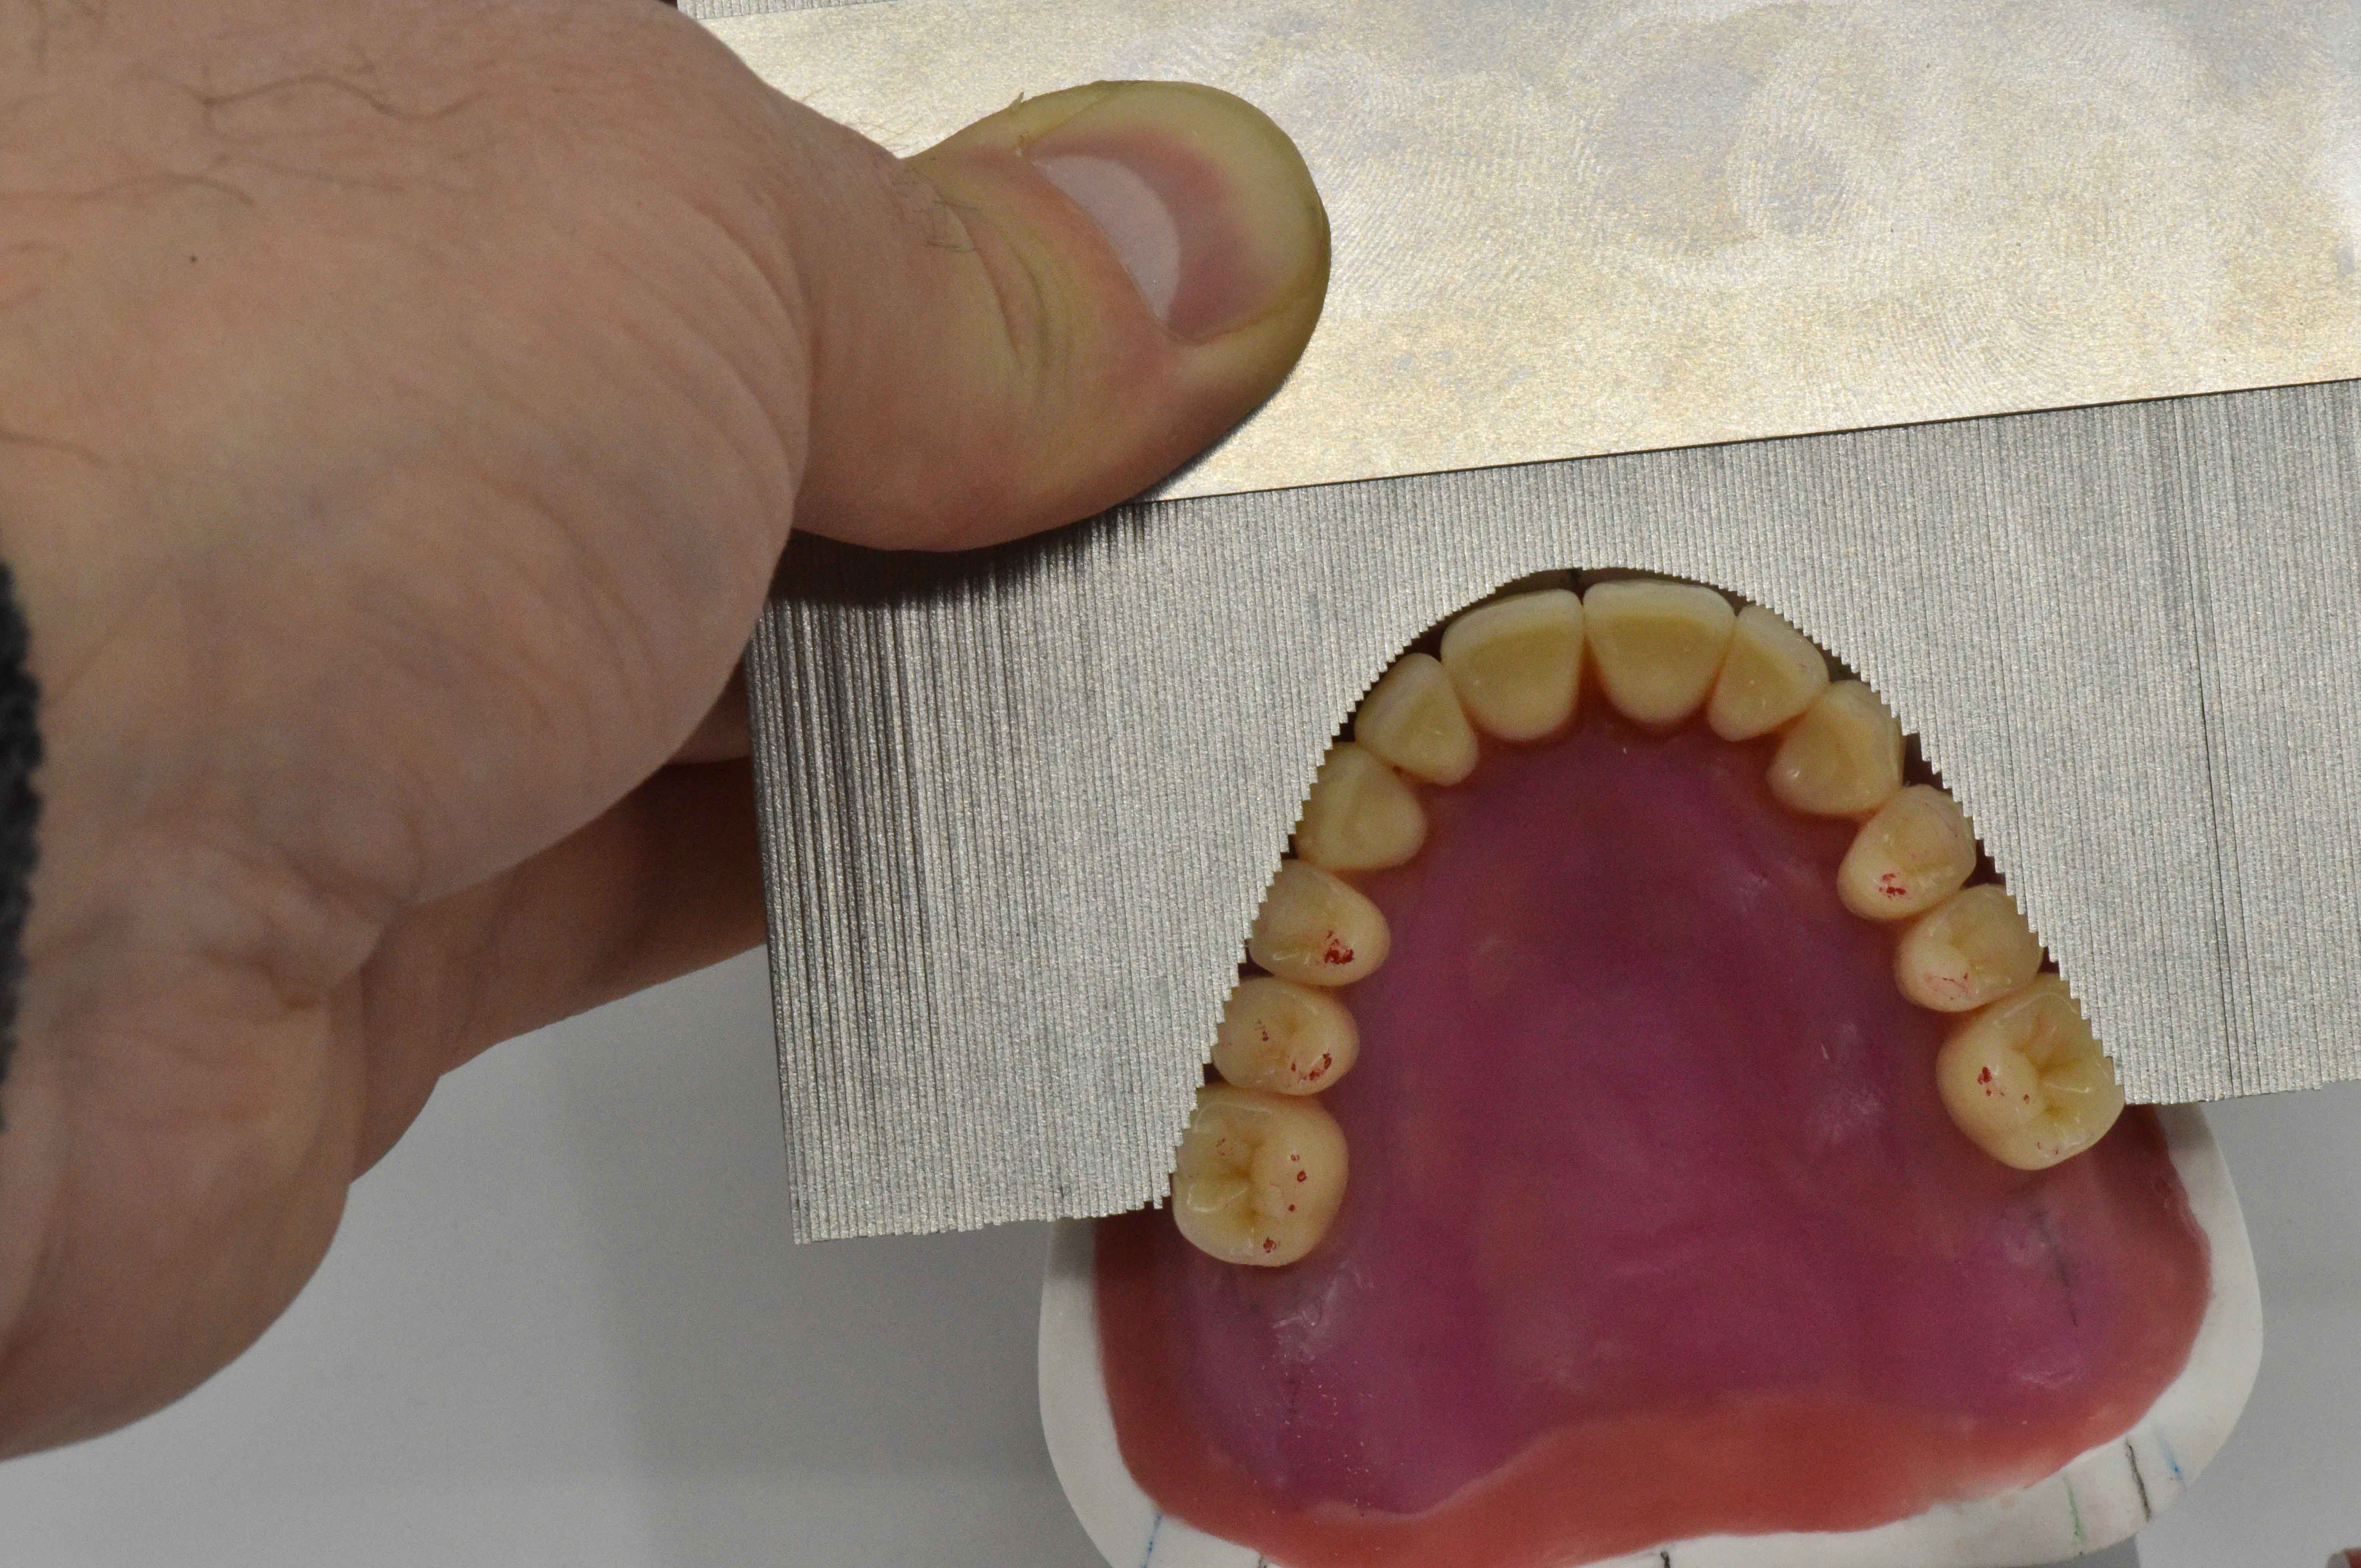
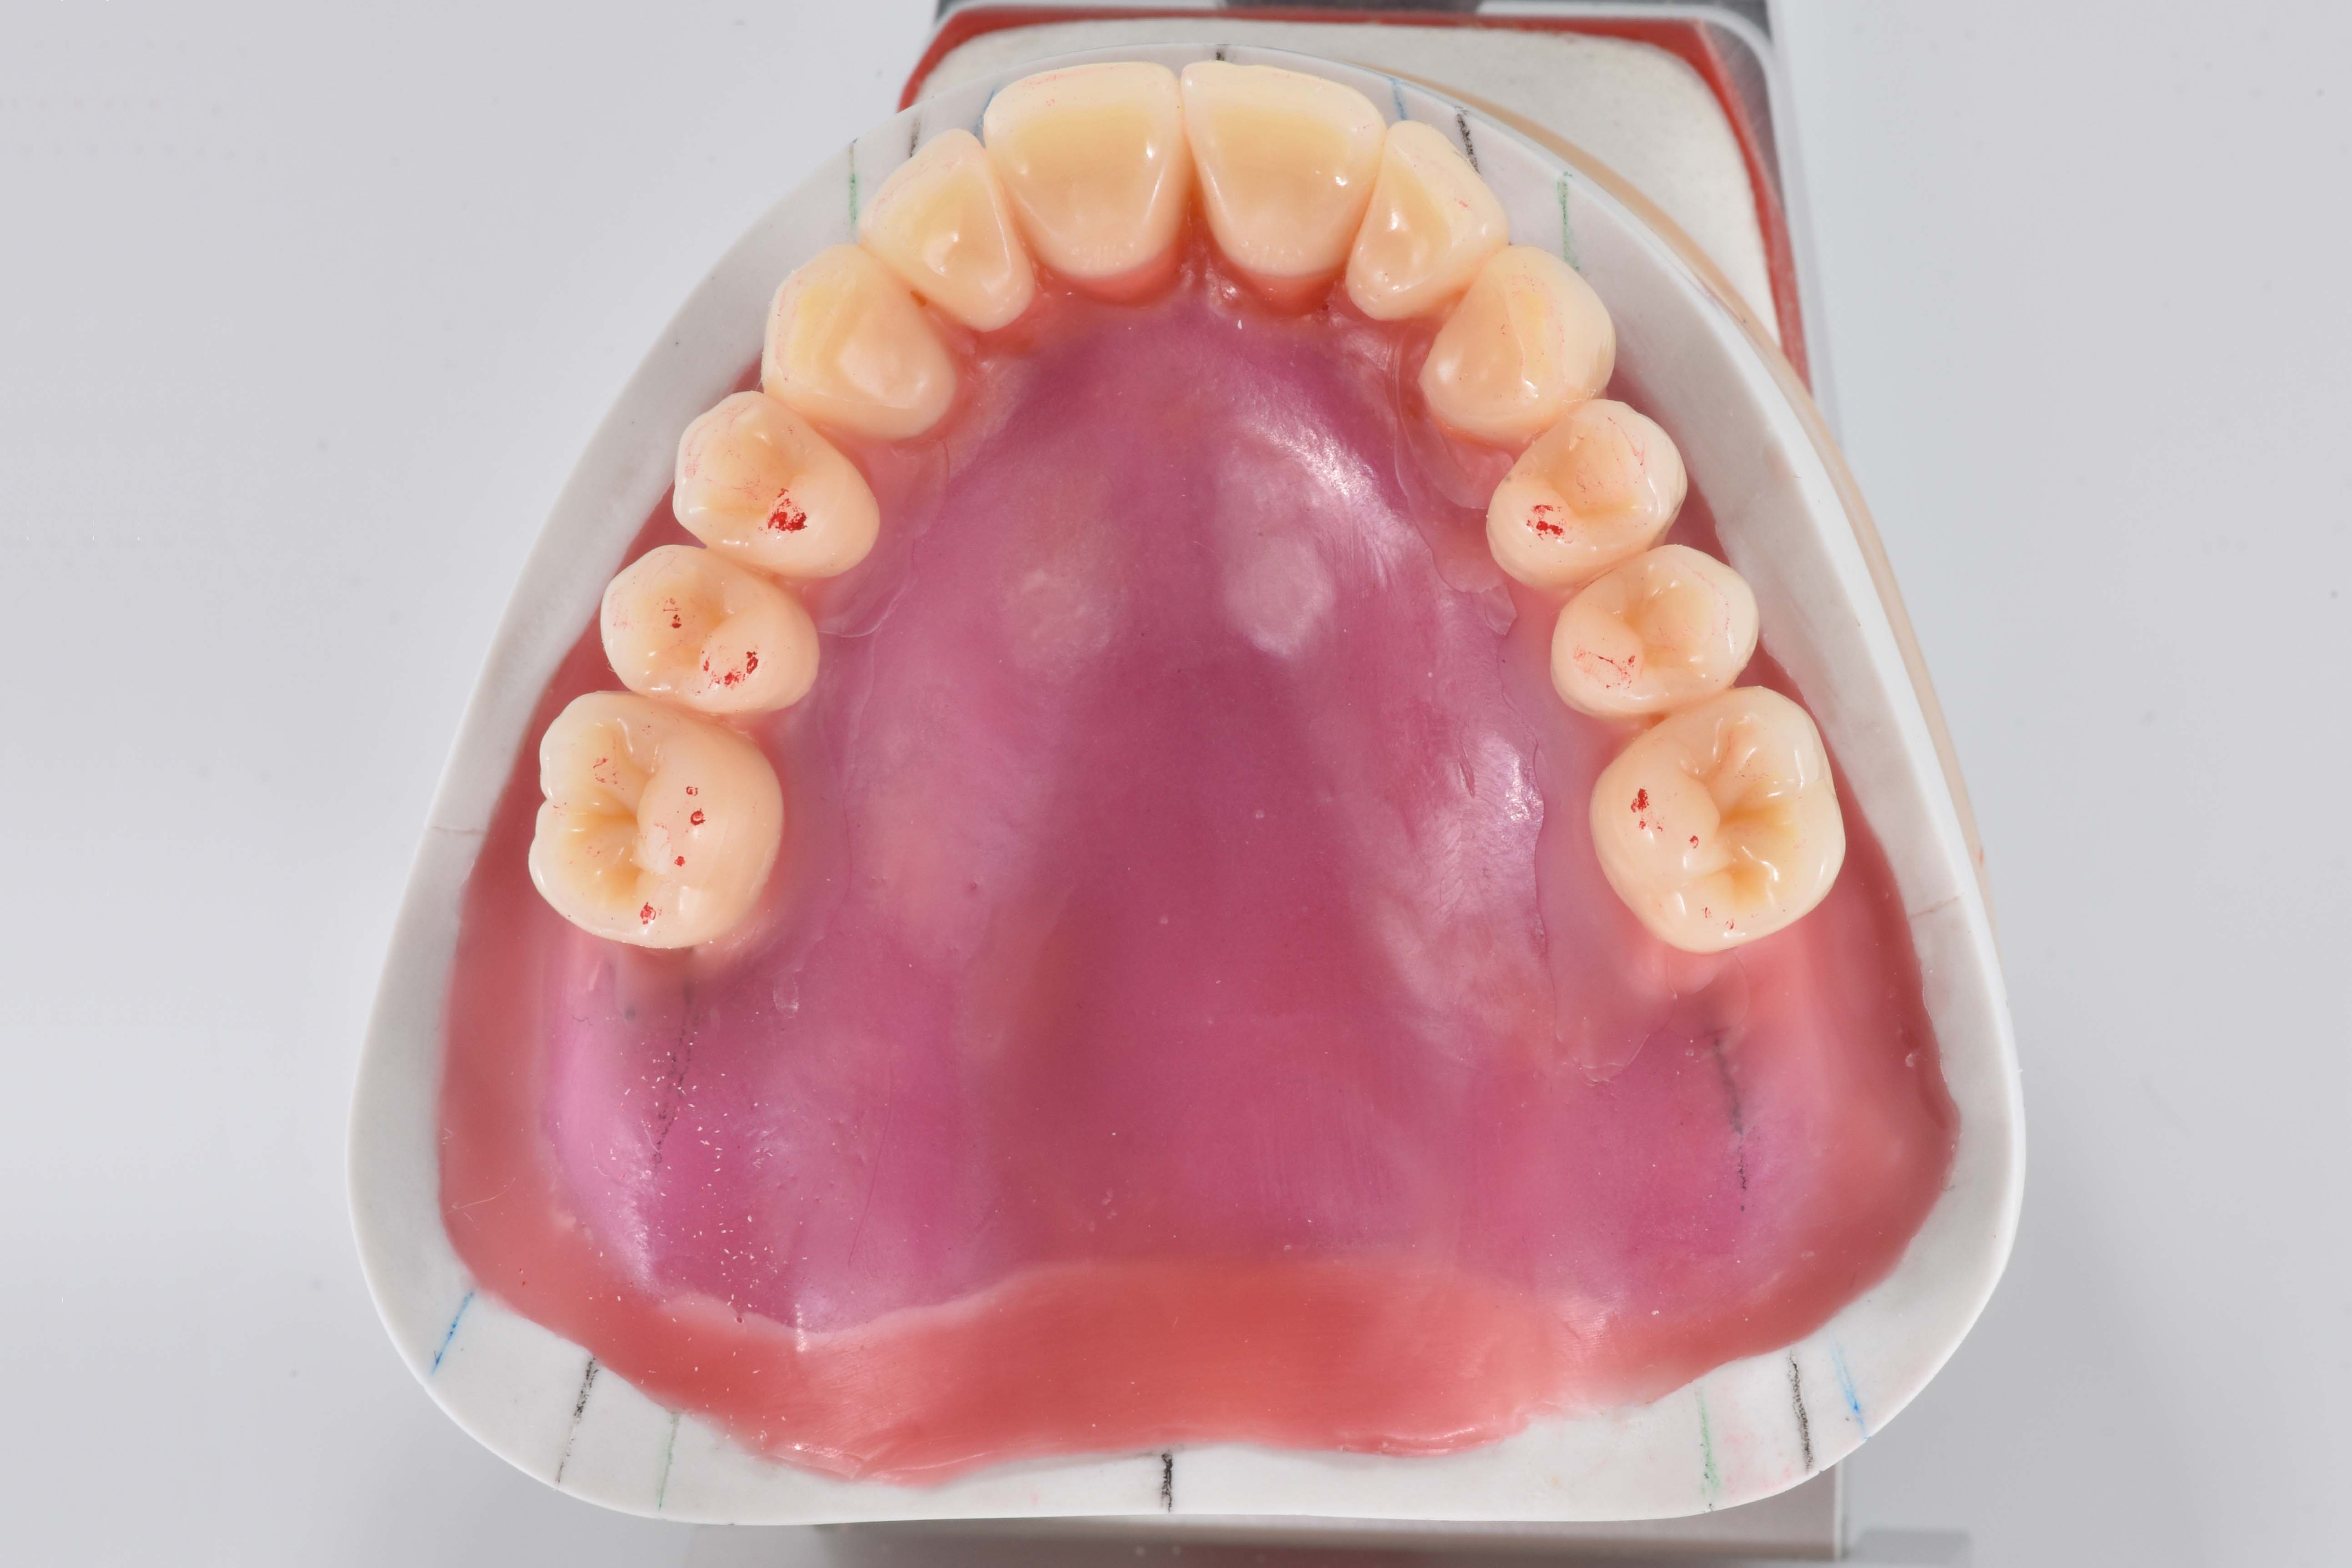
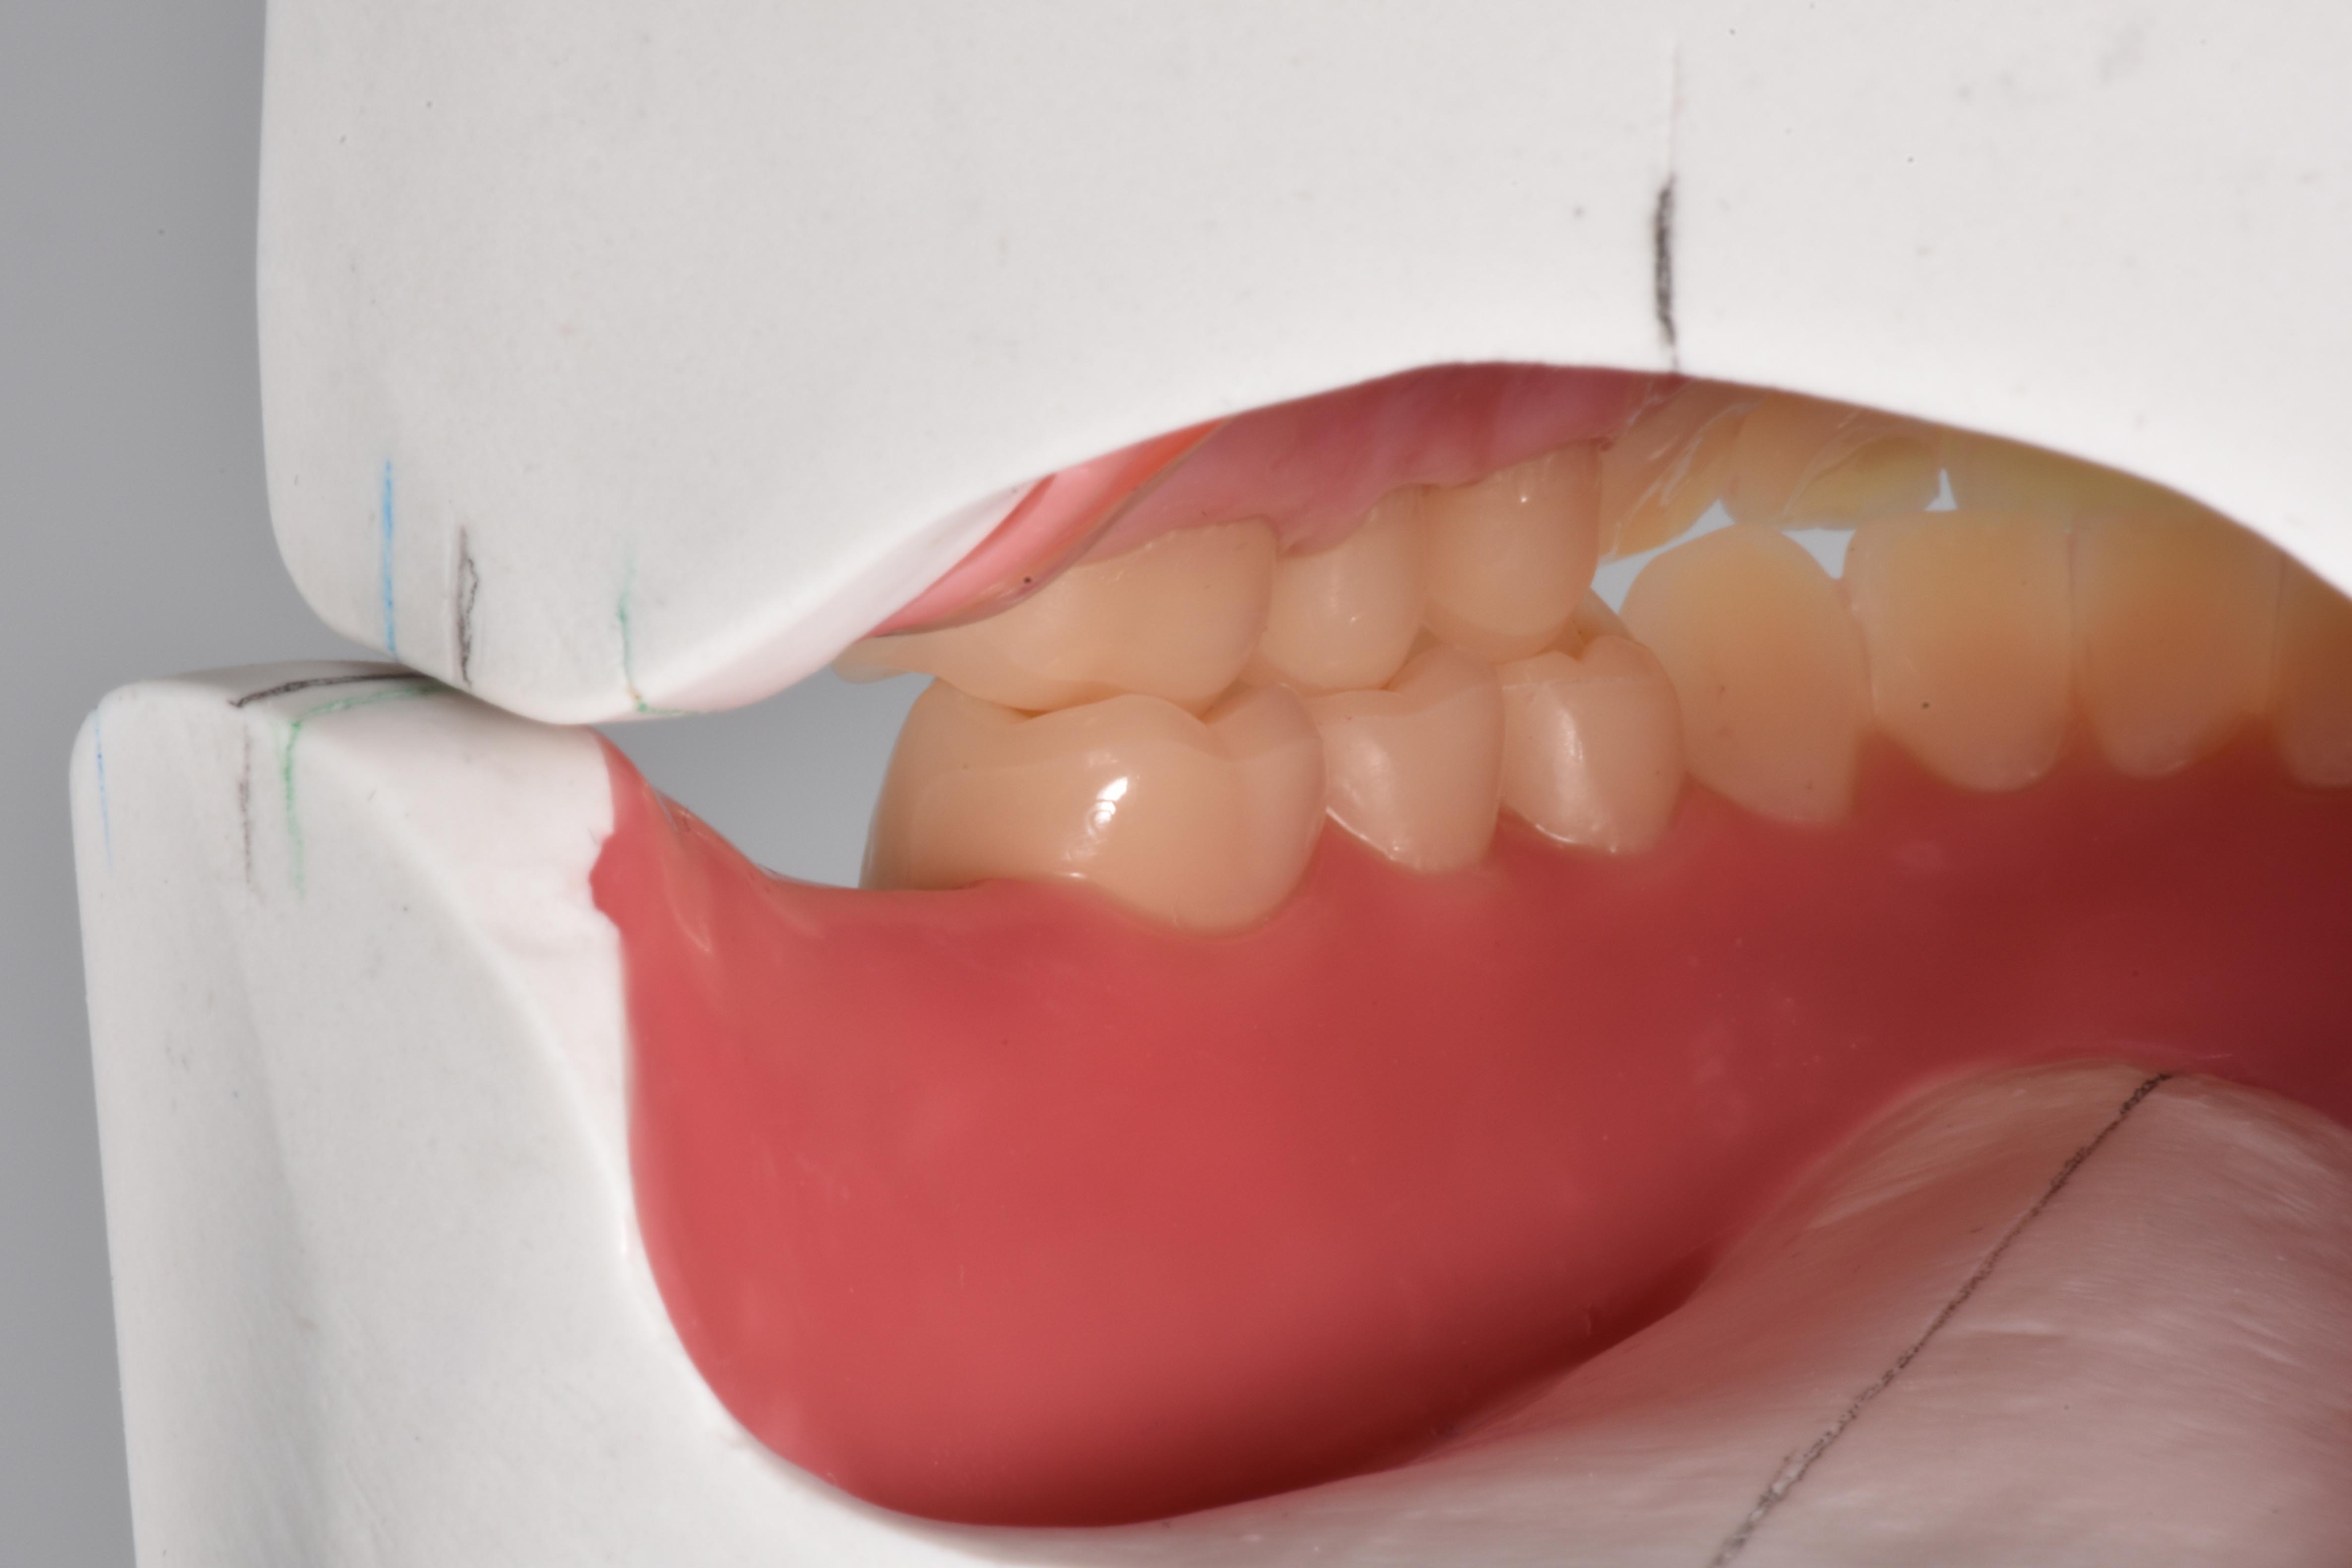
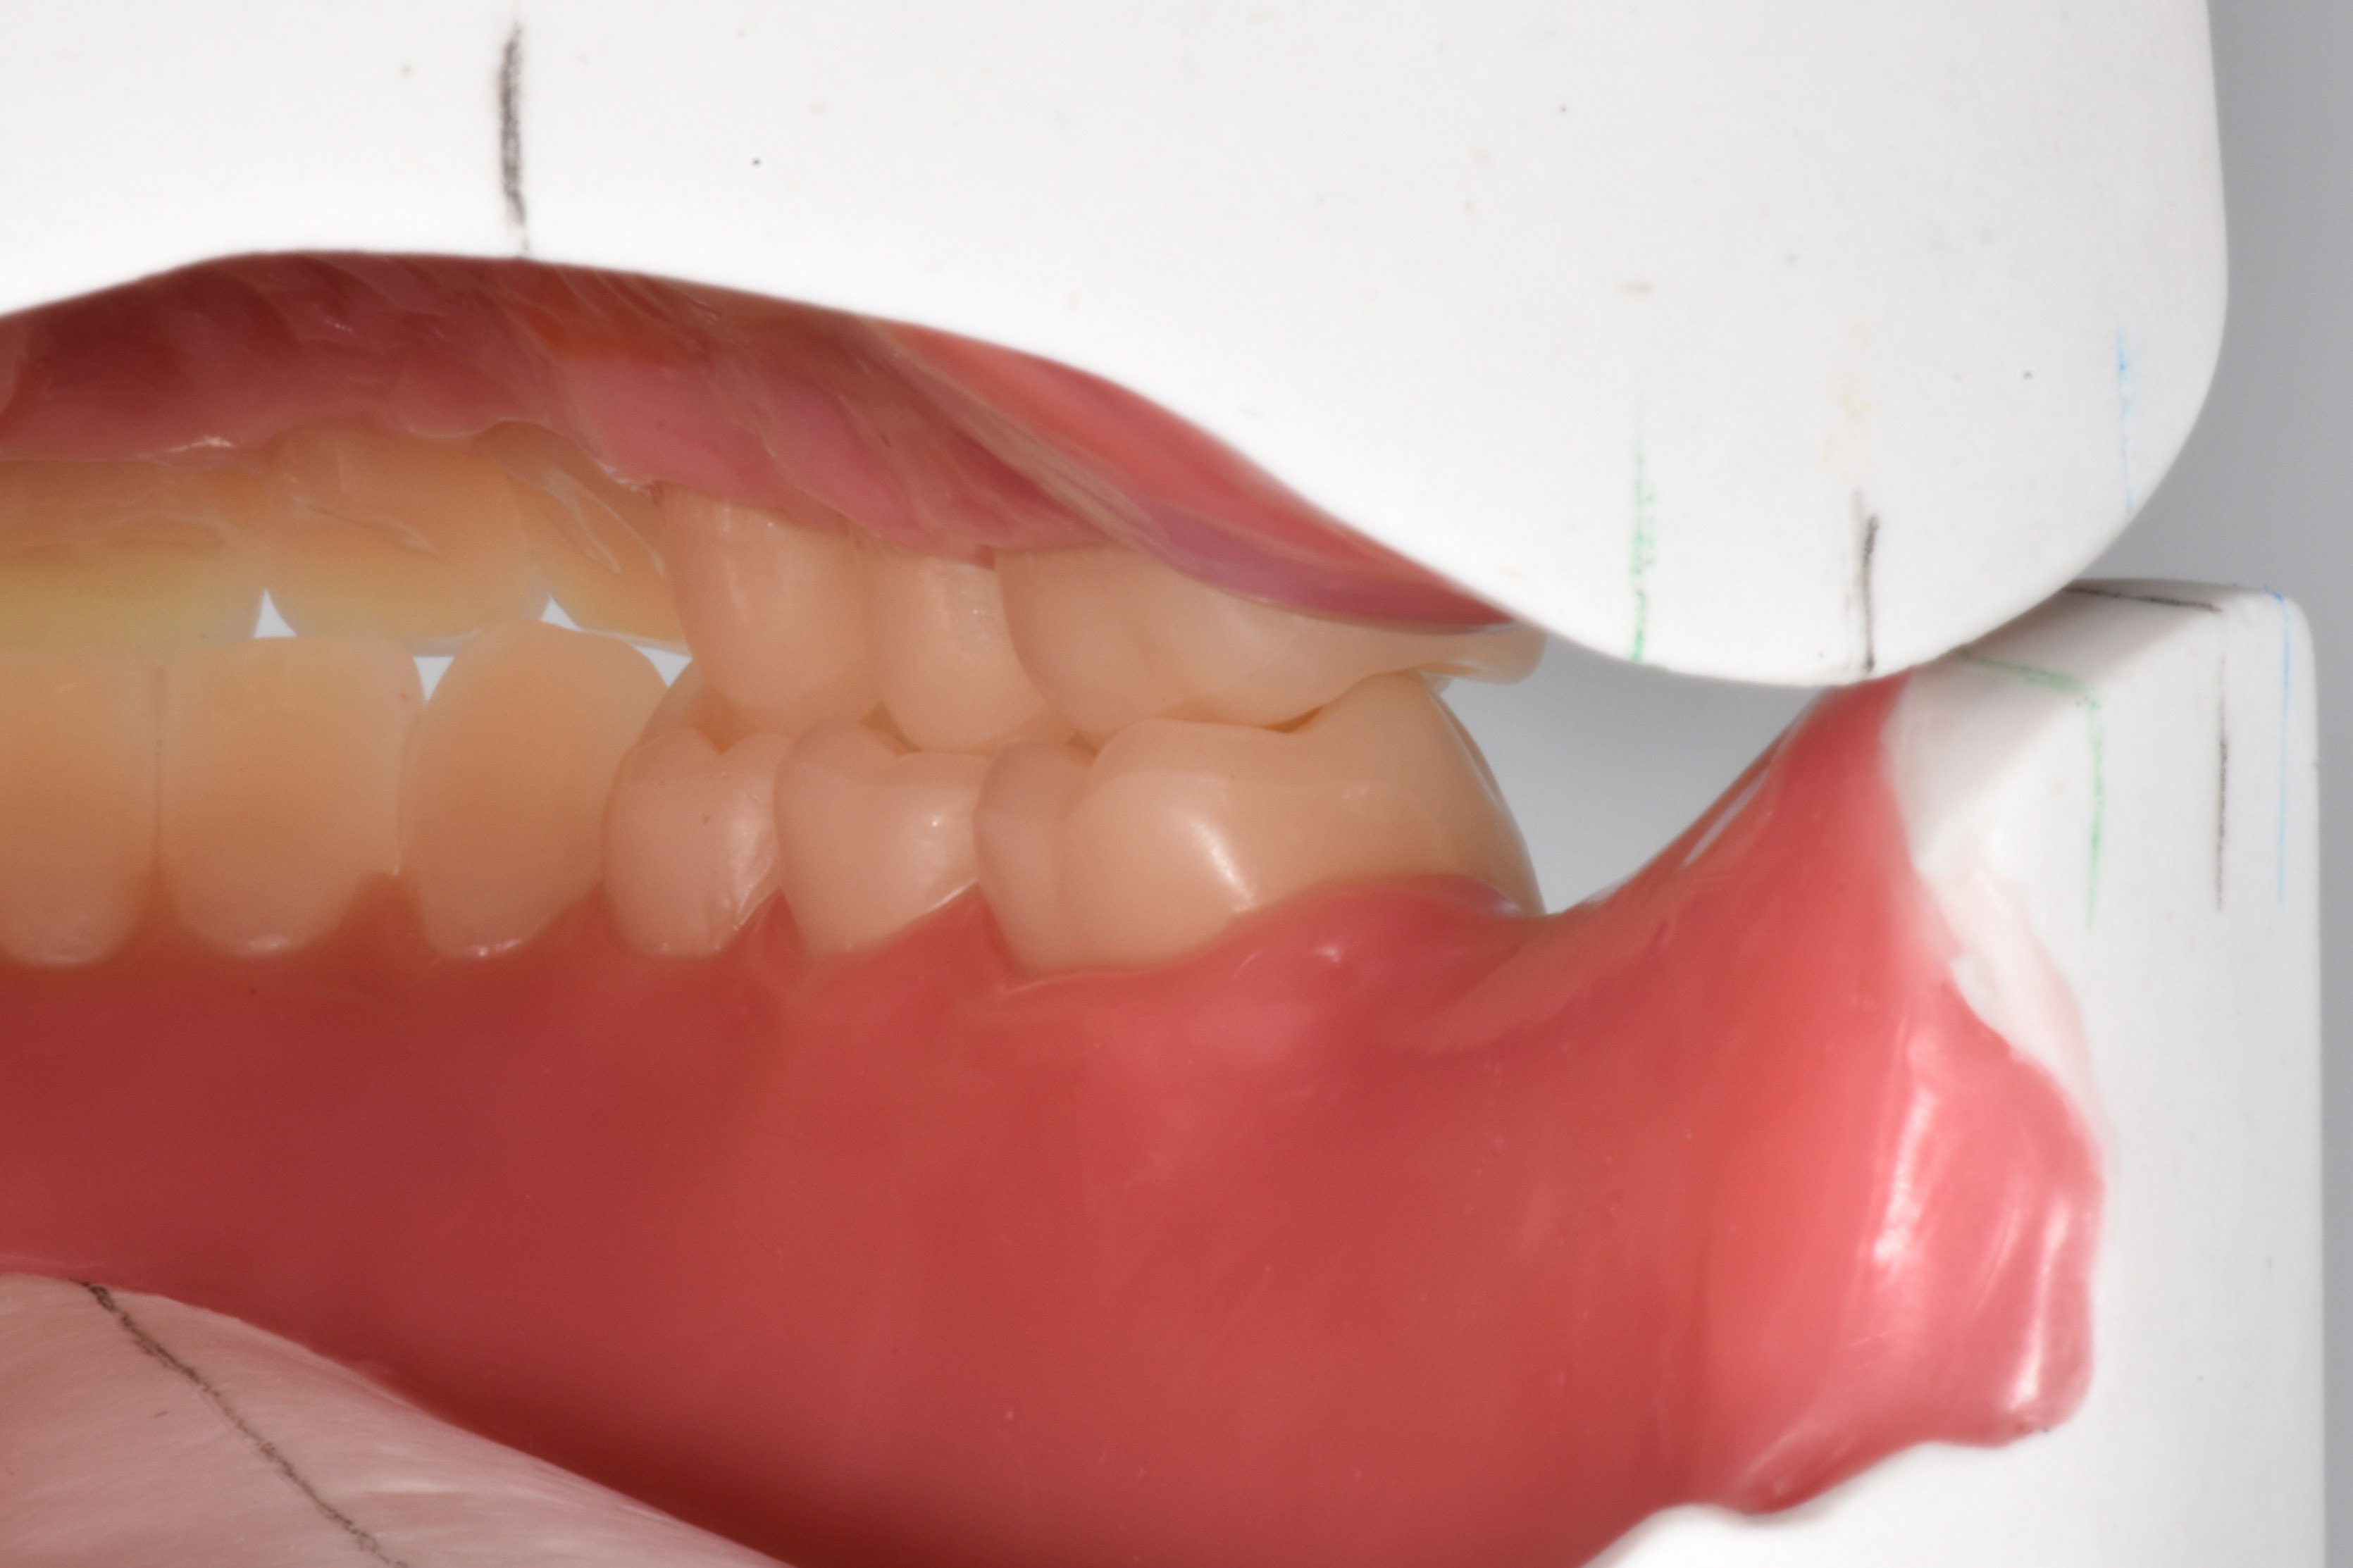
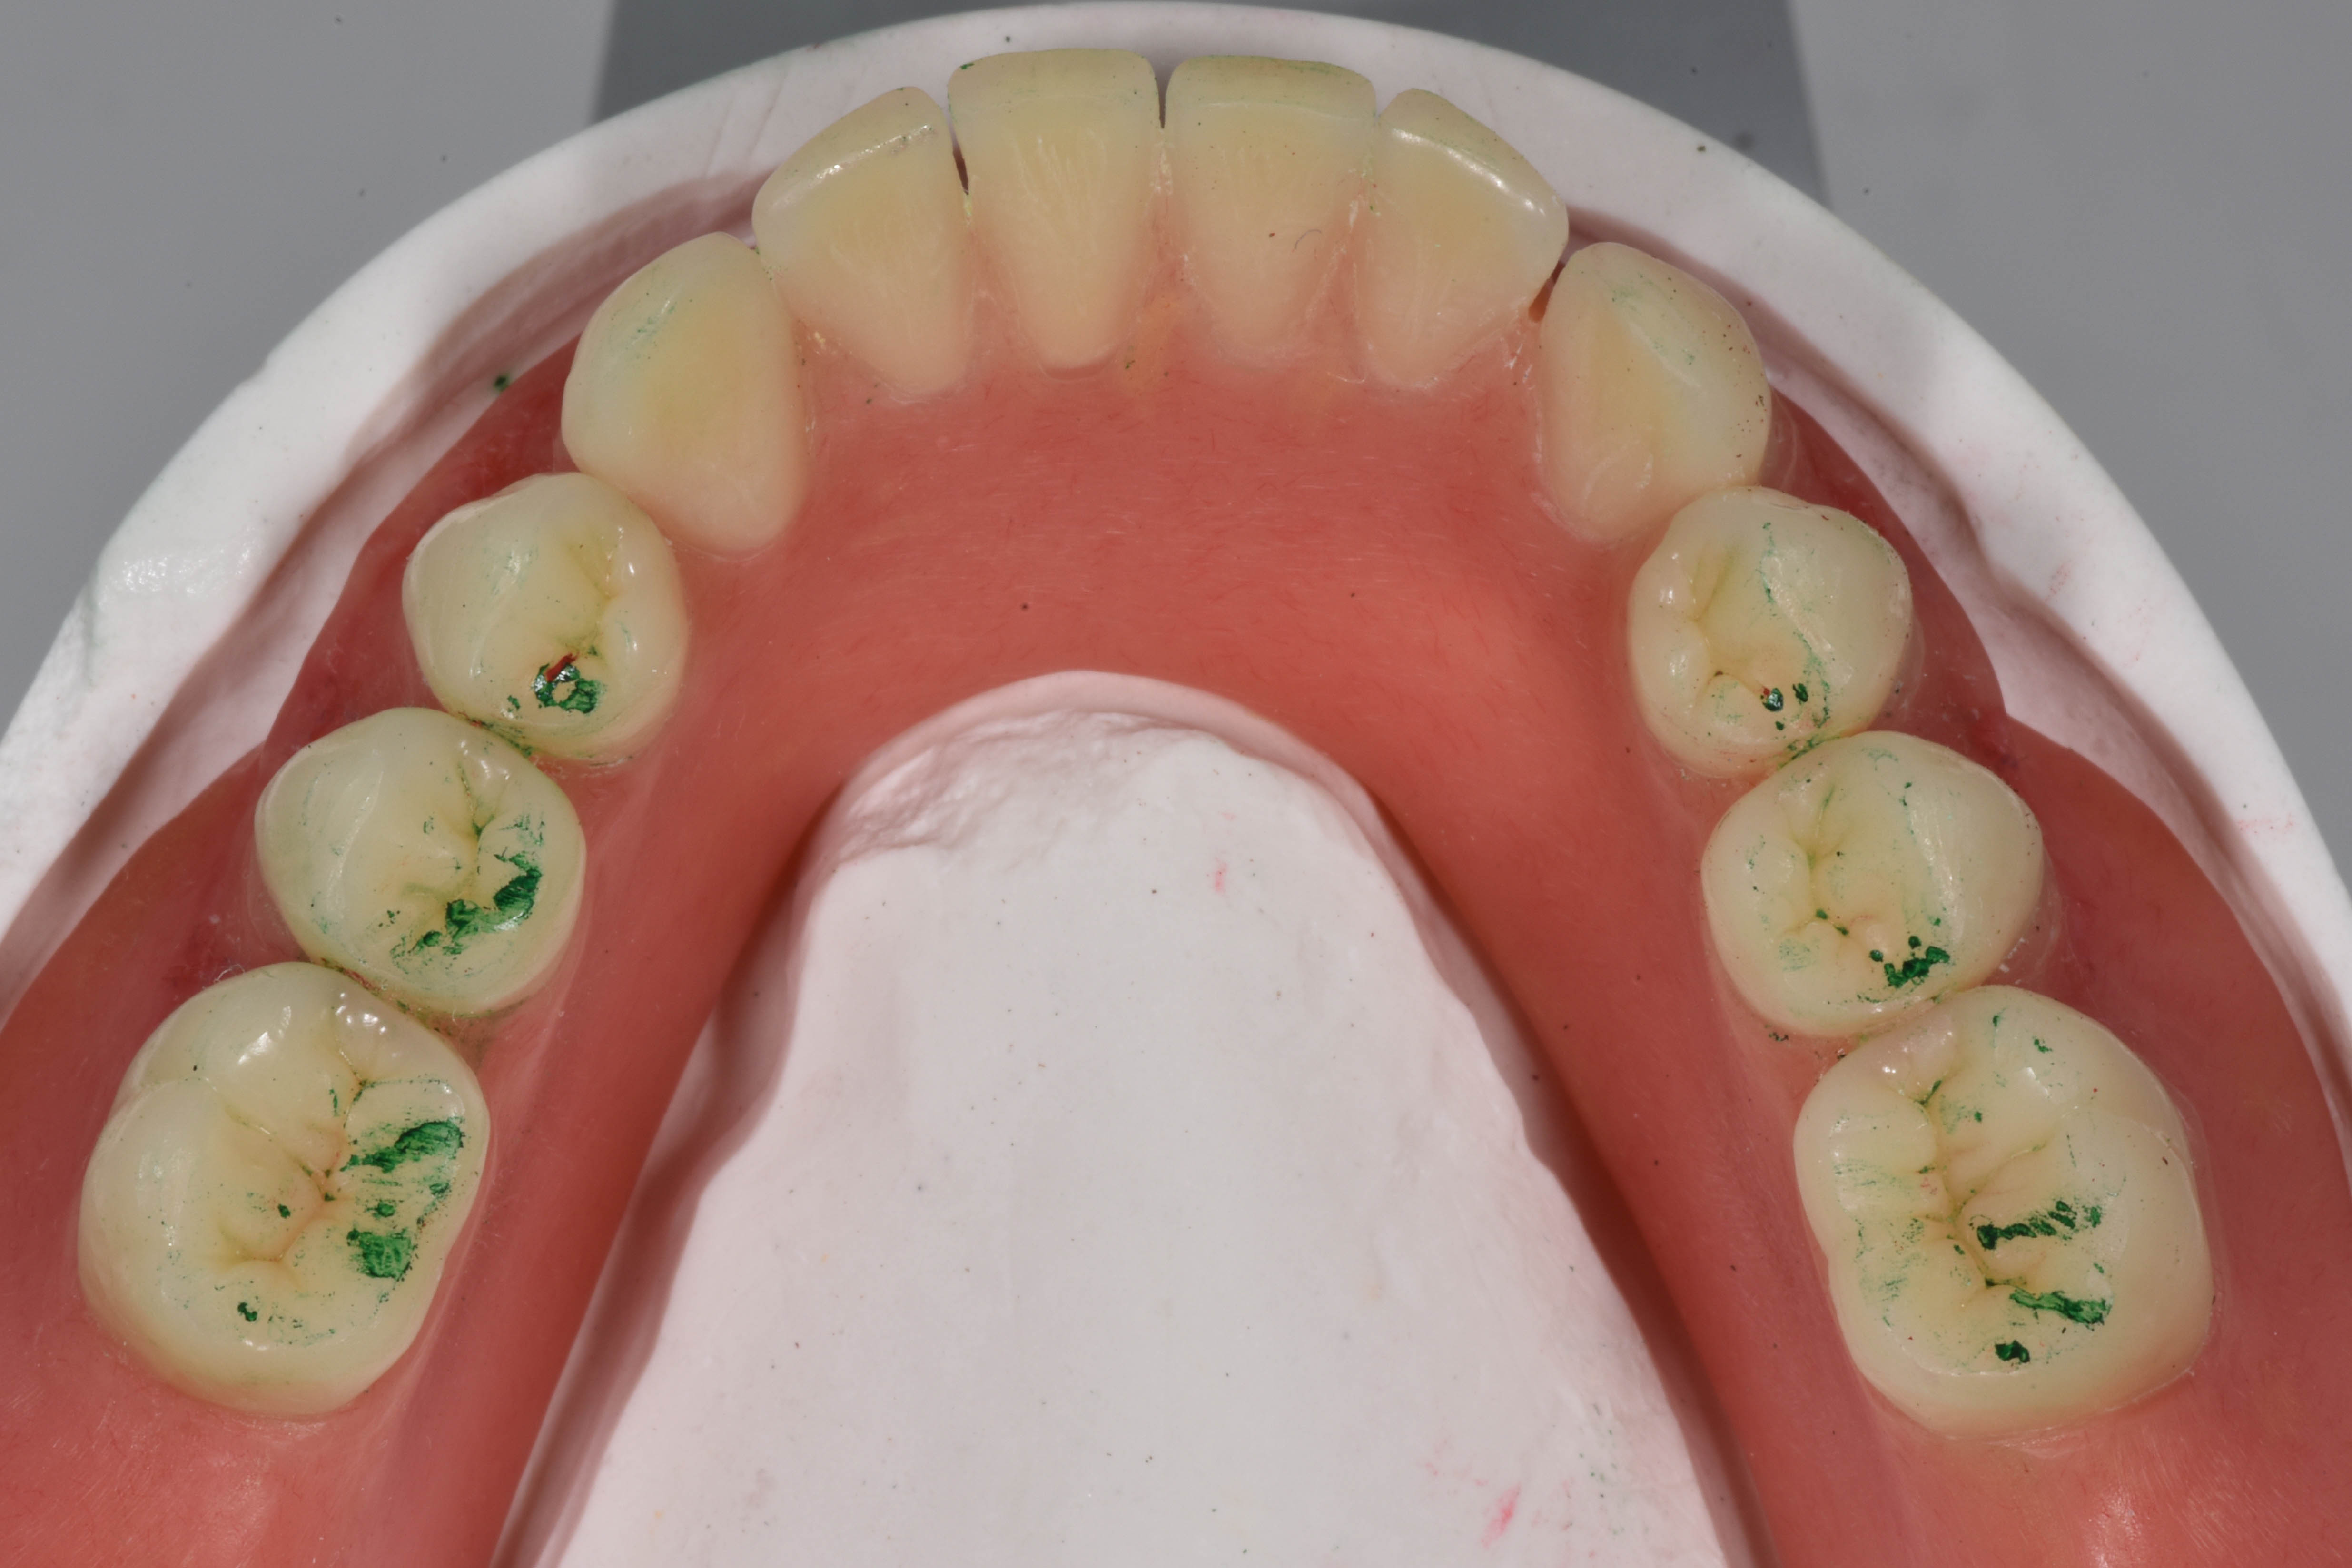
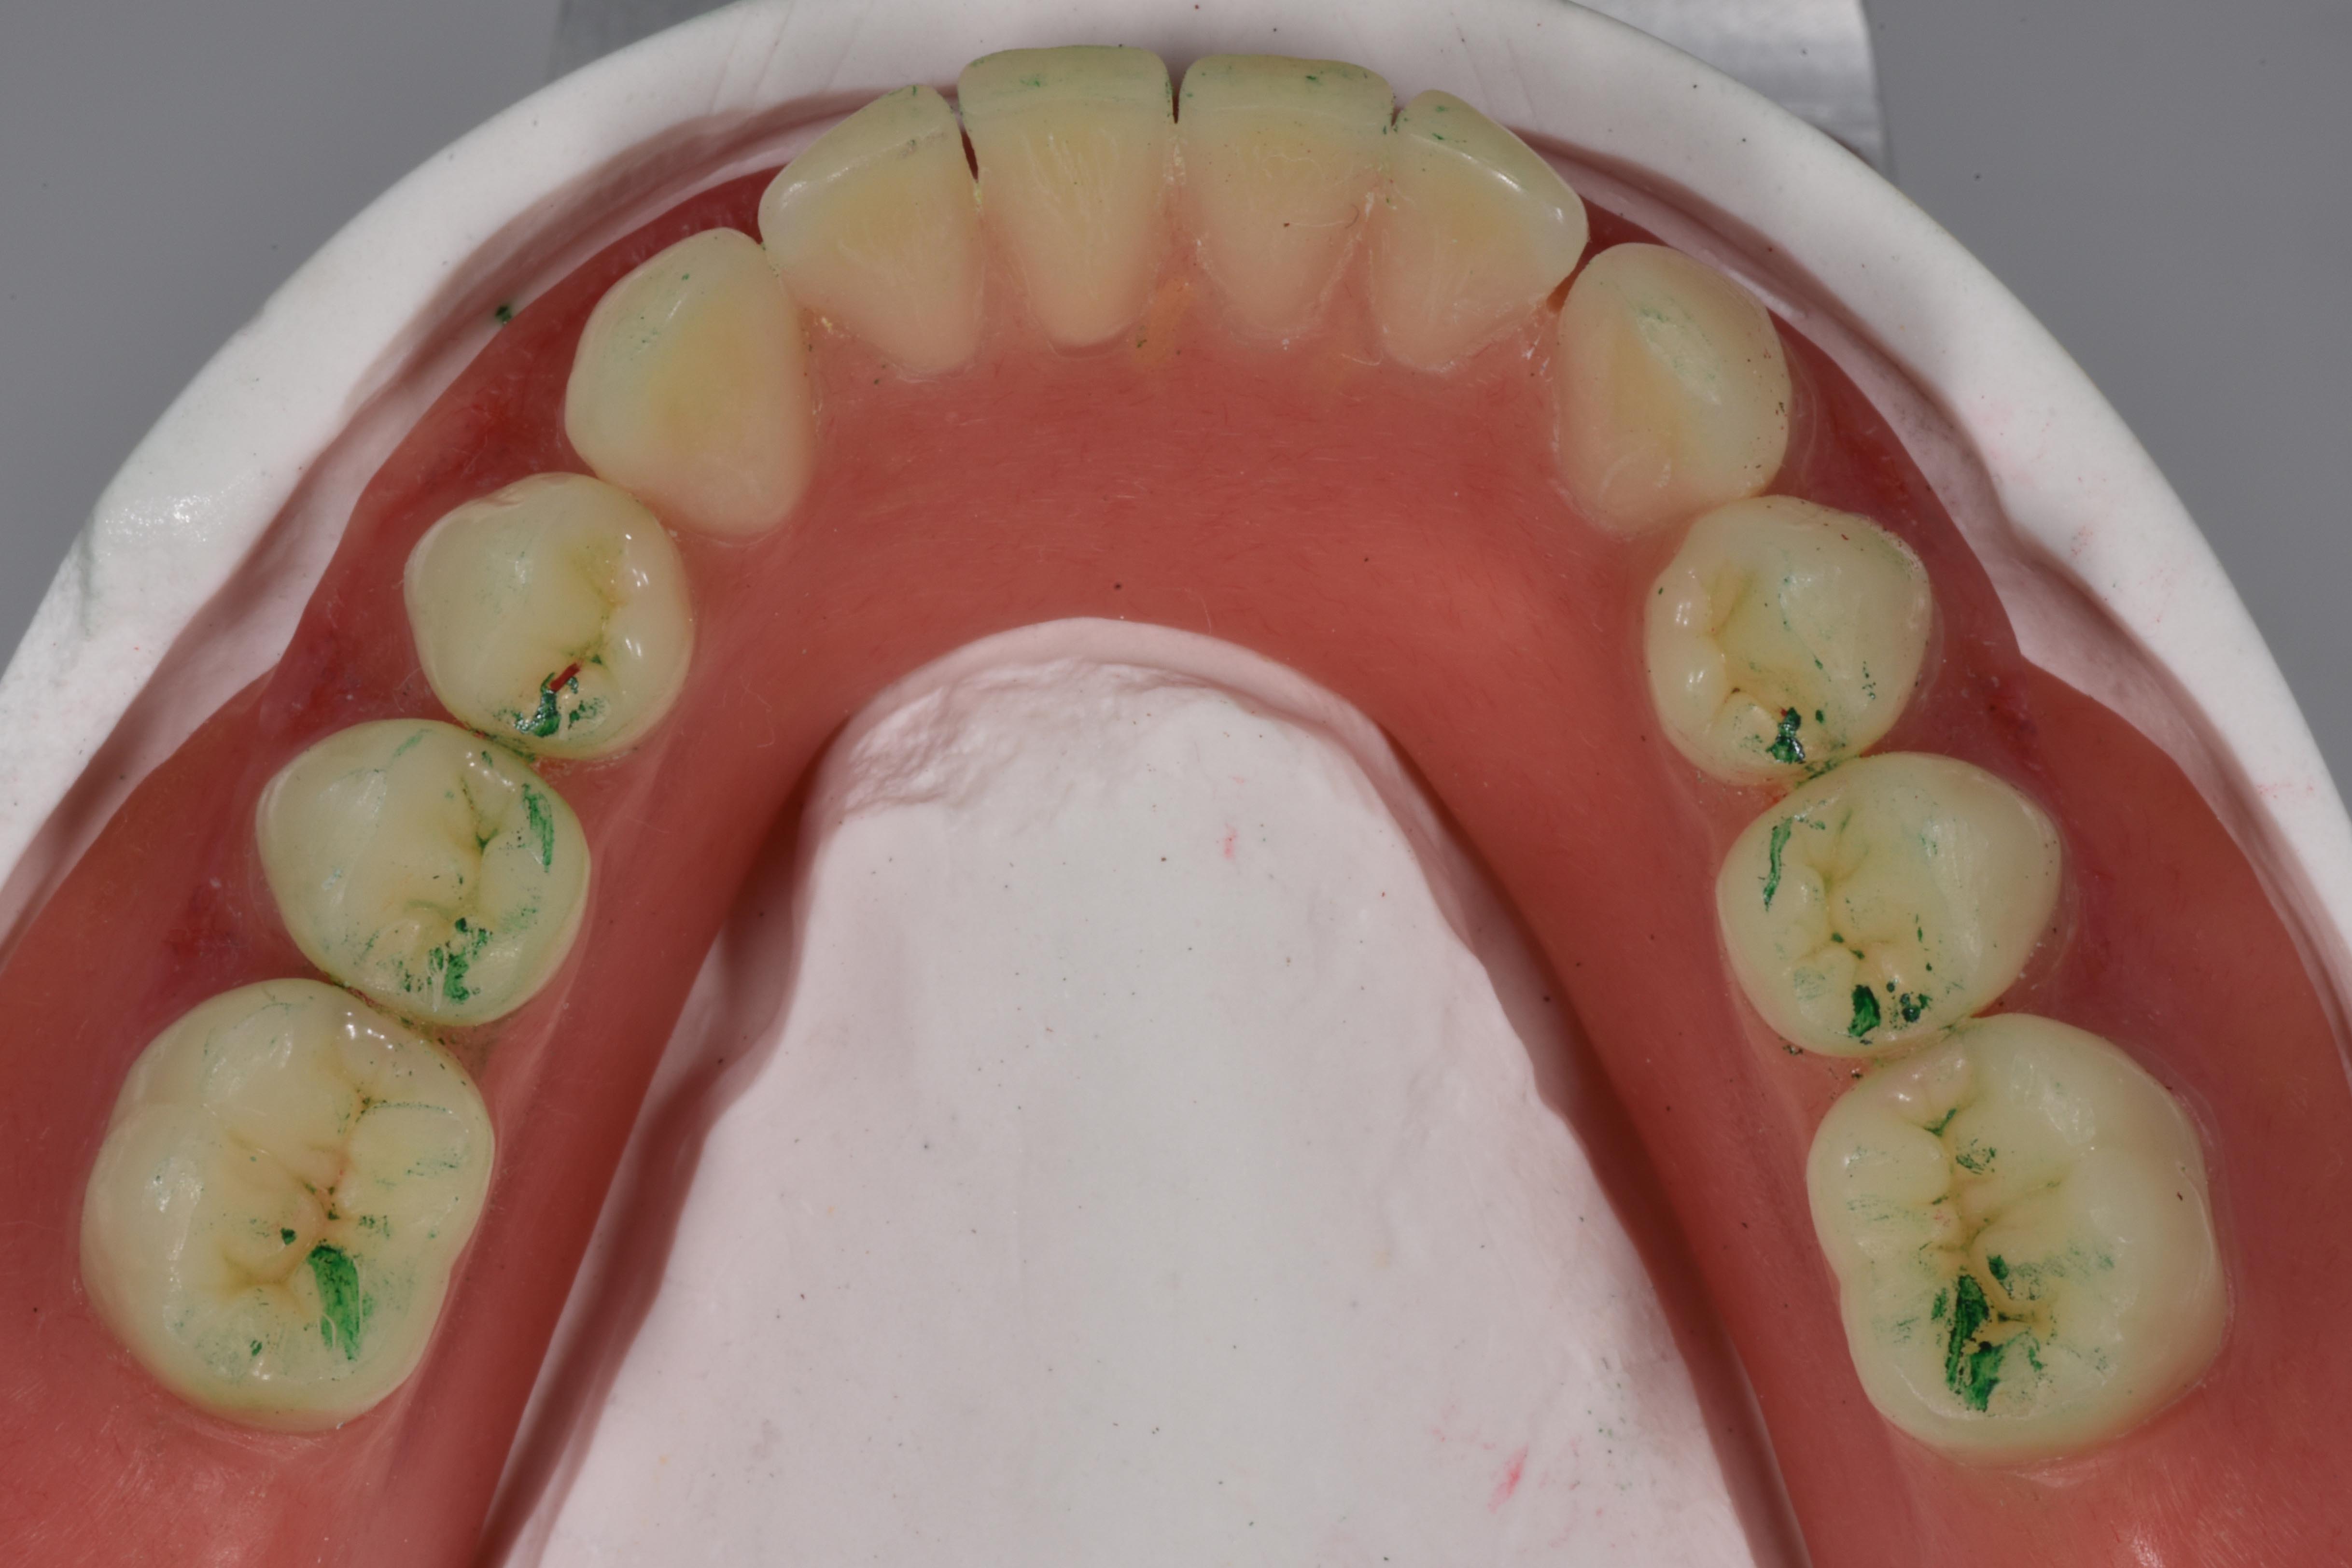
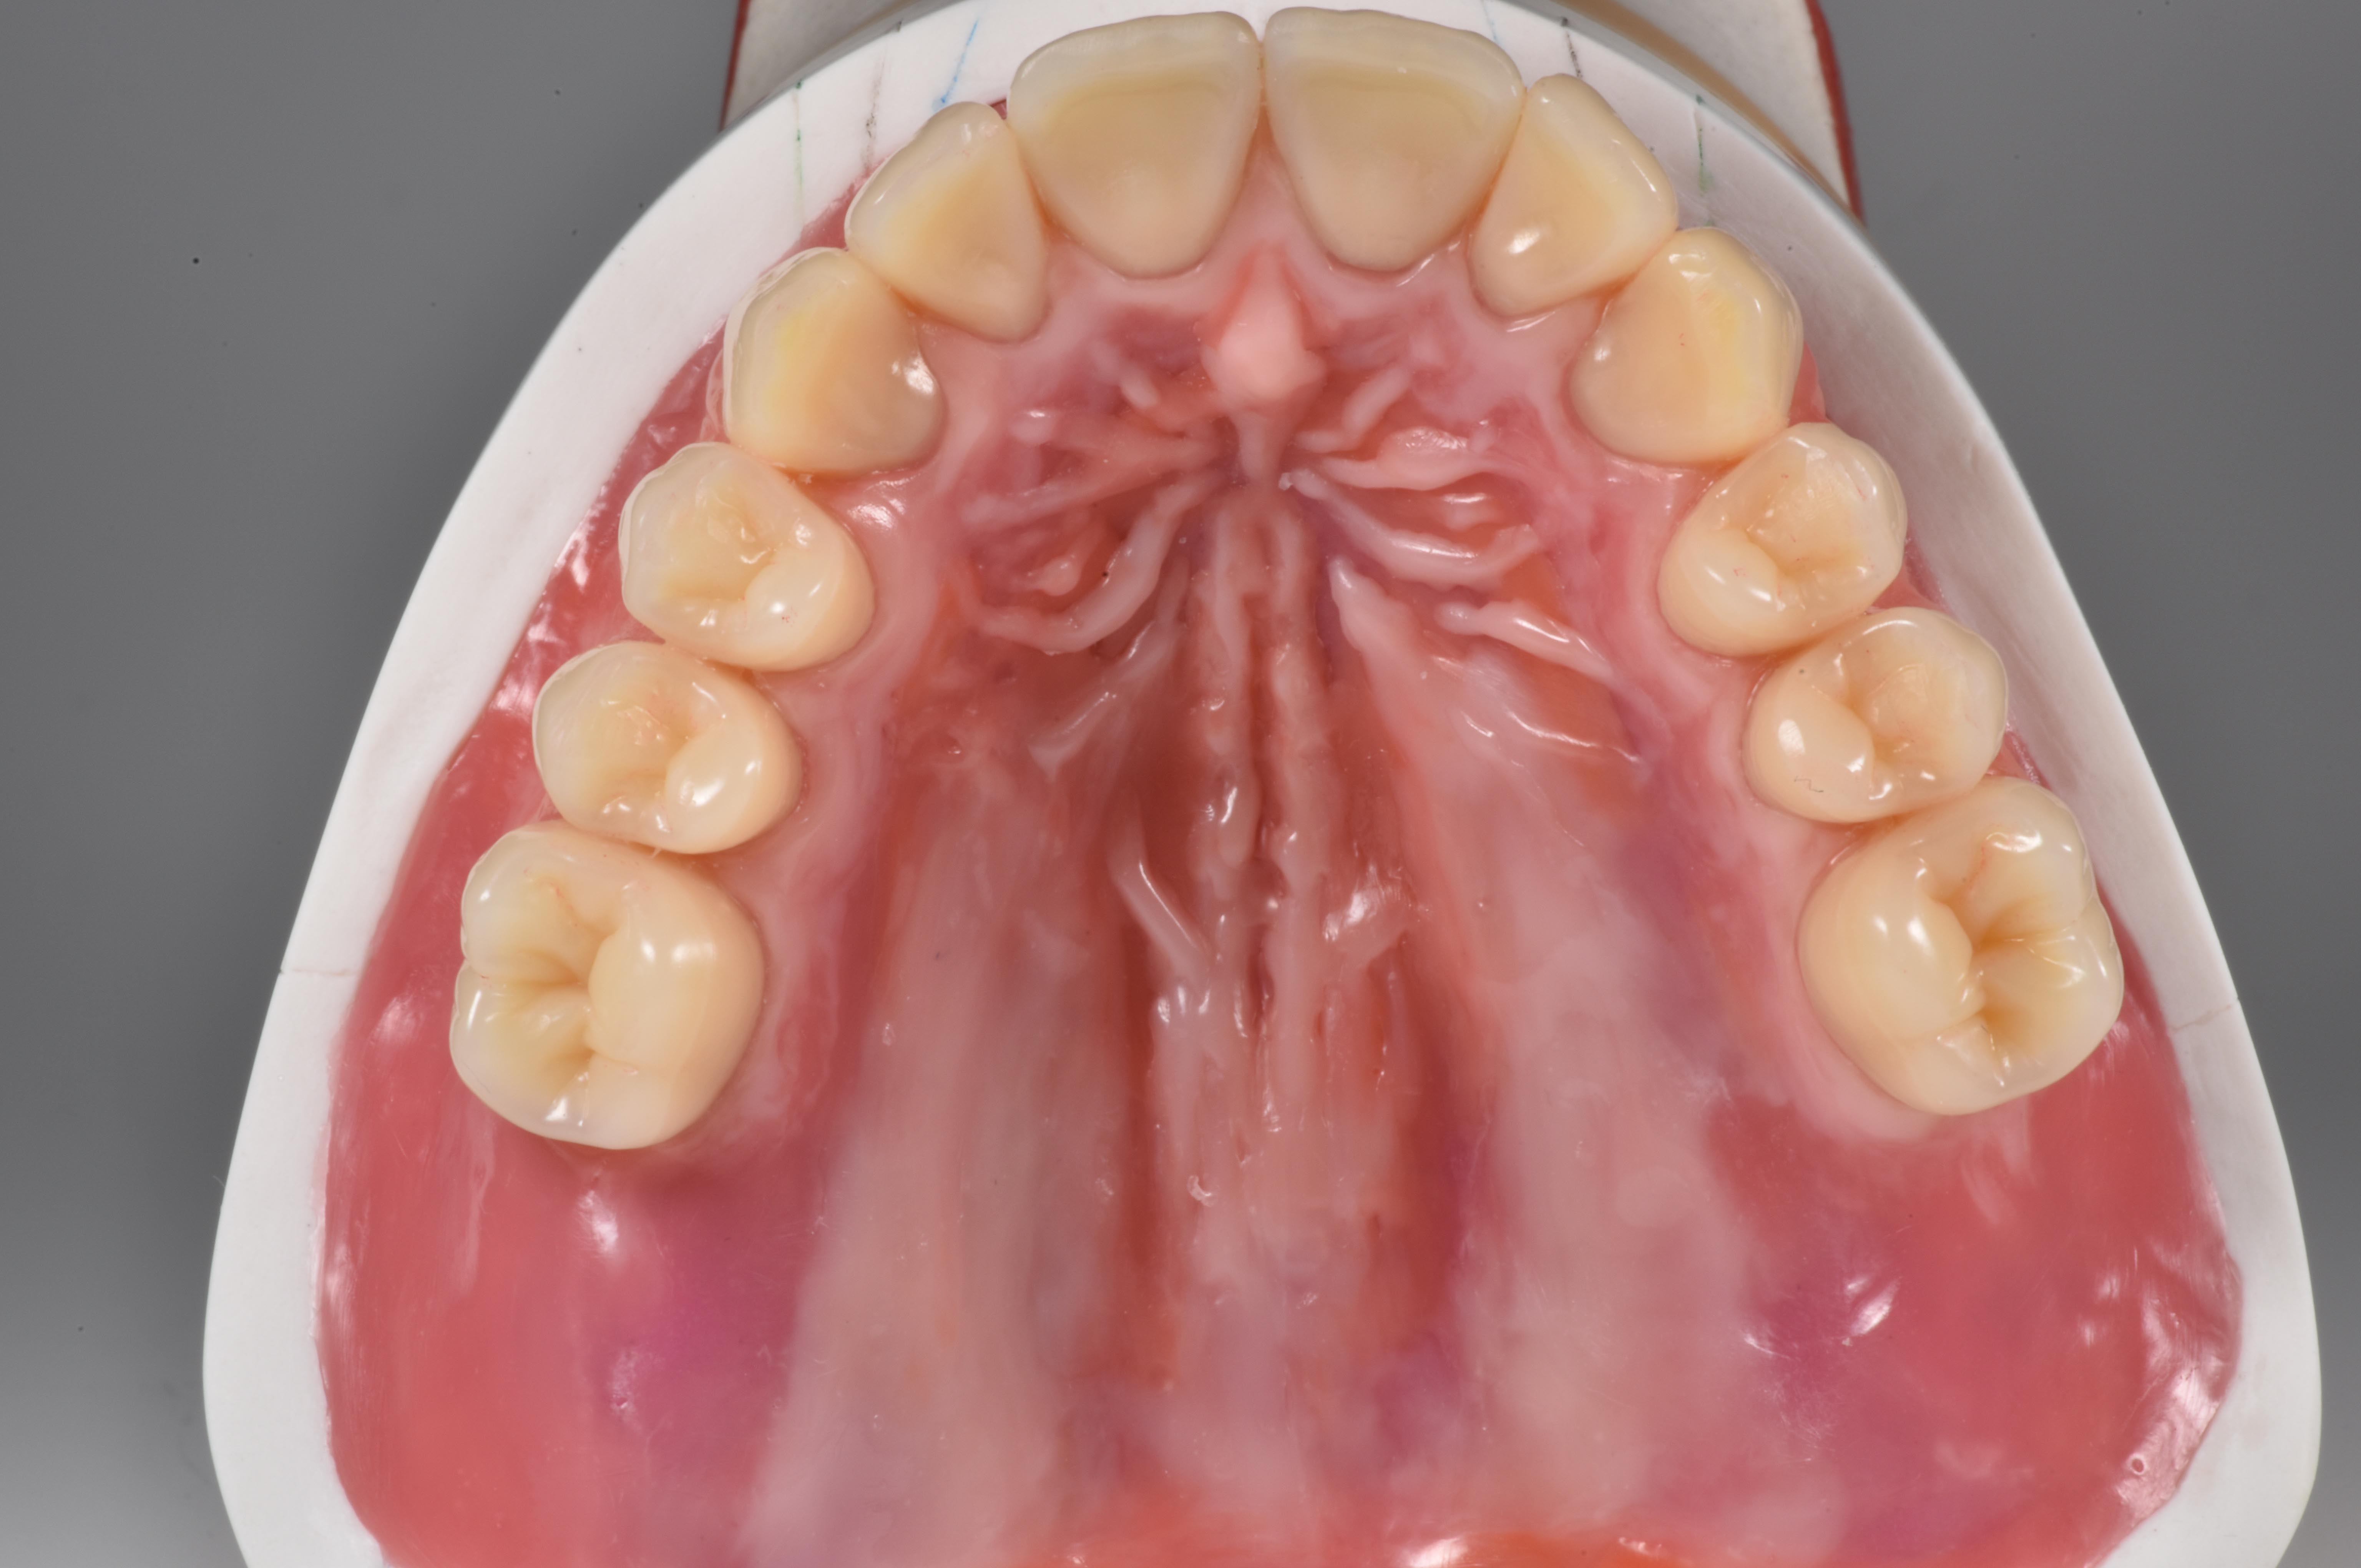
BonSelect TCRs in shape 04 and shade A3 were used in the posterior tooth region to match the PhysioSelect TCR line. Setup was performed according to the tooth-to-tooth occlusion concept (Fig. 18). In the mandible, attention was paid to ensuring that the central fissure of the posterior teeth was set up on the setup line (sagittal contour according to the model analysis). The stop line showed that there was insufficient space for teeth 37 and 47*, so they were dispensed with. The first molars in the mandible were set up at the lowest point in each case. The focus here was on buccal relief of the setup and interlocking occlusion. Overall, it was easy to realize the tooth-to-tooth occlusion. Cheek contact was checked repeatedly with the silicone key and the cross-section instrument (Fig. 19). A look at the palatal cusps of the posterior teeth in the maxilla provides information about the compensation curve (Fig. 20). A final check in the mandible was to establish whether the palatal cusps of the posterior teeth in the maxilla fitted optimally into the fossa of the antagonists (Fig. 21).
Static occlusion
As described during model assembly, the bite in the incisal area was elevated by 1 mm. This increased the vertical relation in the molar region by only about 0.5 mm. Based on the information on the minimum speaking distance with the interim denture (non-contact, large: 5 to 6 mm), it can be assumed that an increase by this amount would still allow for the minimum speaking distance without contact - which is common for the pronunciation of S sounds - and would therefore not have a negative influence on phonation. Positioning the contact points exactly on the alveolar ridge also ensured autonomous chewing stability. In the tooth-to-tooth setup, the supporting cusps were given particularly high priority. This concerns the palatal cusps of the second maxillary premolars as well as the mesio-palatal cusps of the first maxillary molars. These rest in the fossa of the respective antagonist (Figs. 22 and 23). Ideally, the contact point of the first premolars in the mandible is buccal. In this case, it was shifted to lingual, as it would otherwise have been impossible to achieve cheek contact according to the bite key. Reliable static occlusion could nevertheless be achieved.
Dynamic occlusion
The original objective was to avoid any contacts in the front during protrusion. As this plan was not feasible, sliding contacts were tolerated. Contacts which existed after grinding in the guides were reduced for this purpose. This was achieved palatally on the incisal edges of the anterior teeth of the maxilla as well as on the labial incisal edge of the anterior teeth of the mandible without any loss in anterior tooth length. For laterotrusion, perfect bilateral balancing was achieved on both the laterotrusion and mediotrusion sides with the posterior tooth guides (Figs. 24 and 25). Contacts during retrusion were designed to be as numerous and extensive as possible (Fig. 26).
Modeling
The final check of all contact points was followed by modeling the wax base. The shape was designed on the basis of information obtained during the model analysis. Accordingly, the morphology of the surfaces was designed as natural as possible (Figs. 27 to 30). It is worth investing ample time in this step, as it makes final finishing of the denture much easier.
Denture design and finishing
From own experience, the subsequent work step - resin processing - has considerable influence on the successful outcome of treatment. With correct processing, a dental technician can create the necessary conditions for high surface quality, thus making an important contribution to the longevity of the resulting dentures. This is not only important for the long-term satisfaction of patients, but also for one's own conscience.
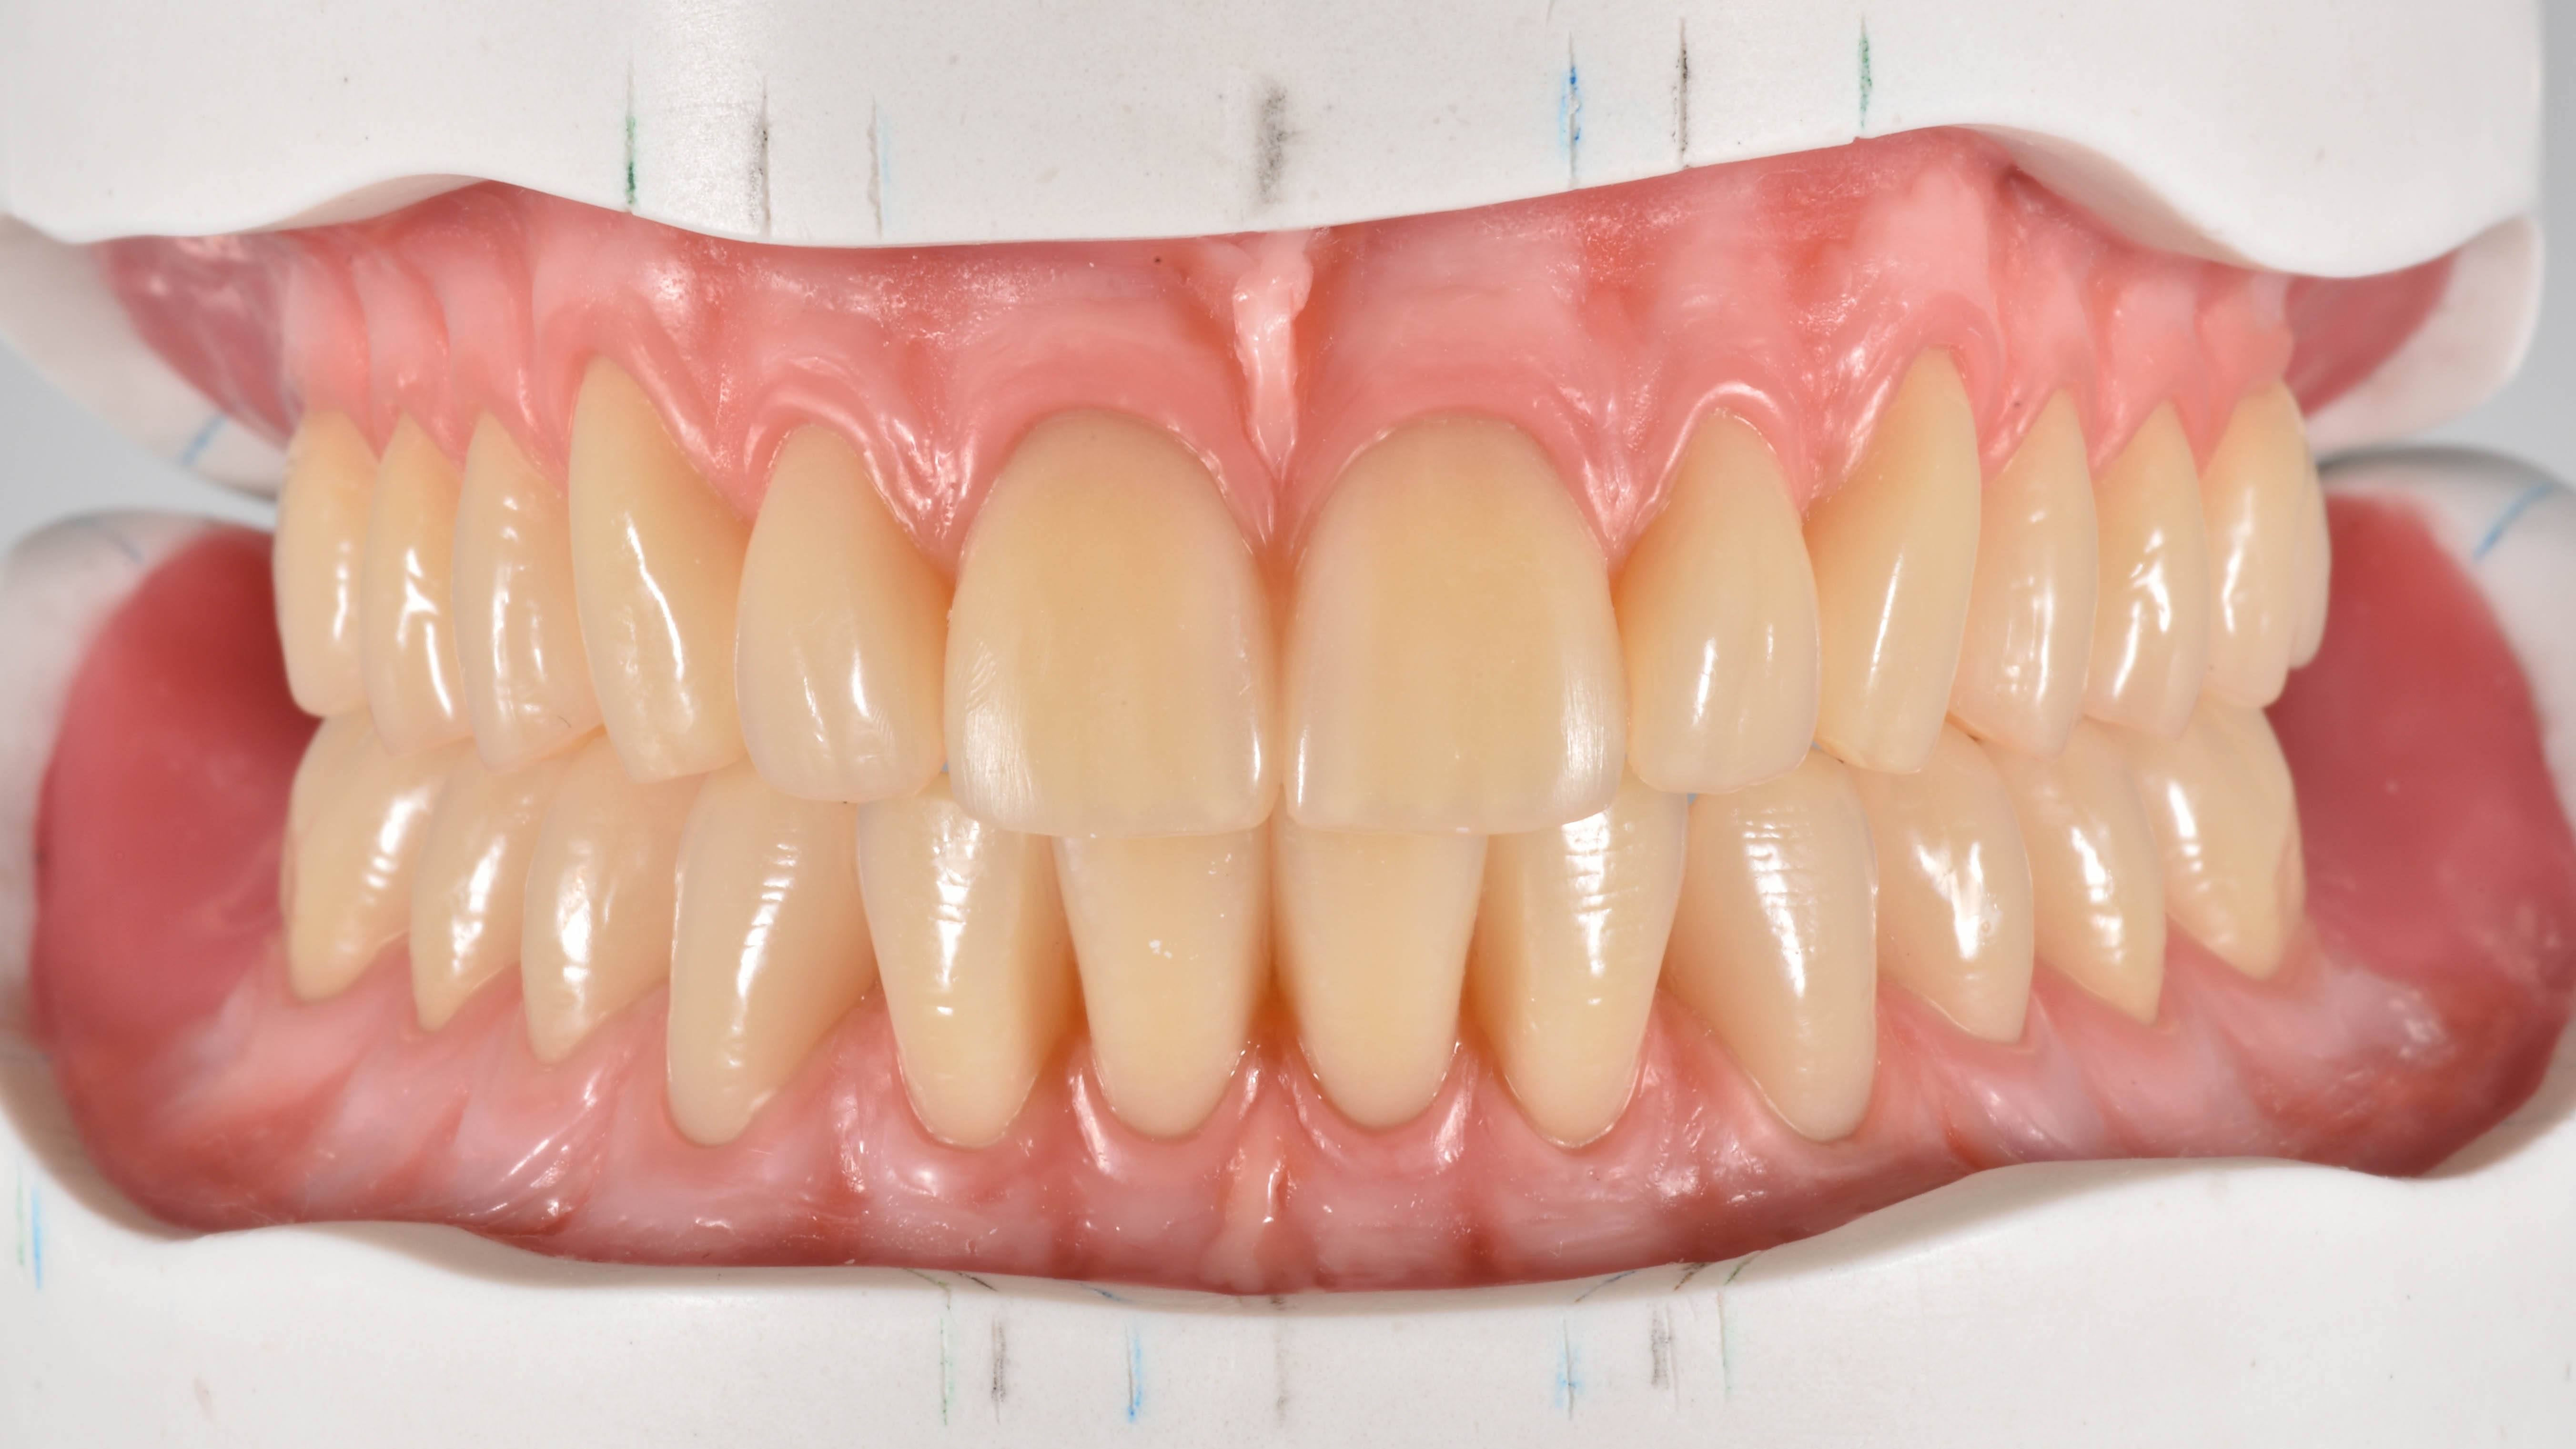
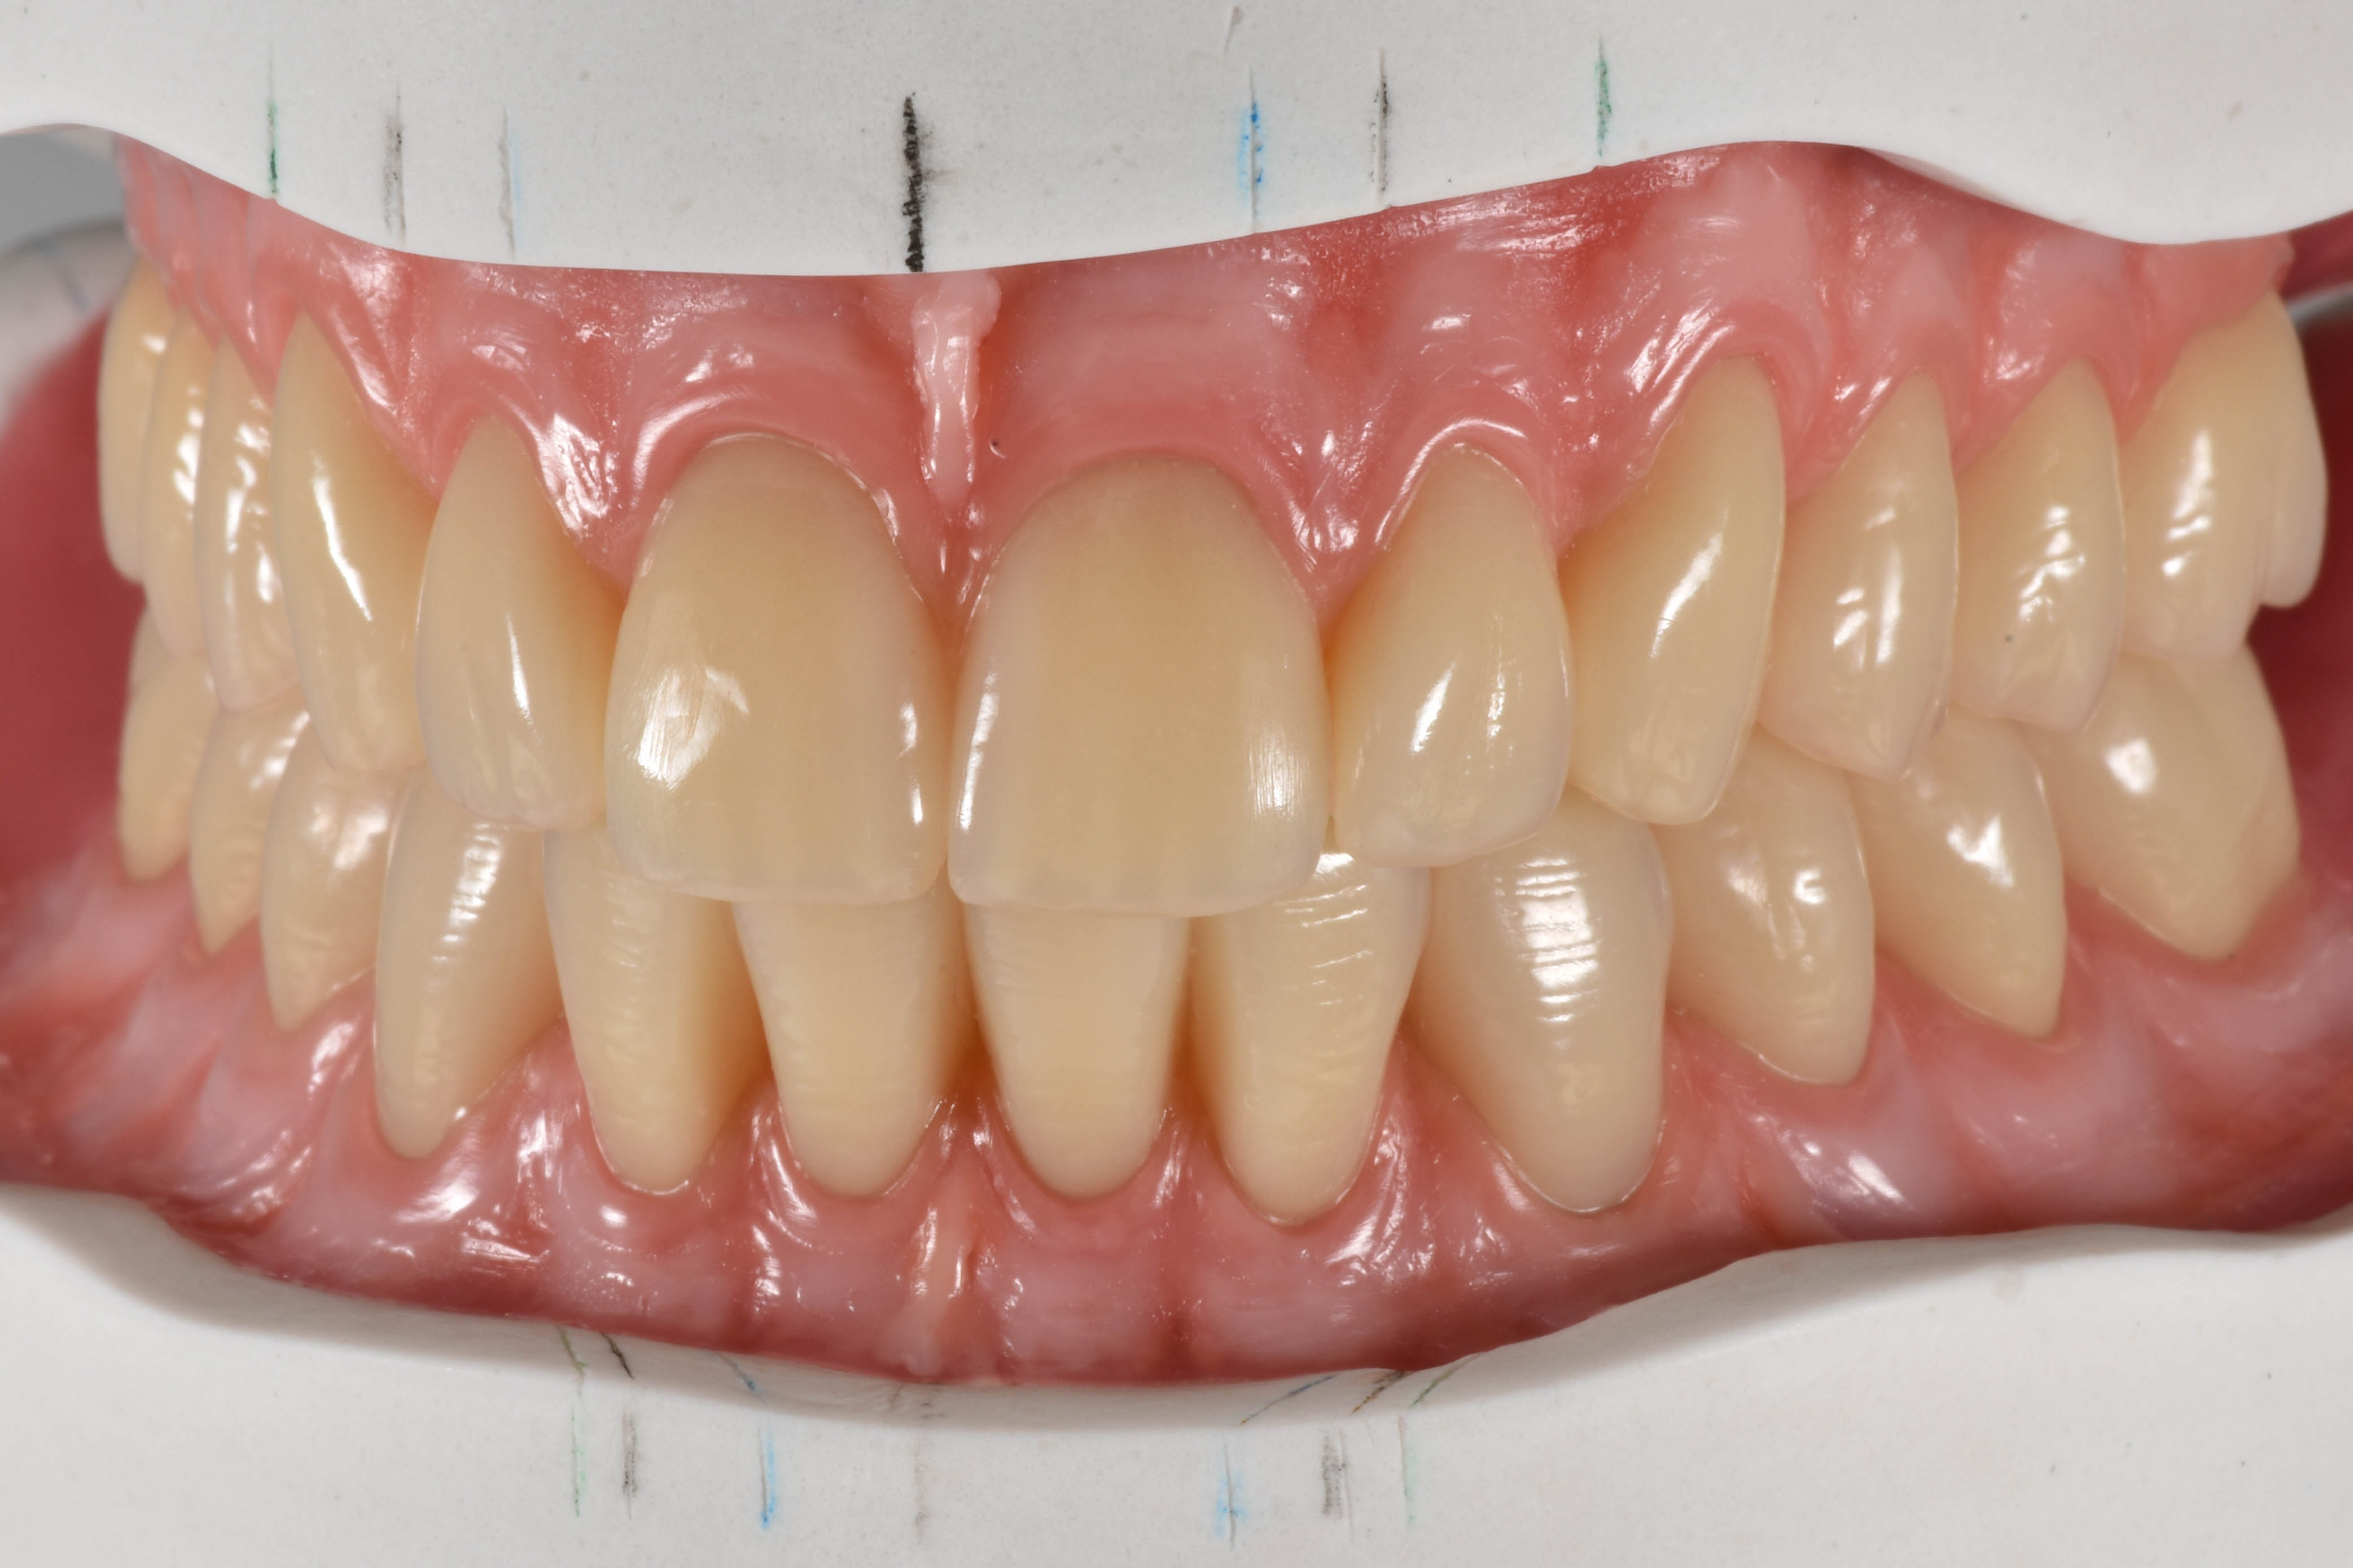
In the present case, the final, mucosa-supported full dentures were fabricated using the flask press technique (Figs. 31 to 33). The dentures were embedded in flasks and pressed. PMMA was used for the subsequent characterization instead of composite. The selected resin teeth did not require any additional milled retentions and were only blasted cervically in the areas that were covered with pink resin.
When finishing the dentures, it became apparent how high the quality of the materials used by the Candulor company are. They allow reaching a level of quality and esthetics that seems unattainable in a digital workflow in my estimation. Figures 34 to 38 show the completed dentures.

Fig. 31: Model in the flask.
Fig. 32: Silicone key produced via the wax-up.
Fig. 33: Basal view of the embedded silicone key with denture teeth.
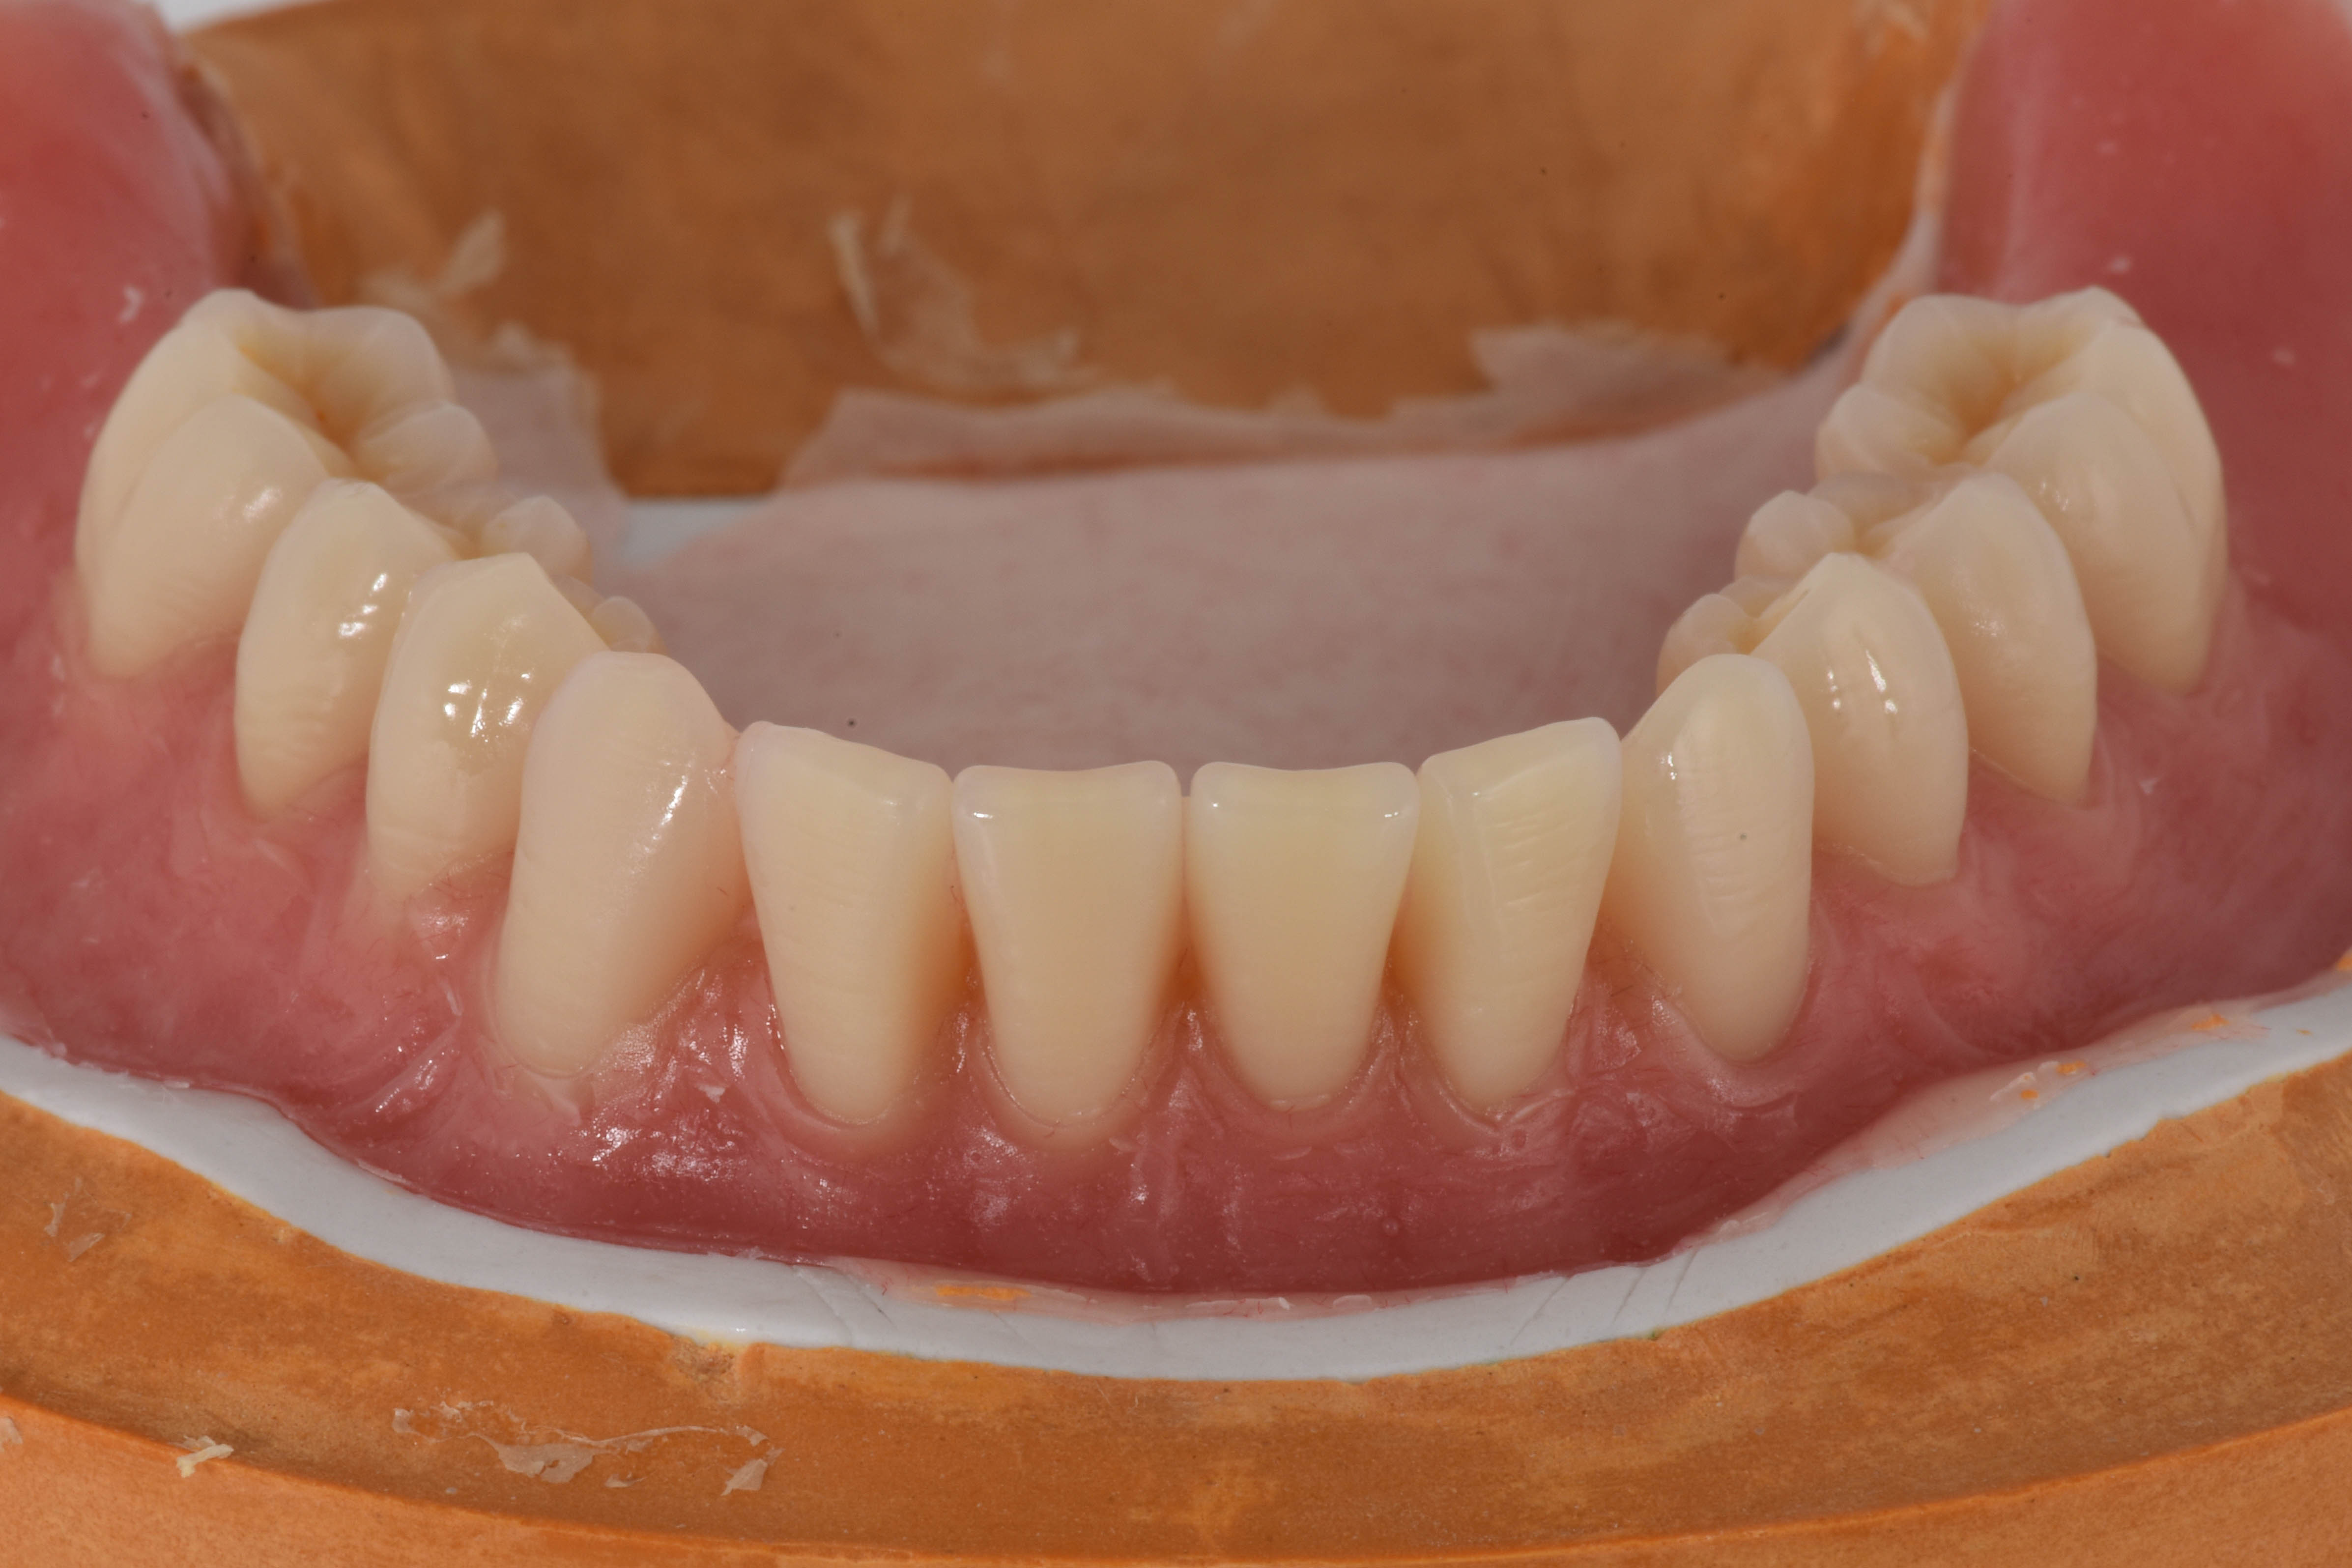
Fig. 34: Mandibular denture in the flask.
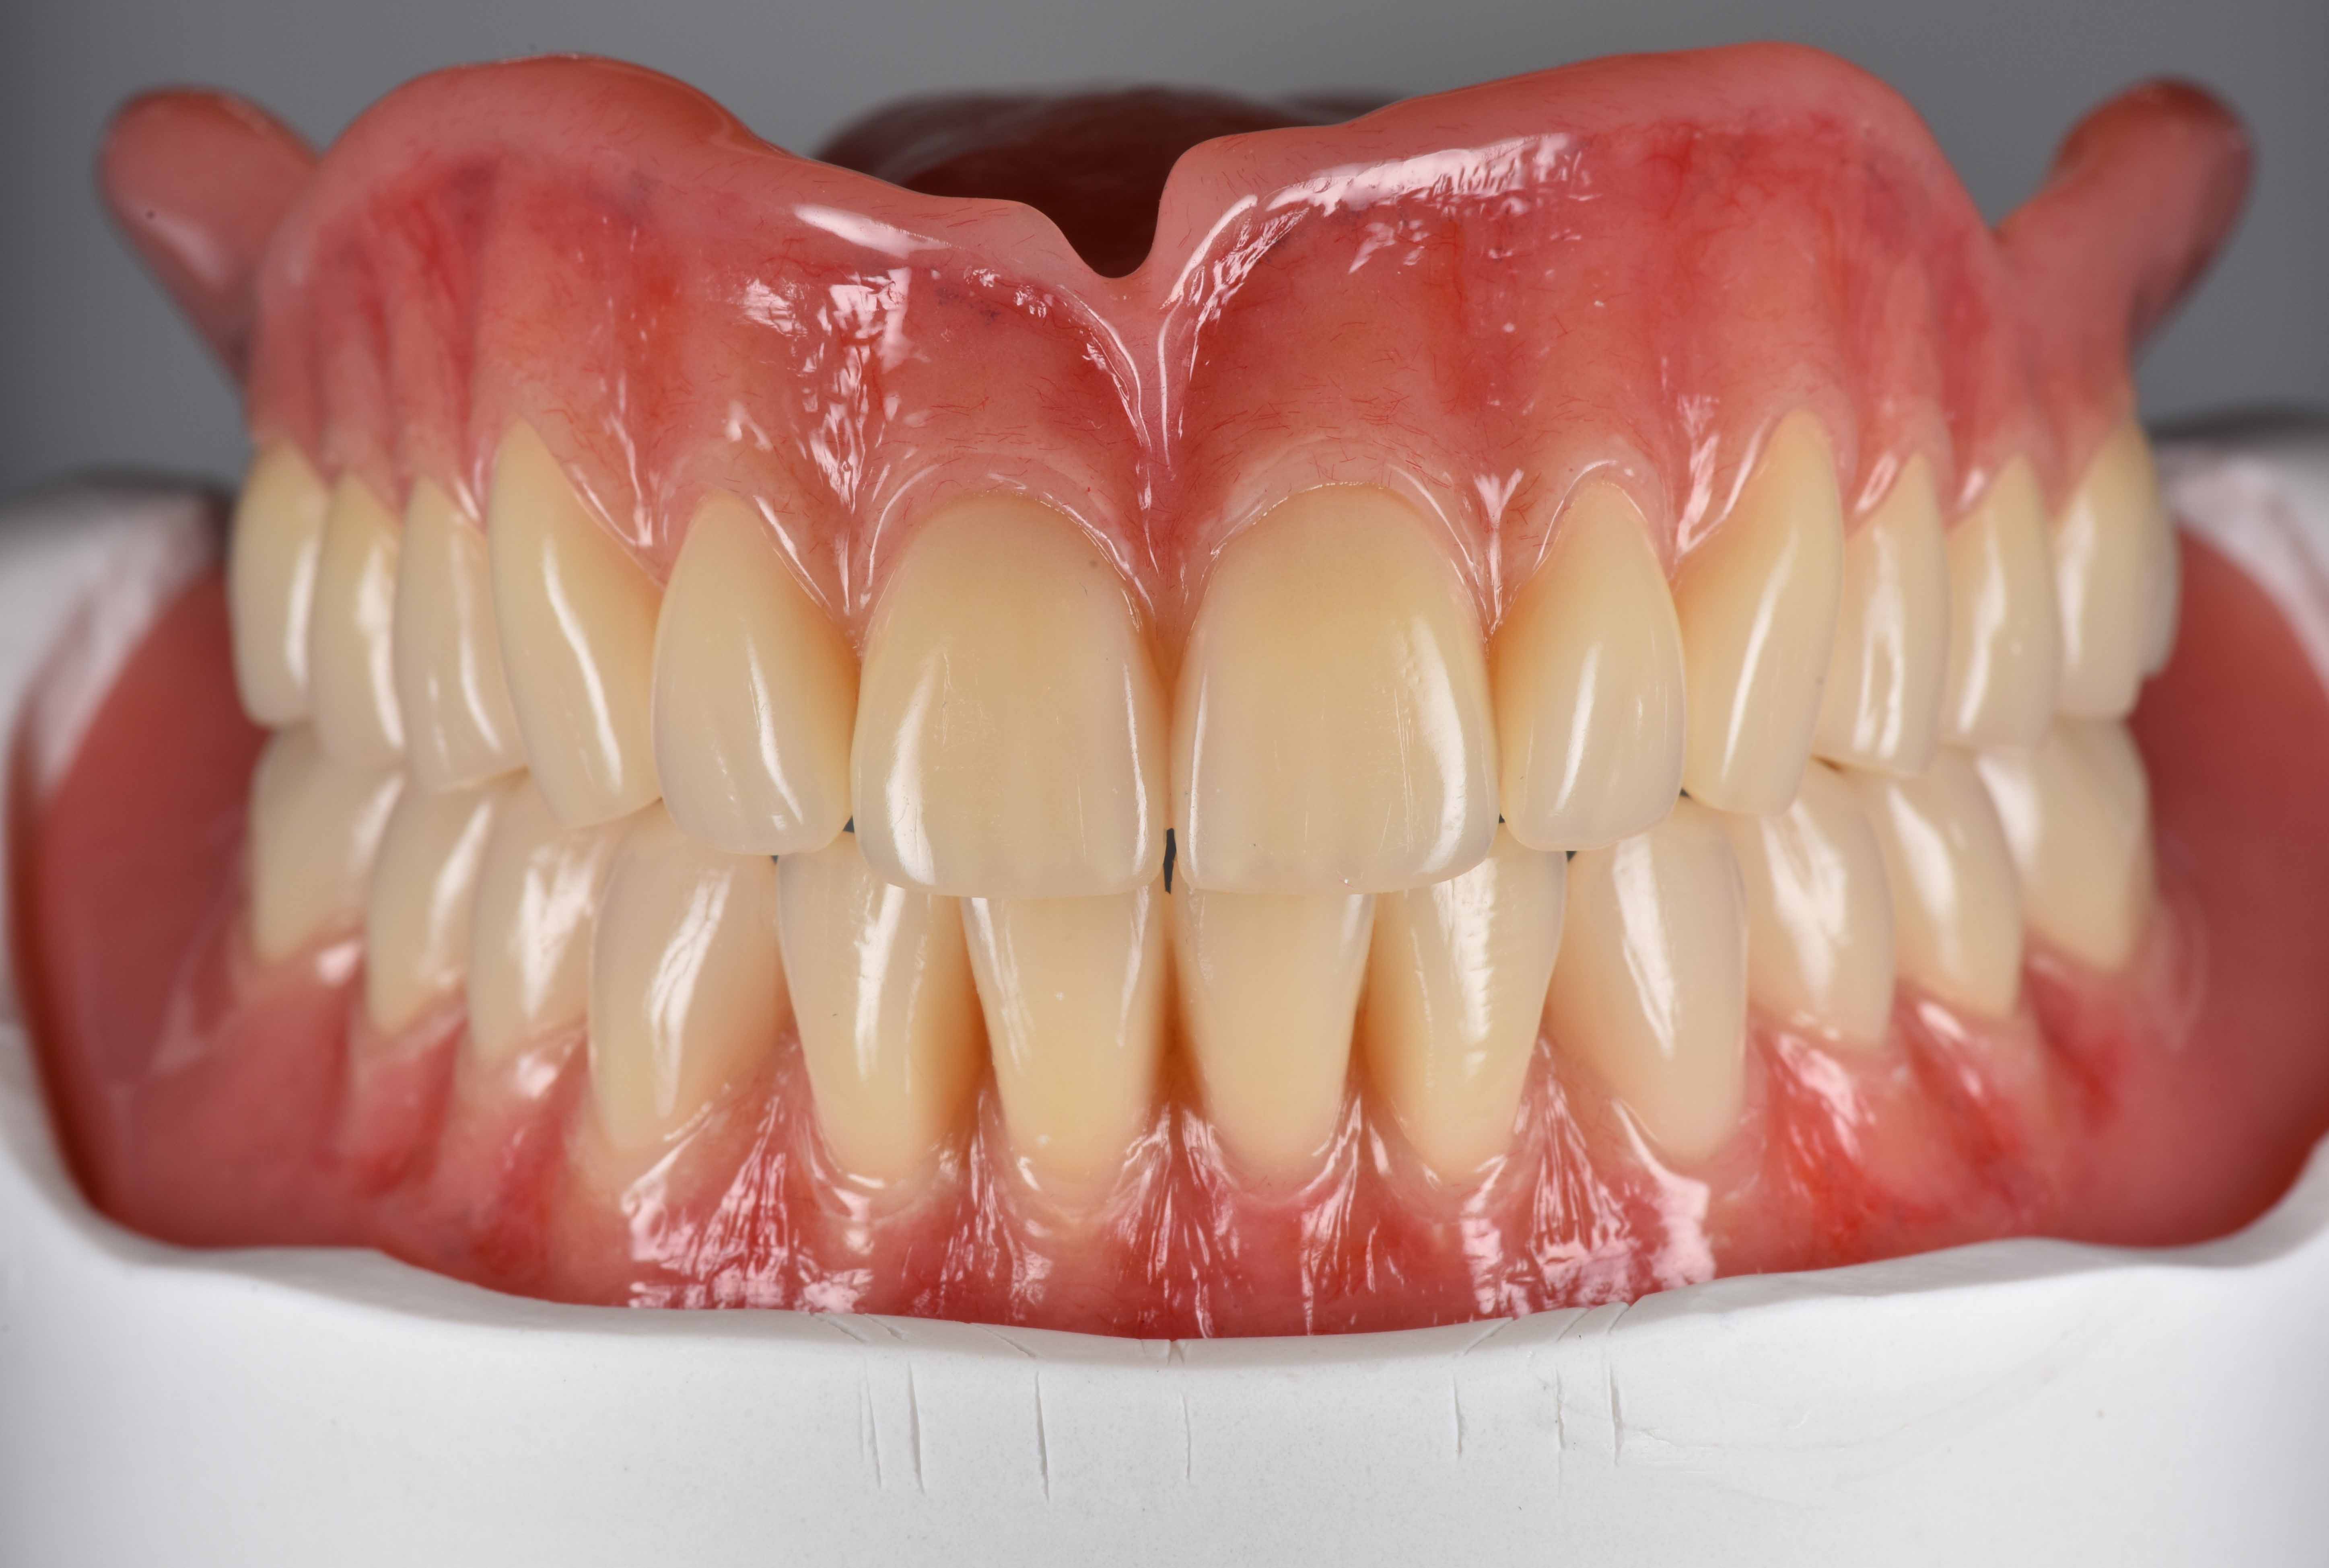
Fig. 35: Frontal view of the completed maxillary and mandibular full denture on the mandibular model.
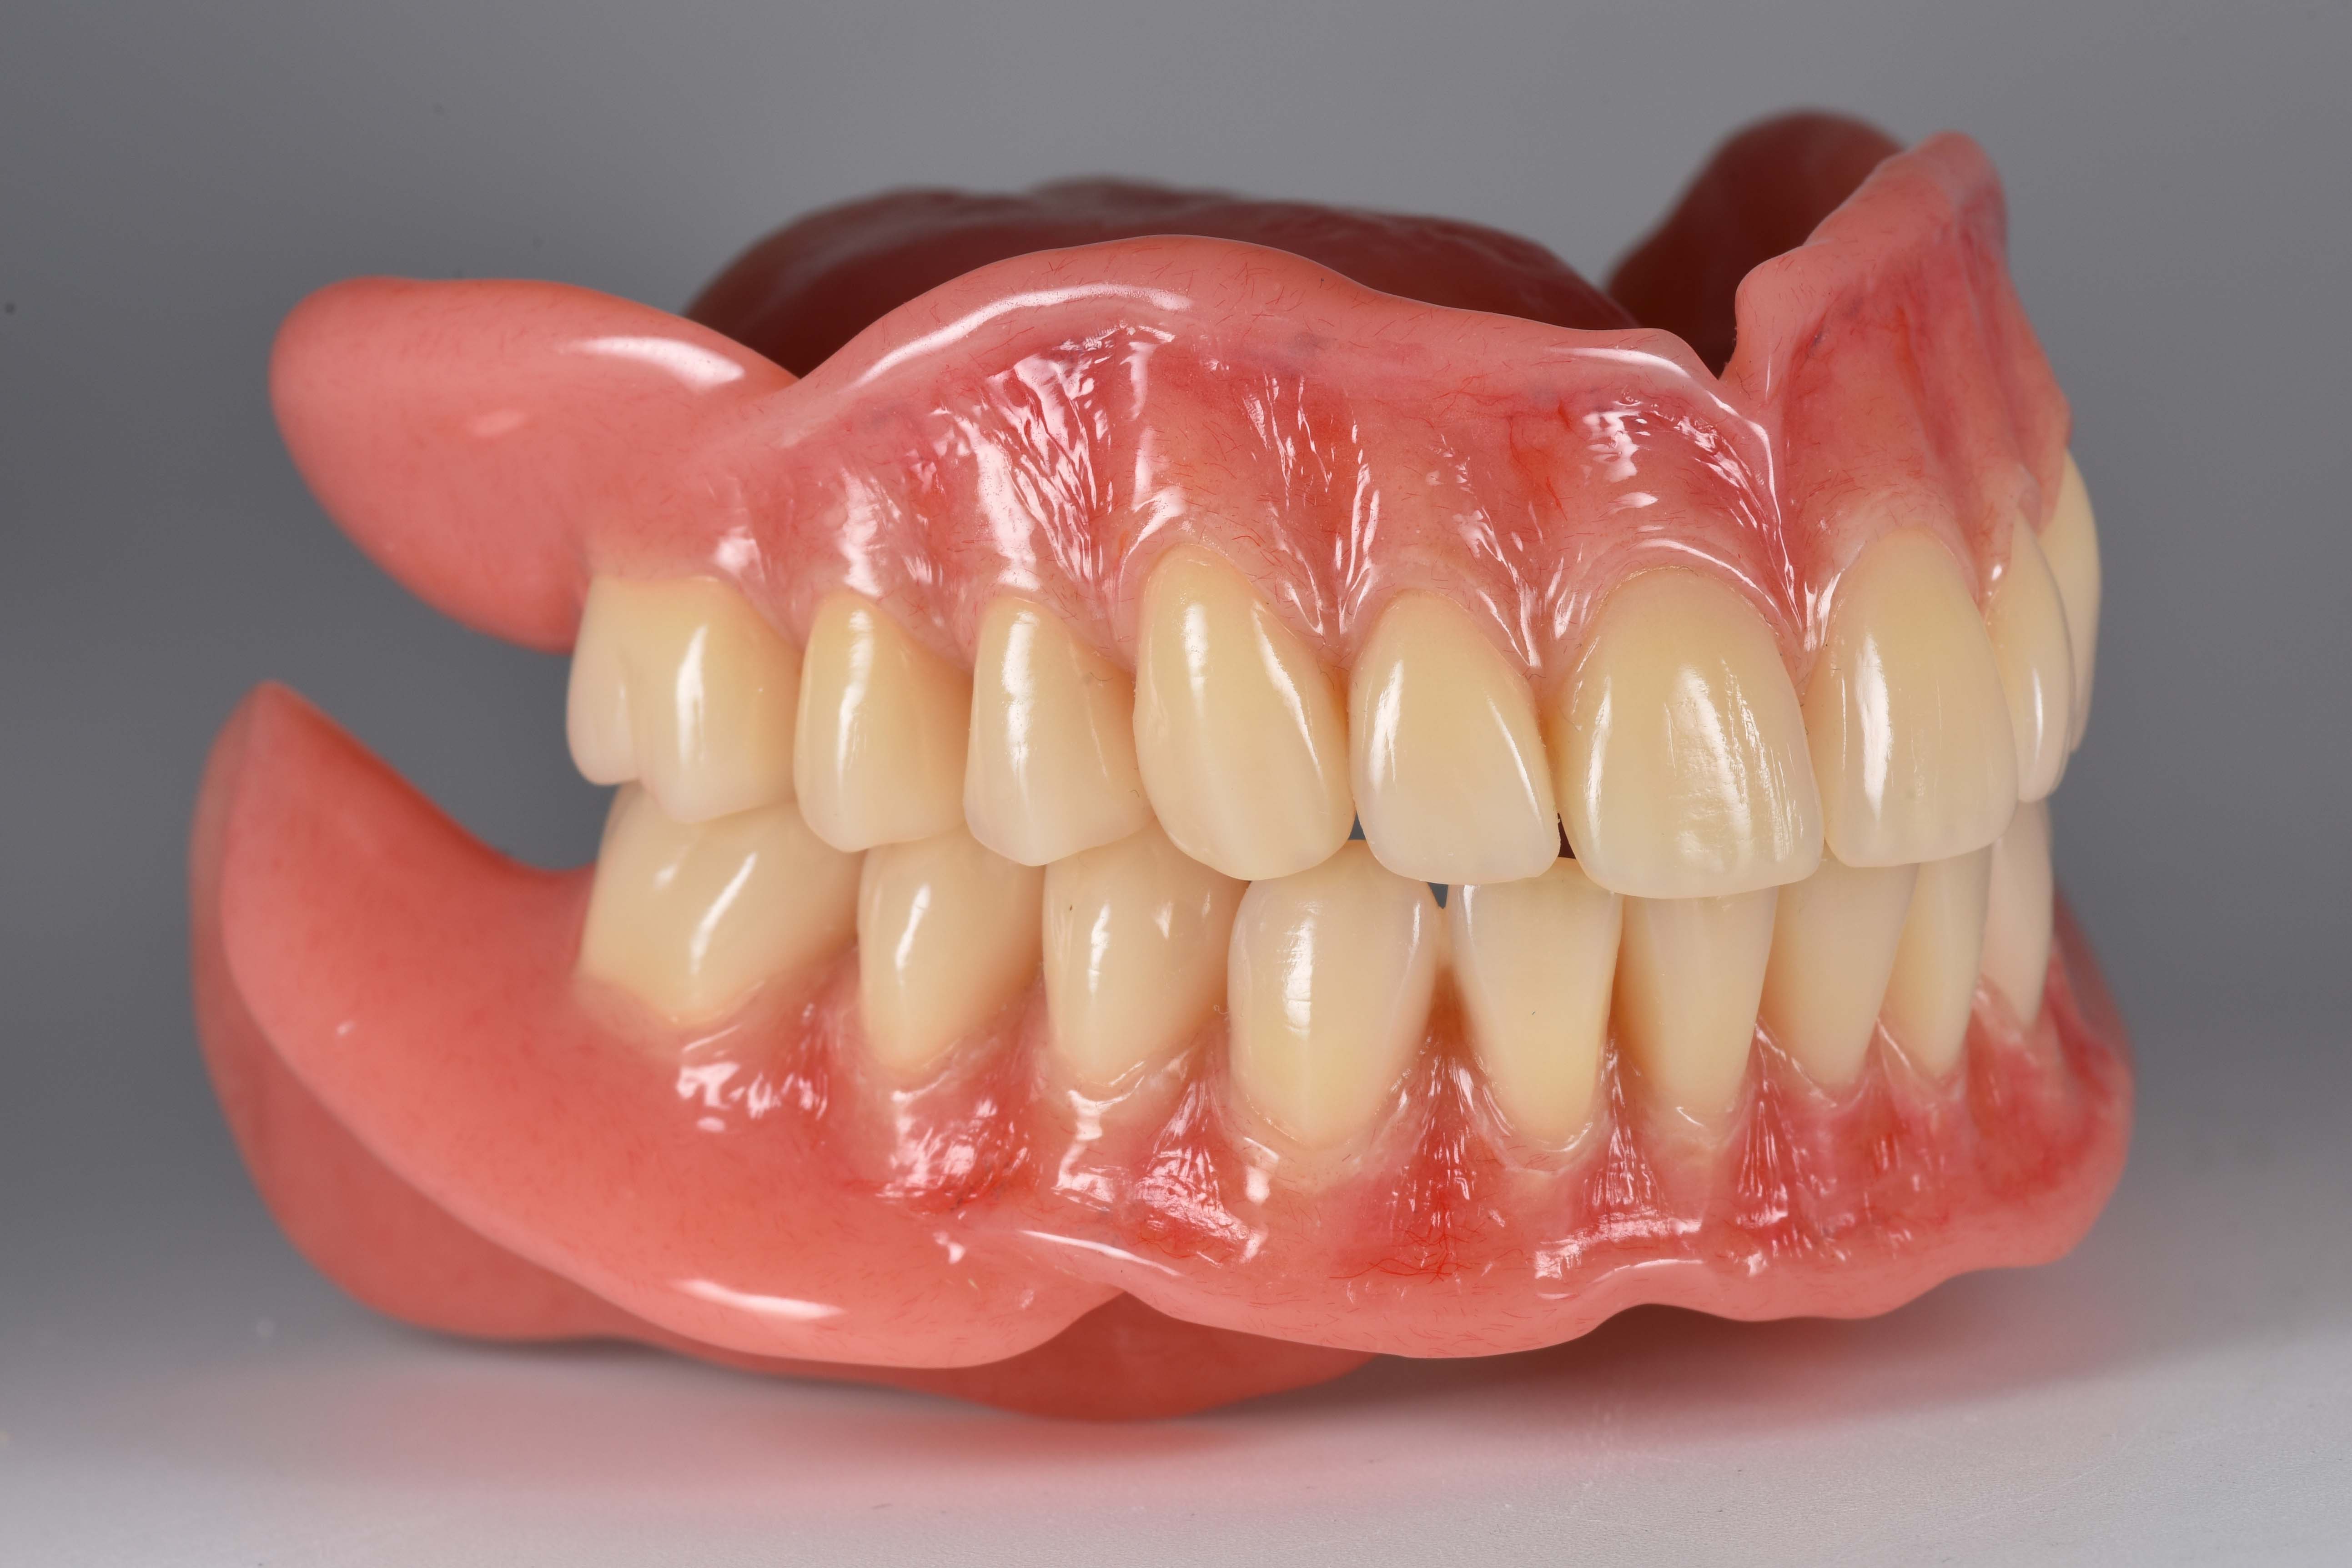
Fig. 36: Lateral …
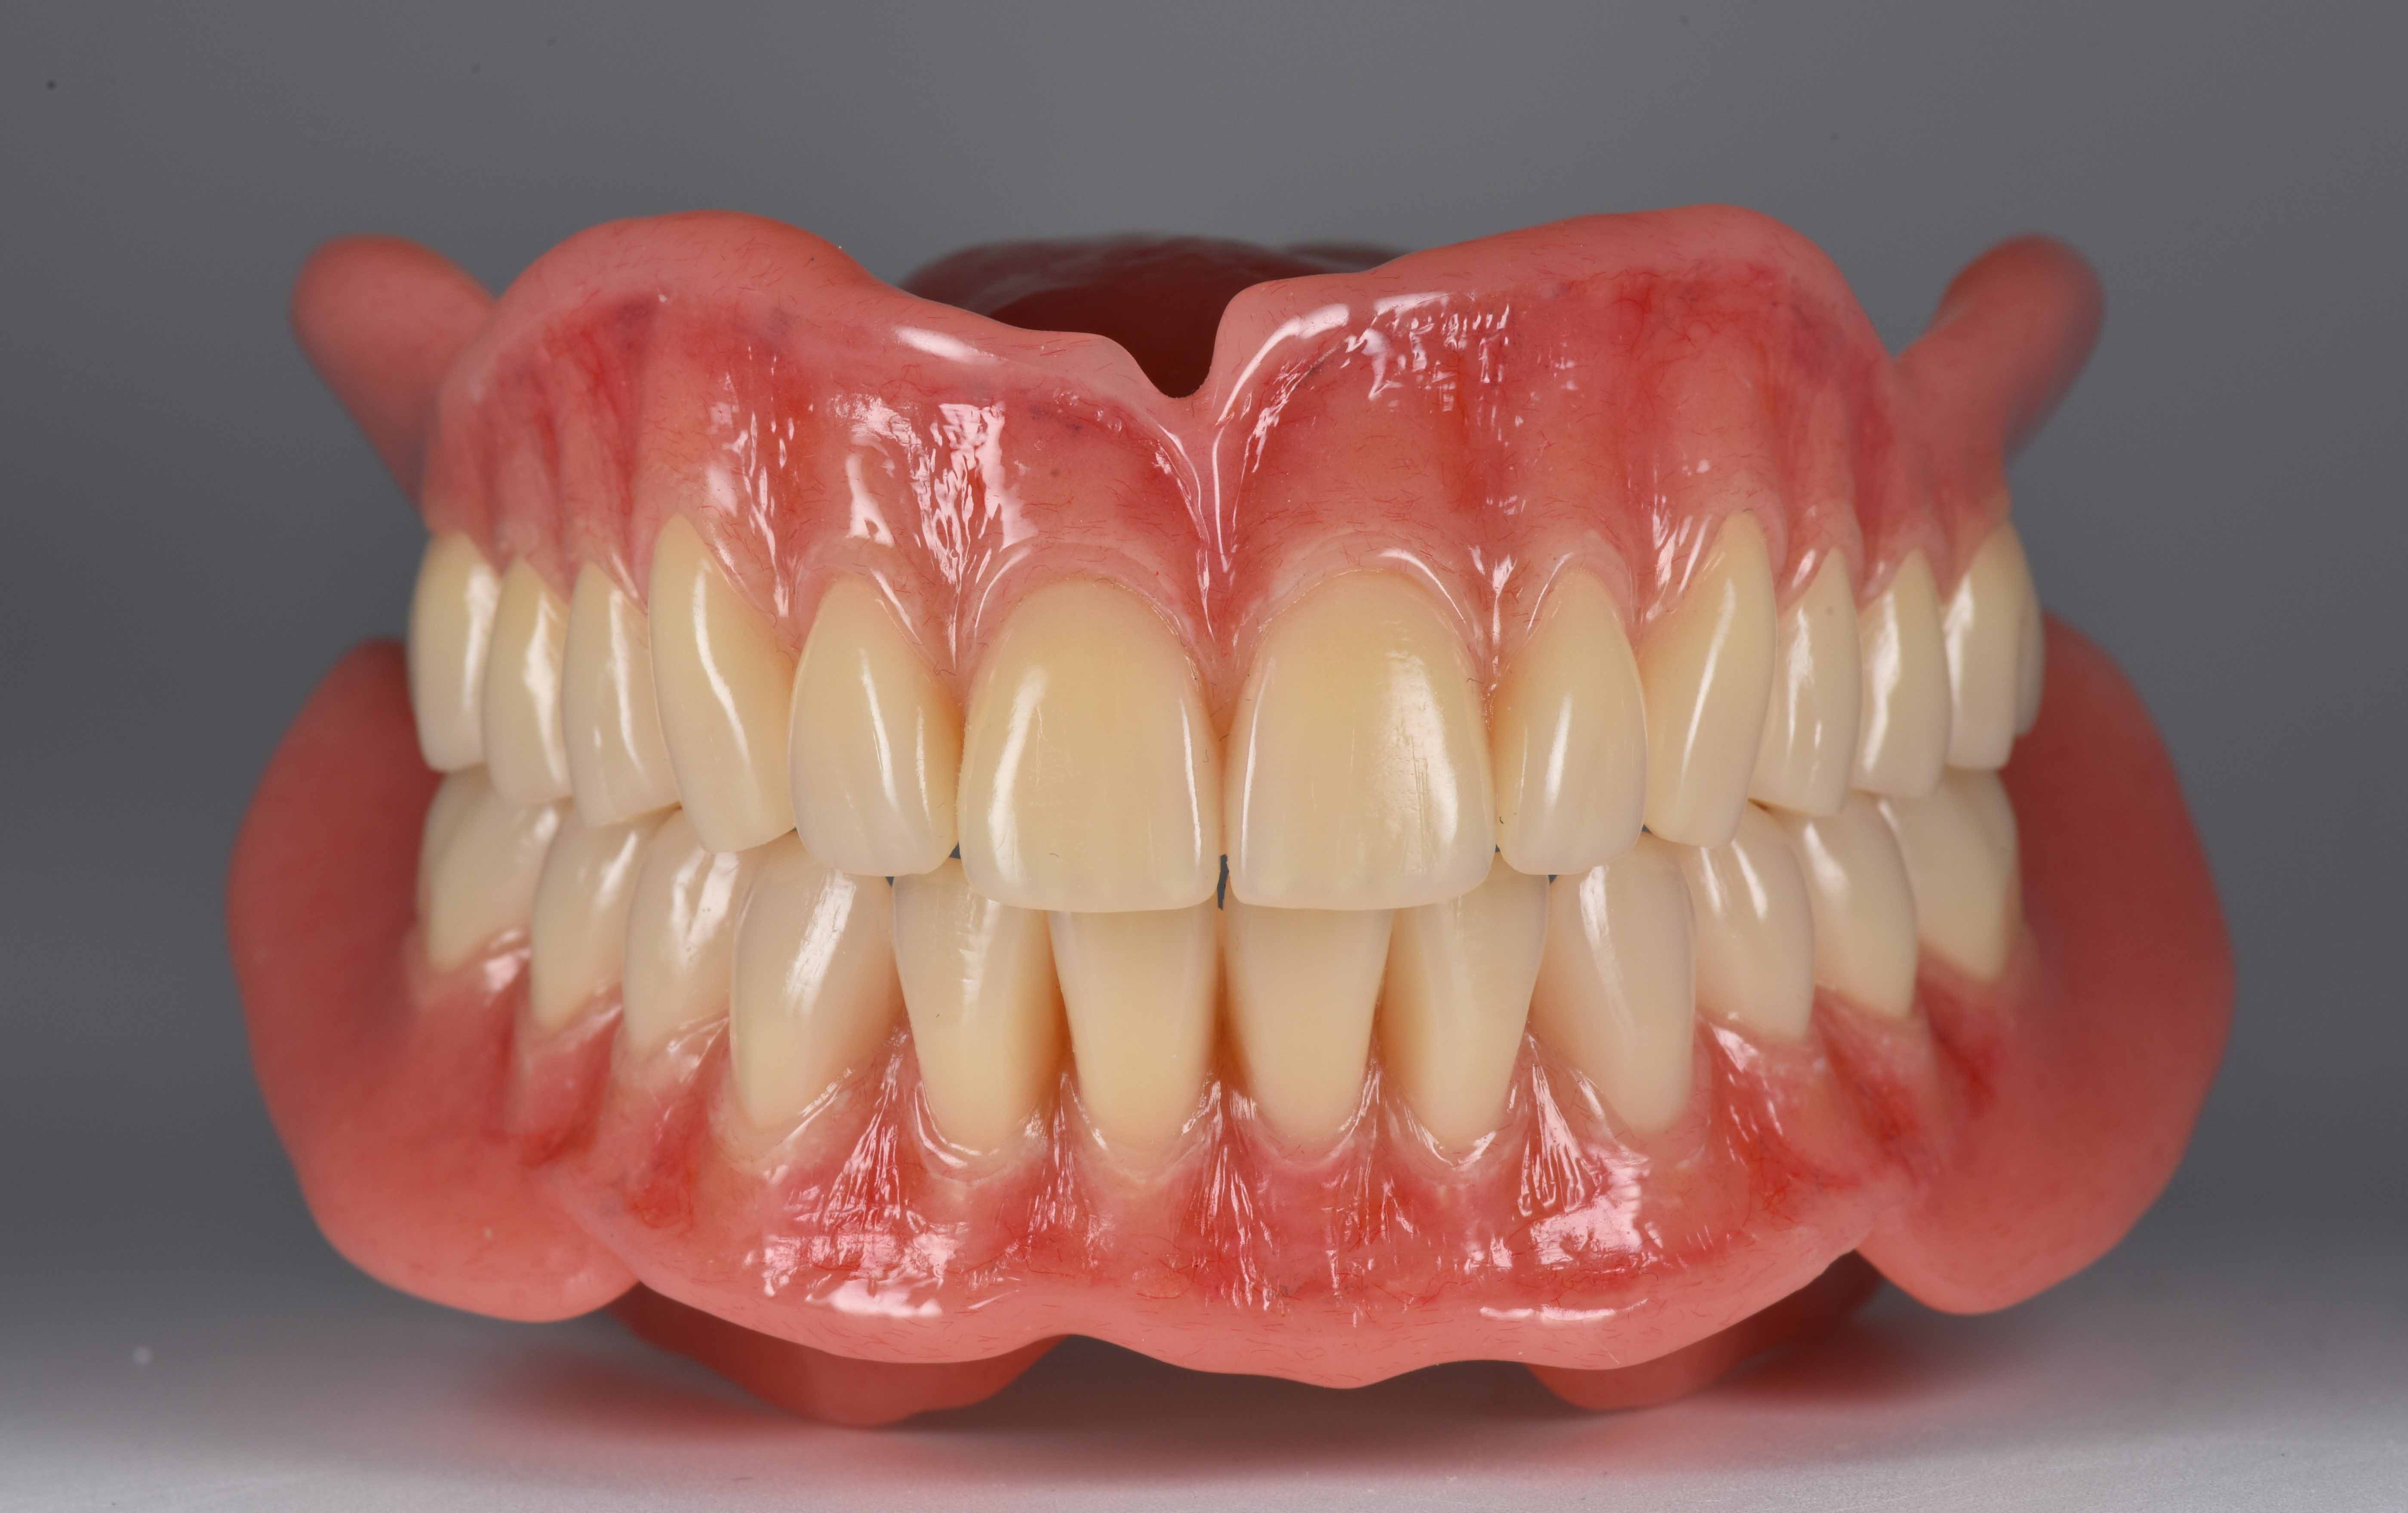
Fig. 37: … and frontal views …
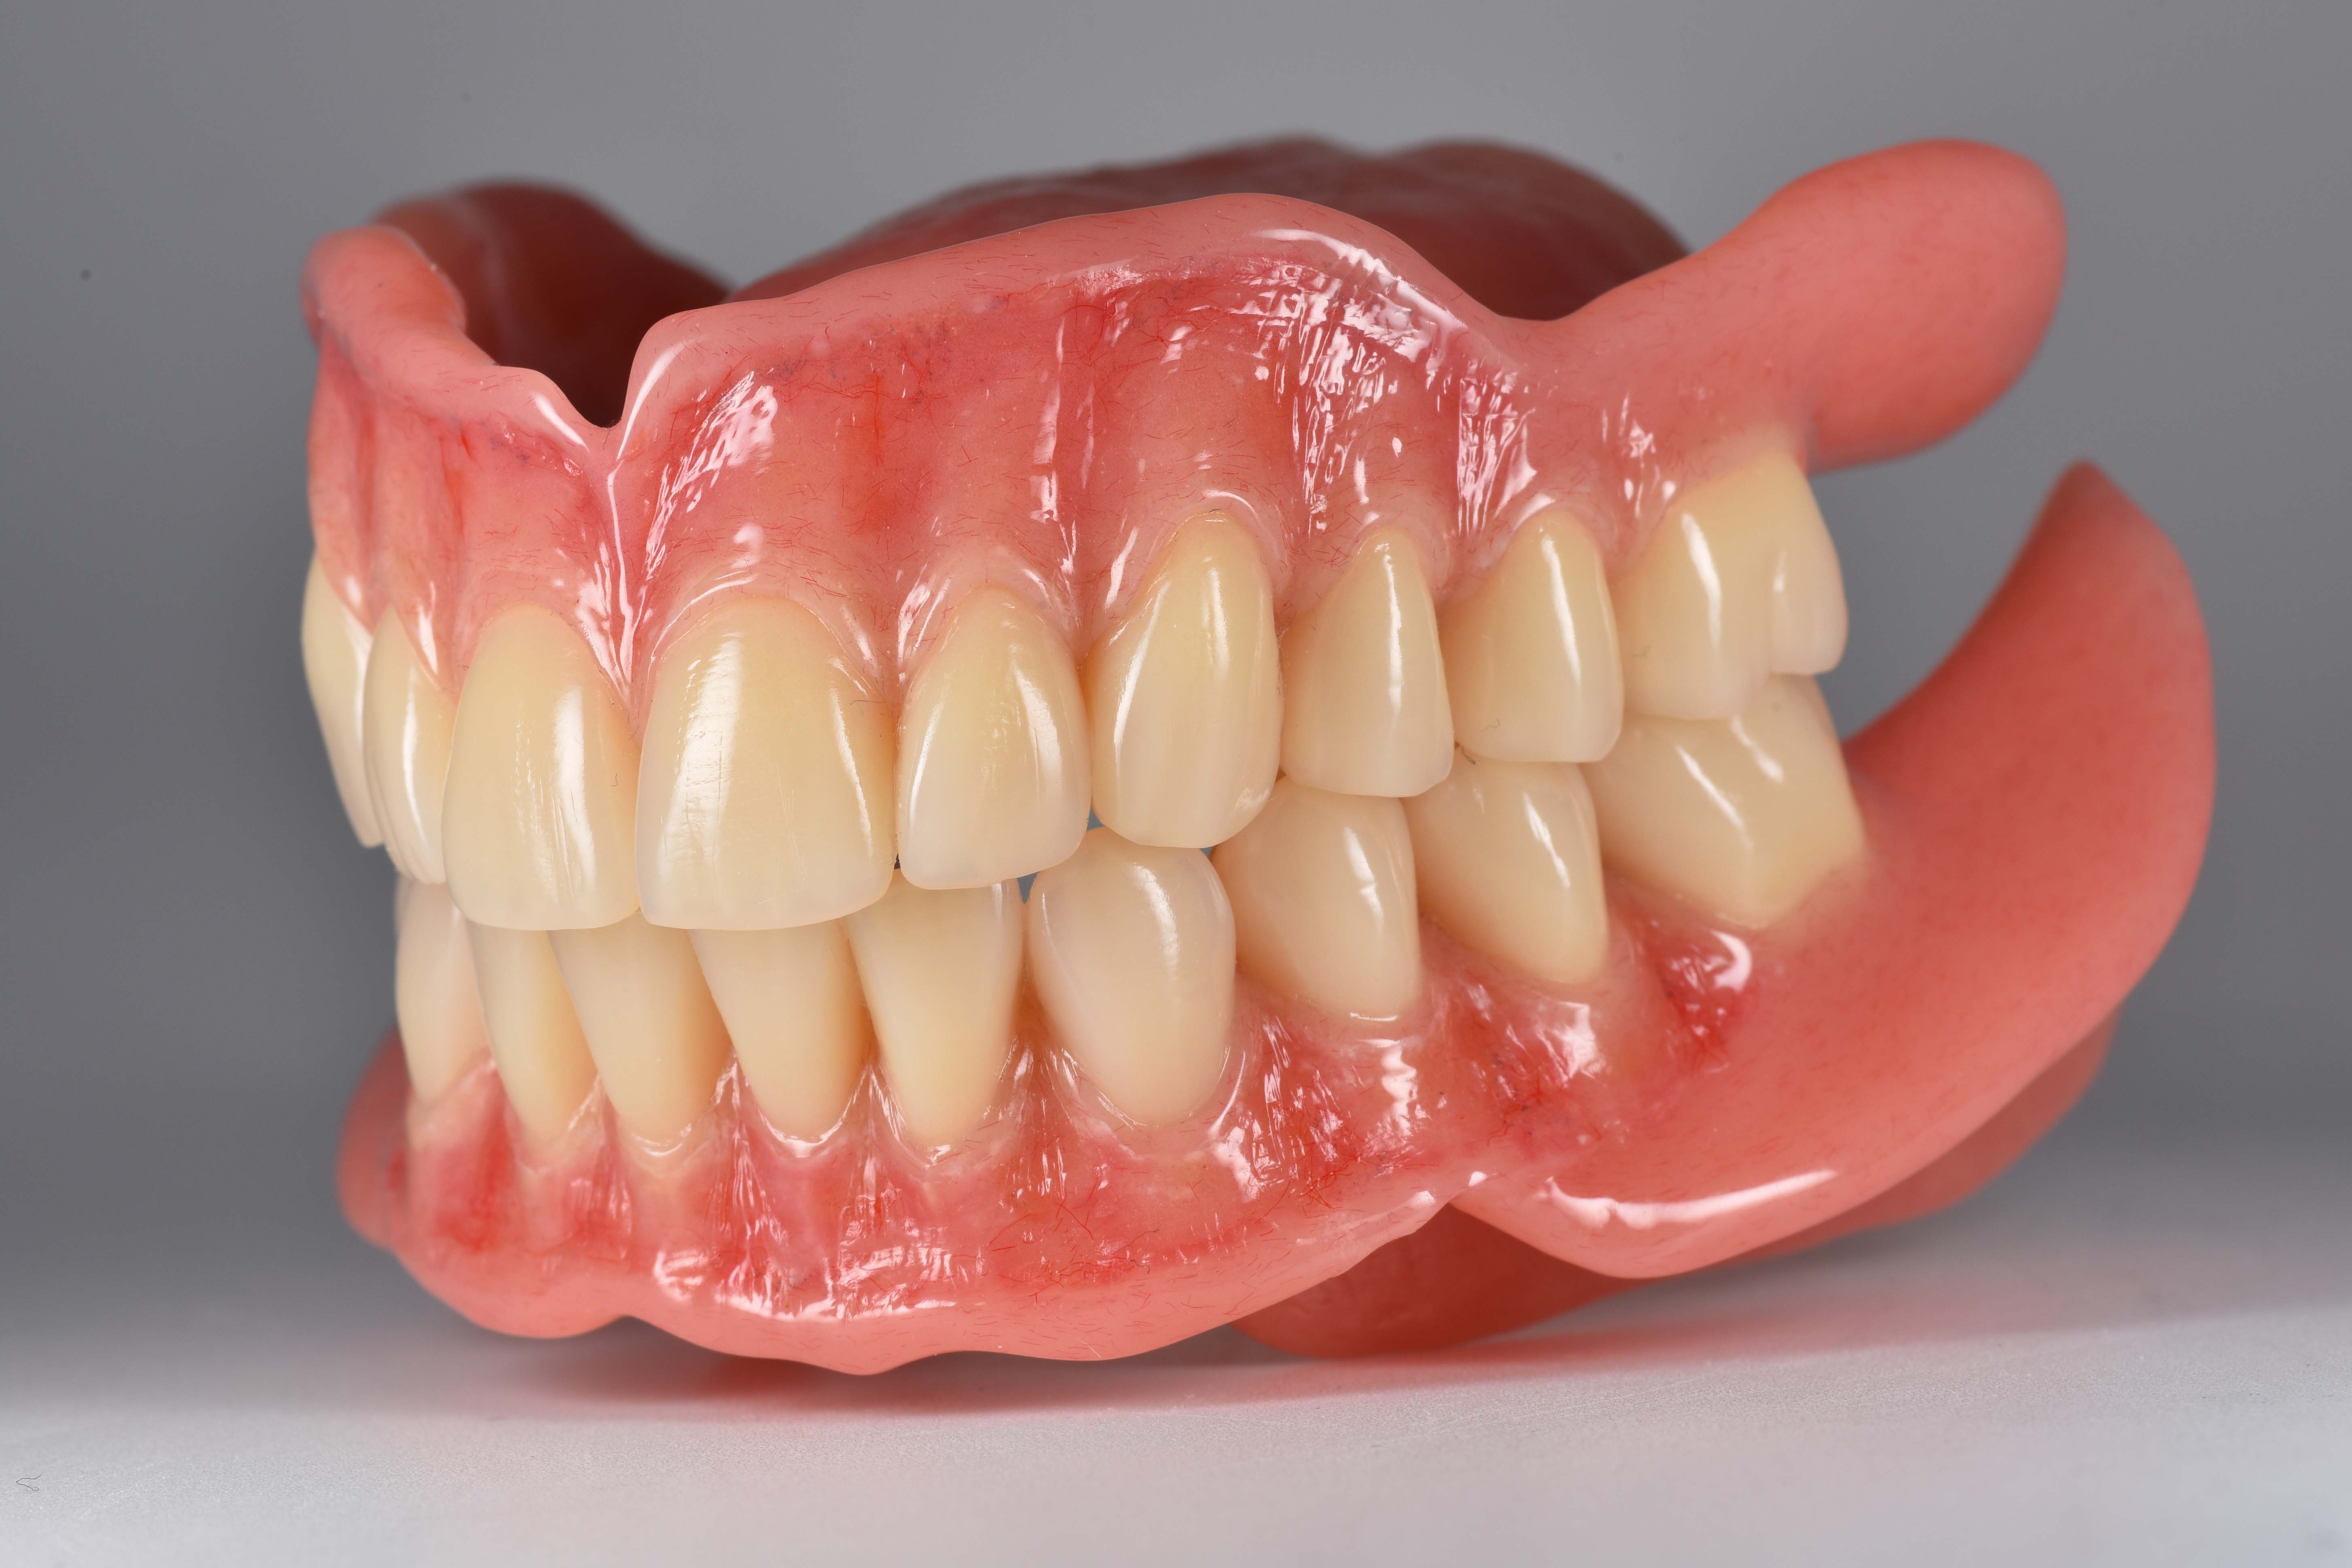
Fig. 38: … of the completed restoration.
Conclusion
This case study is an excellent example of how full dentures can be fabricated to meet the highest functional and esthetic requirements. If one plans carefully and masters the techniques of the conventional fabrication process from setup to completion, one can achieve an esthetic level that seems unattainable with digital technologies. Working with the conventional workflow is made considerably easier when using innovative, high-quality materials, such as those offered by the prosthetics specialist Candulor.
And while the presented method of fabrication may appear old-fashioned to some readers, I am convinced that there will always be patients who place special value on individuality and beauty. They will continue to ensure that demand for handmade dentures remains stable in the future. Being able to offer these patients a customized solution is and remains an important issue for me.
* In this article we refer to the dental scheme: FDA (Fédération Dentaire Internationale / DIN EN ISO 3950:2016-09).
MATERIALS
Articulator
Articulator CA 3.0 (CANDULOR)
Plastic putty
Gumex N, masking compound, yellow (DENTAURUM)
Modelling wax
AESTHETIC Denture Wax (CANDULOR)
Tooth lines
PhysioSelect TCR and BonSelect TCR (CANDULOR)
Denture resin
AESTHETIC BLUE (CANDULOR)
Individualization of the gingiva
AESTHETIC Intensive Colors (CANDULOR)
Articulating film
Artikont articulating ribbon (CANDULOR)


The artikont articulating ribbon is a double-sided marking articulating ribbon made of silk for checking occlusion on the model.
Learn moreWho is…?

Skender Ramadani successfully completed his training as a dental technician in 2007. Since then, he has worked in various dental laboratories in Switzerland, experienced the entire spectrum of dental technology and regularly attends further education. Due to his passion for prosthetics, he has participated several times in the CANDULOR KunstZahnWerk competition, where he won first place in 2013 and second place in 2023. In the "Das Goldene Parallelometer" (The Golden Parallelometer) competition, he took 13th place in 2014, making him the best participant from Switzerland.
Award winner at the CANDULOR KunstZahnWerk Competition 2023: Silver CANDULOR Award (2nd place) and third best documentation