Full denture prosthetics - the ultimate discipline: craftsmanship and individual specifications
KunstZahnWerk and the importance of traditional manufacturing methods in a digital age
MDT Sebastian Guttenberger, Pirk
Candulor's 13th KunstZahnWerk competition once again showcased the sound skills and know-how of dental technicians in 2023. This year again focused on the fabrication of mucosa-supported full dentures in the maxilla and mandible. The participants completed their competition work based on a detailed model analysis. Among them, Sebastian Guttenberger (Zahntechnik Hierold, Pirk). He accepted the challenge and won first place. In fact, he achieved a double victory, as he also took first place for the documentation of his work. What at first seemed unachievable thus turned into a personal achievement for him and a confirmation of his technical dental skills. In this article he describes his work philosophy and goes into detail about the competition work.
When dental technology meets passion, the result is a combination of craftsmanship and anatomical-functional understanding. Dental technology competitions such as the KunstZahnWerk are venues for this energy and provide a stage for measuring one's talents and further one's advancing skills. Participation in the KunstZahnWerk, which is all about full dentures and where dental technicians from all over the world have their work judged by a renowned jury of experts, may at first sight seem unattainable. For me, too, the dream of participating had been there for a long time. But my master craftsman's examination had priority. After successful graduation - and apart from the daily work of fabricating high-quality dental restorations - came the question of which further professional goals to pursue. And that is when KunstZahnWerk sprang to mind again. It was time to face the dream. Backing from my employer and the family provided the necessary incentive. So, full dentures occupied my mind for several weeks.
Patient-customized full dentures
What is the role of full dentures in the age of artificial intelligence (AI), automation and CAD/CAM manufacturing? What relevance do manual skills still have? These questions occupy the minds of many of my colleagues. Digitization undoubtedly offers many advantages. However, full dentures still represent handcrafted work. The realization of esthetic, functional and patient-specific aspects which make up a "good" full denture requires skills such as observation as well as creativity and an understanding of functional relationships. The basic idea behind the fabrication of dentures is always the same: a denture should be comfortable to wear and inconspicuous for the patient. The focus is on the natural shape of the teeth and - depending on the tooth replacement solution - of the gingiva. Be it digital or analog, a number of preliminary considerations are required prior to realization to prevent problems from occurring in the first place. Digitization is particularly helpful for fixed denture solutions. Digital design not only allows the frameworks to be created, but also enables a fully anatomical situation to be defined as the target. This can, for example, be realized by means of 3D printing. Digital technologies can also prove helpful for full dentures. In principle, however, full dentures are based on a sound knowledge of traditional fabrication methods and on taking the patient's individual circumstances into account.
Competition entry (KunstZahnWerk 2023)
Female patient and task
A mucosa-supported maxillary and mandibular denture is to be created for a 69-year-old female patient. In the maxilla, the patient has been fitted with a denture for 15 years. Initially anchored via double crowns, abutment teeth 21, 22 and 23* had to be removed. She wears an interim denture in the mandible after teeth 35 - 44 and 46* had to be extracted due to advanced periodontitis.
- The task: natural-looking dentures according to the dynamic occlusion concepts tooth-to-tooth or tooth-to-two-tooth setup.
This is aggravated by a pronounced atrophy in the mandible, a slight flabby ridge in region 32 to 42* and a change in the mucosa (leukoplakia) in region 35*. The existing dentures exhibit several deficits. The anterior teeth are barely visible in both the upper and lower jaws. Due to the low vertical proportion, the lower third of the face appears squat and the chin pointed. The patient complains about inadequate denture retention. She can only eat by using adhesive cream to fixate the denture in her mouth. She would like a denture with a firm hold, visually more prominent anterior teeth and age-appropriate esthetics, as well as adequate chewing performance. Also important to her is an appealing facial appearance, where the chin appears less pointed. Youth photos serve as an orientation.
- The challenge: age-appropriate dentures (full dentures) at pronounced atrophy in the mandible.
Preparatory steps by the dental technician
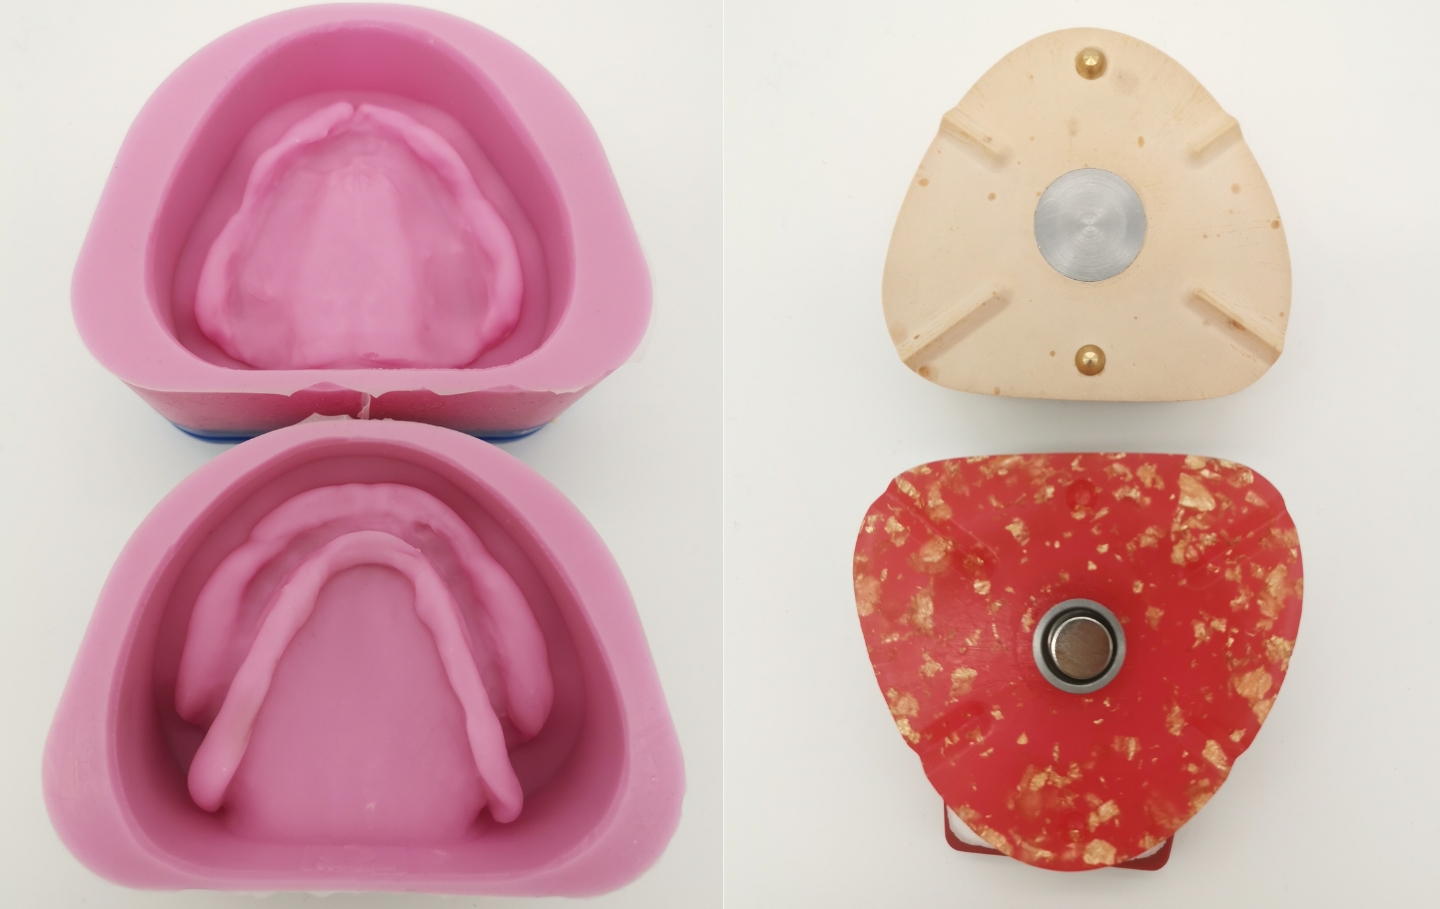
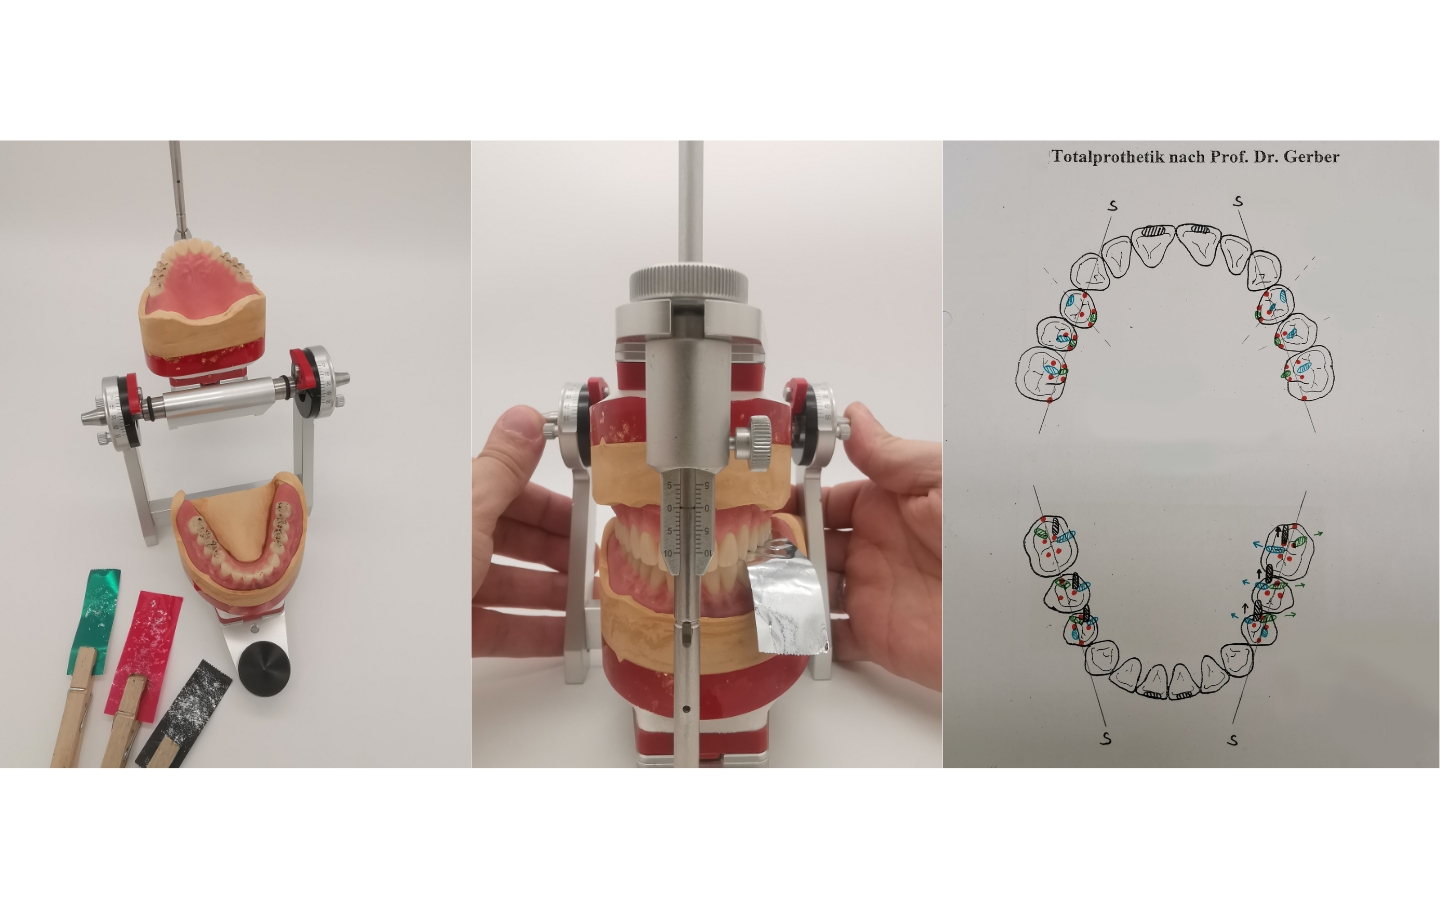
The models of the maxilla and mandible are duplicated and the master models are fitted with rotation locks (brass cones, milled grooves, magnet) for a Splitcast base (Figs. 1 and 2).
Preliminary technical dental considerations:
- The increase in vertical relation must be taken into account when articulating.
- As the flabby ridge can lead to a poor suction effect of the denture, adequate finishing of the denture body is required (buccinator support, muscle-gripping denture body, margin design).
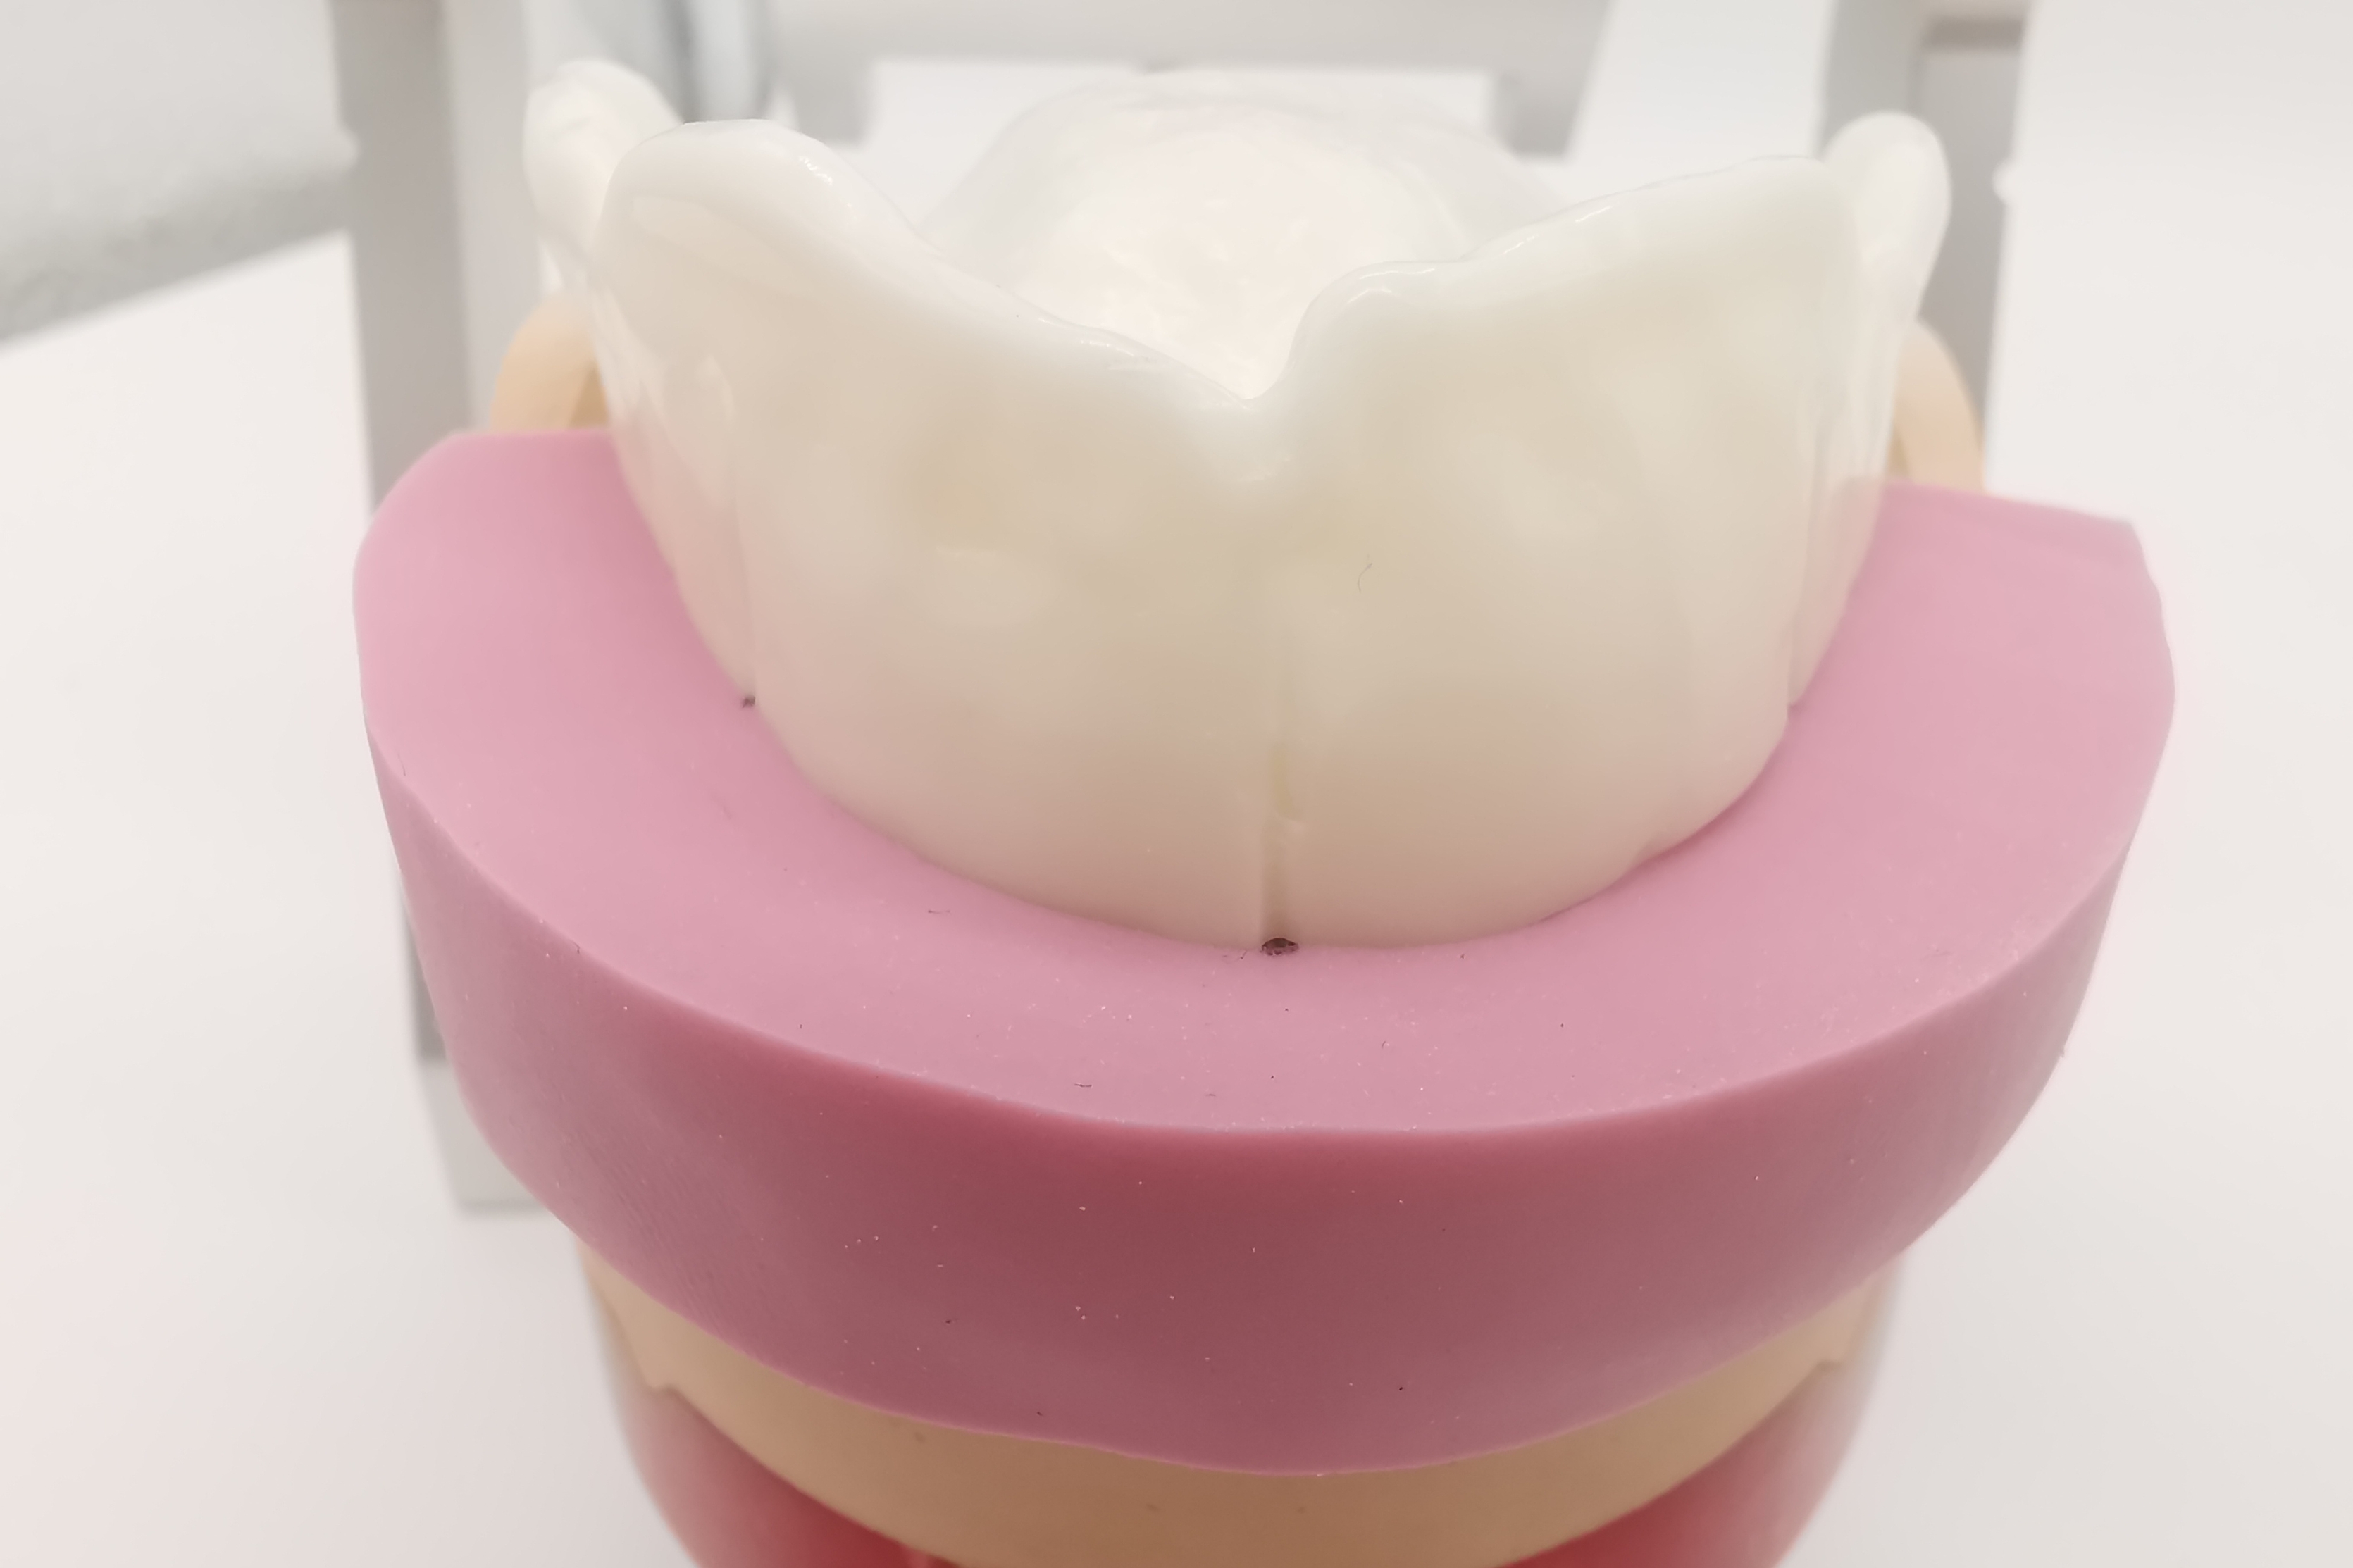
- For an individual setup of the maxillary teeth according to the physiognomic bite key, a silicone matrix is helpful as a control element (Fig. 3).
Assignment of the models in the articulator
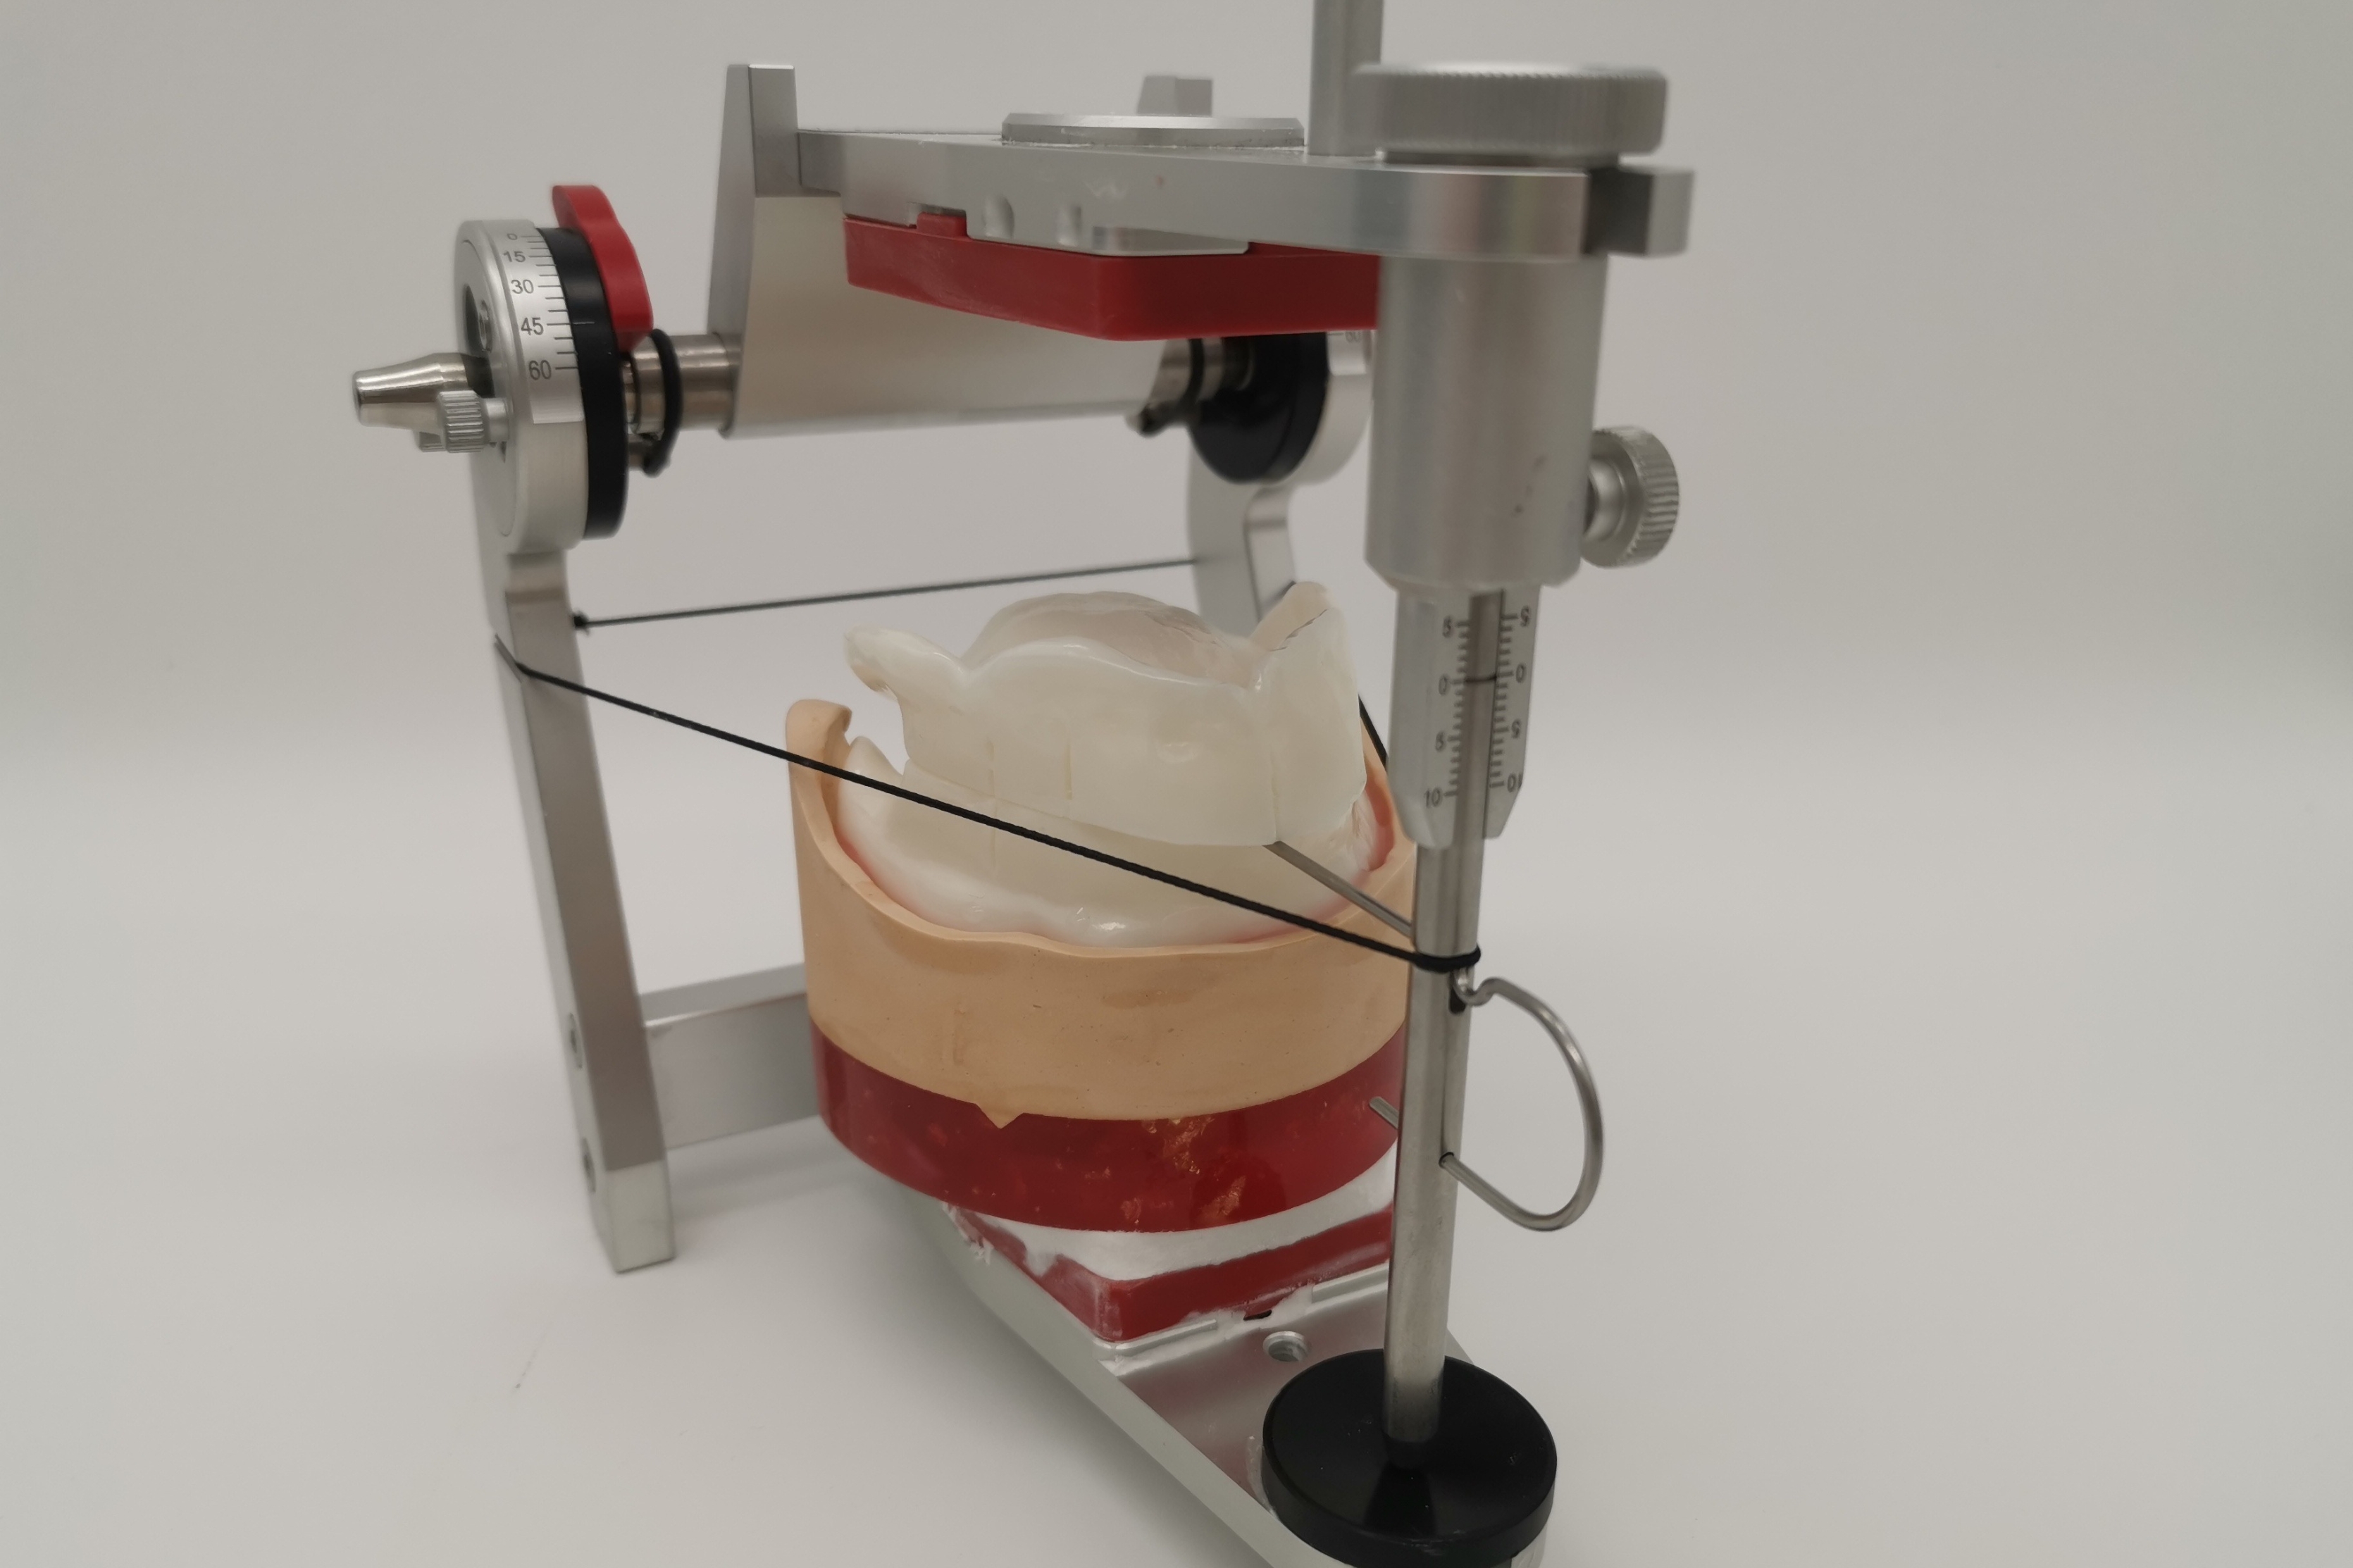
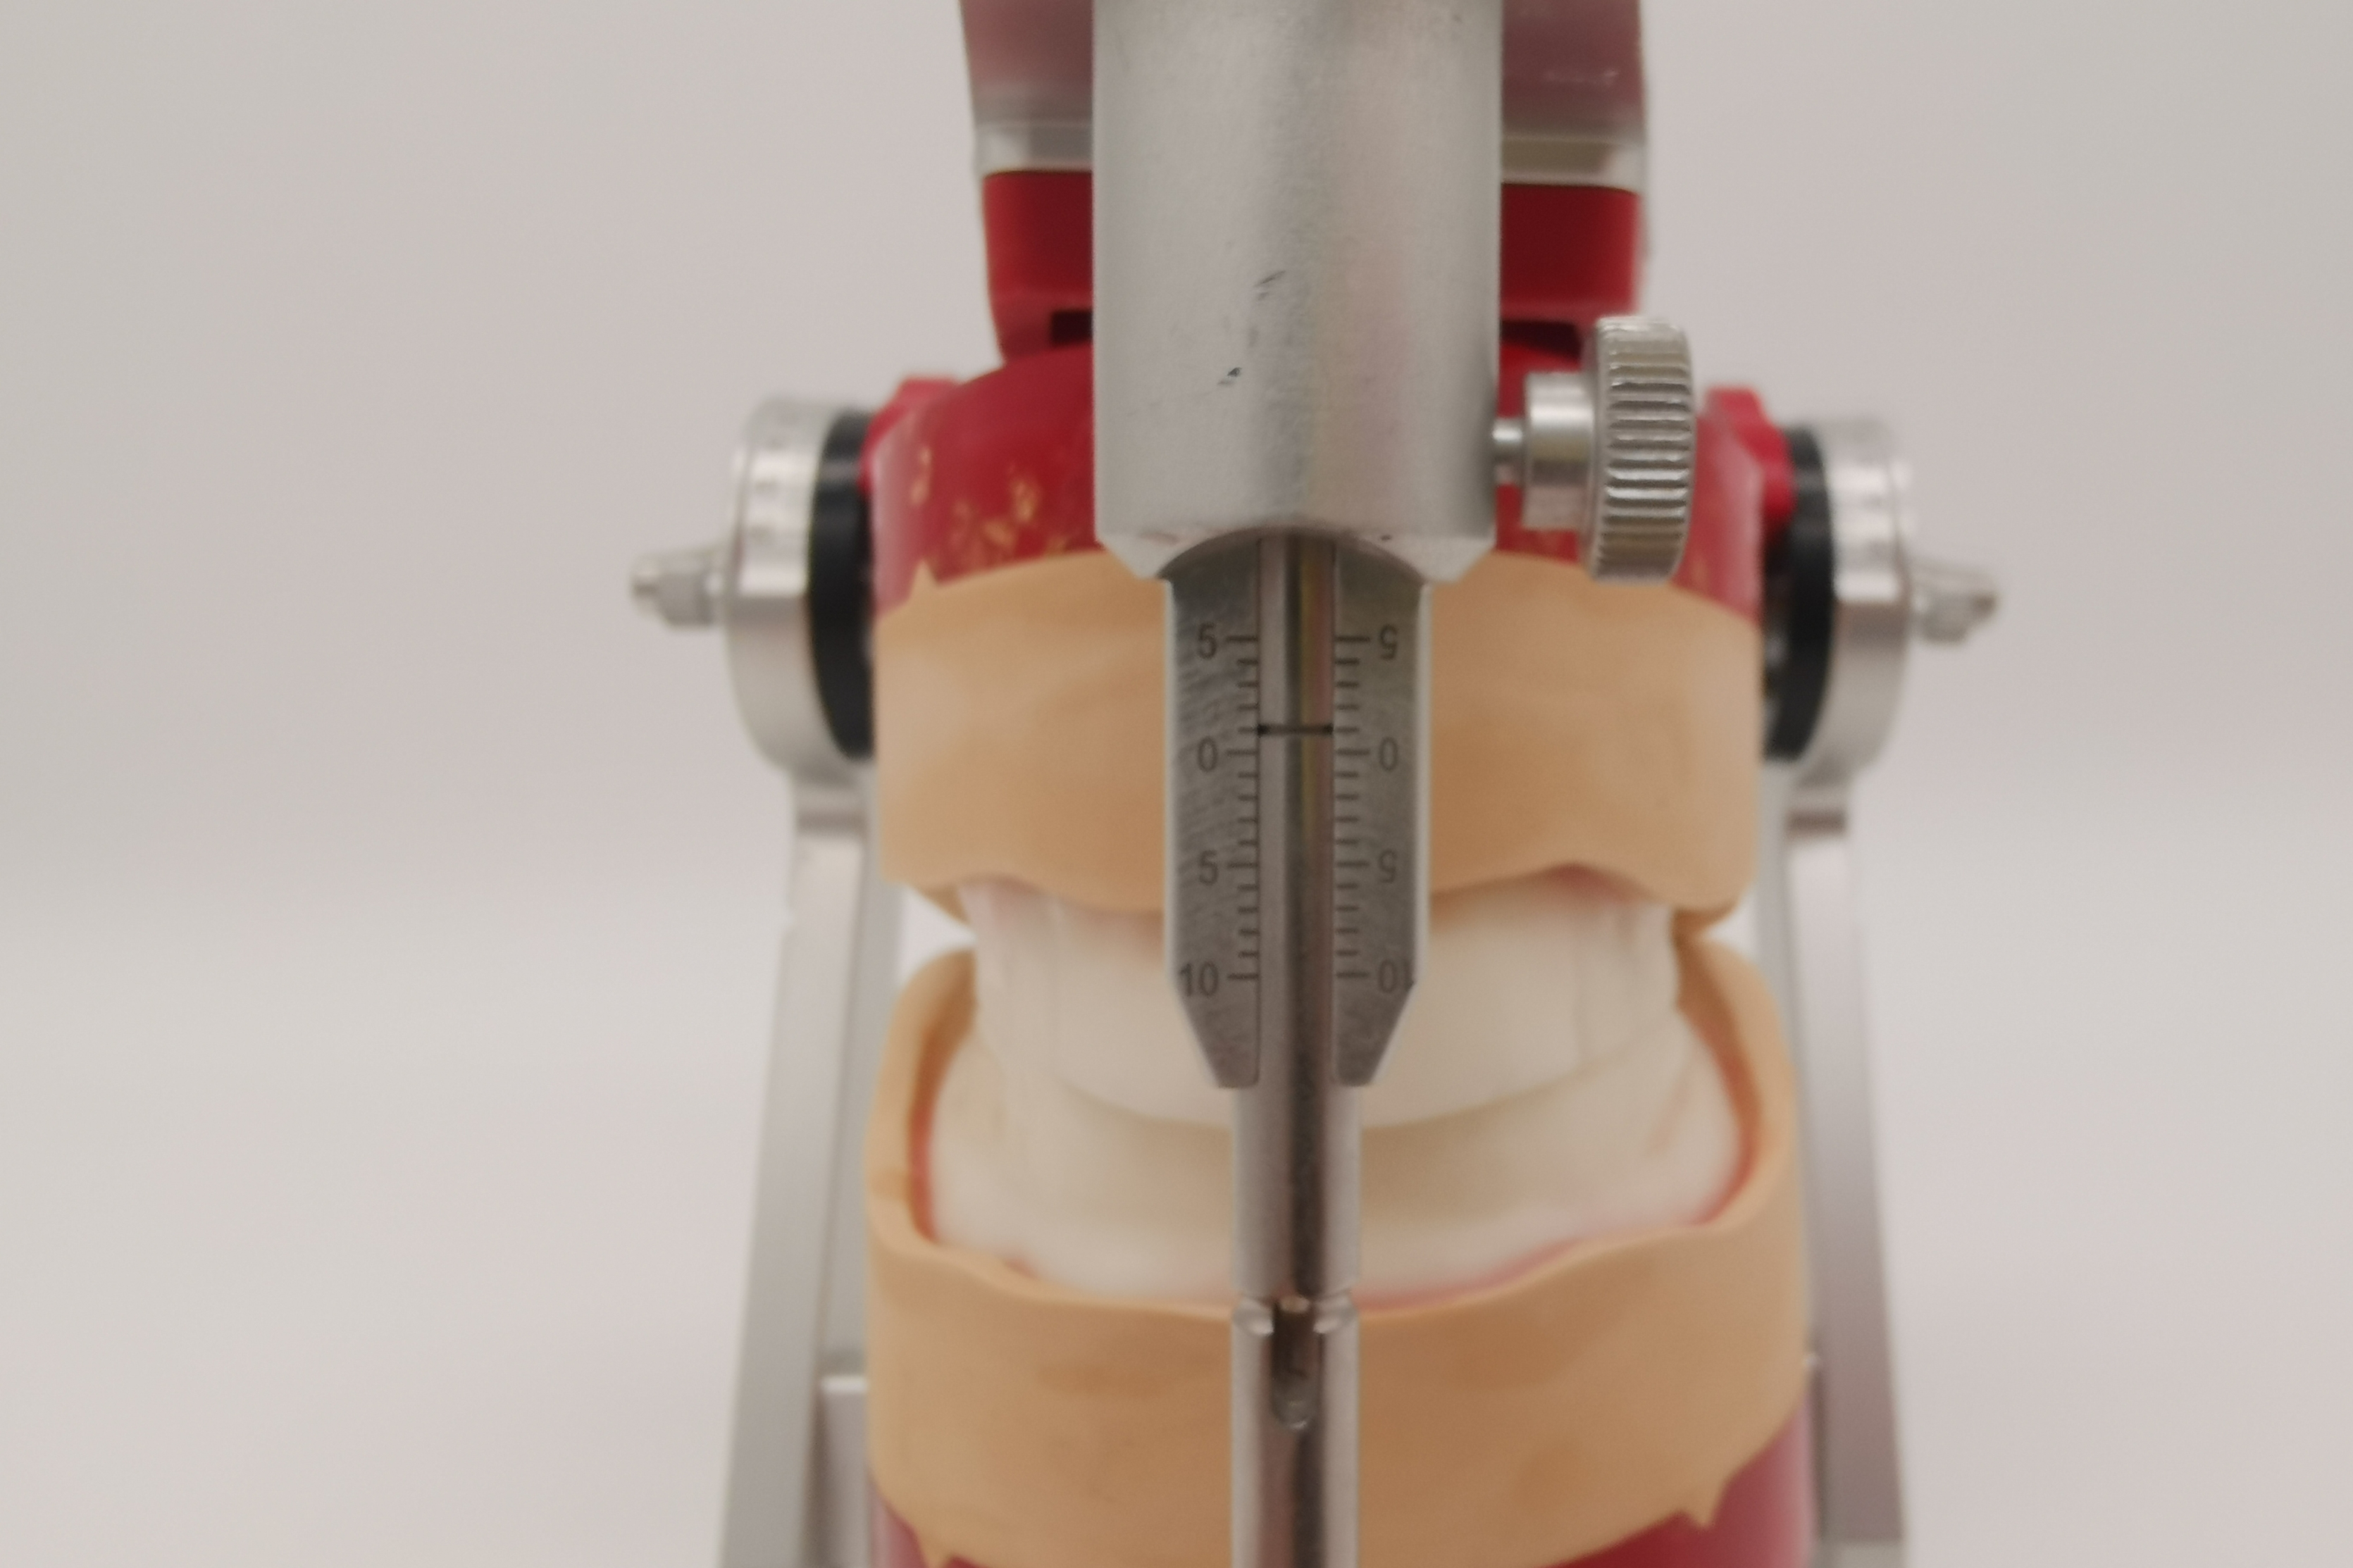
There are various methods for transferring the position of the mandible in relation to the cranium to the articulator. A common approach is the facebow to determine the position of the upper jaw. For the competition work, the mandibular model is transferred to the articulator (CA 3.0, Candulor) with a mean value (Fig. 4). The condylar path inclination in relation to the Camper's plane (occlusal plane) is preset at 45° on the right and 47° on the left. To reflect the increase in vertical relation, the support pin is lowered by 1 mm (Fig. 5). Among other things, the objective is to make the maxillary anterior teeth more visible and to make the patient's physiognomy appear more harmonious.
- Prior to the model analysis, the support pin of the articulator is reset to the zero position.
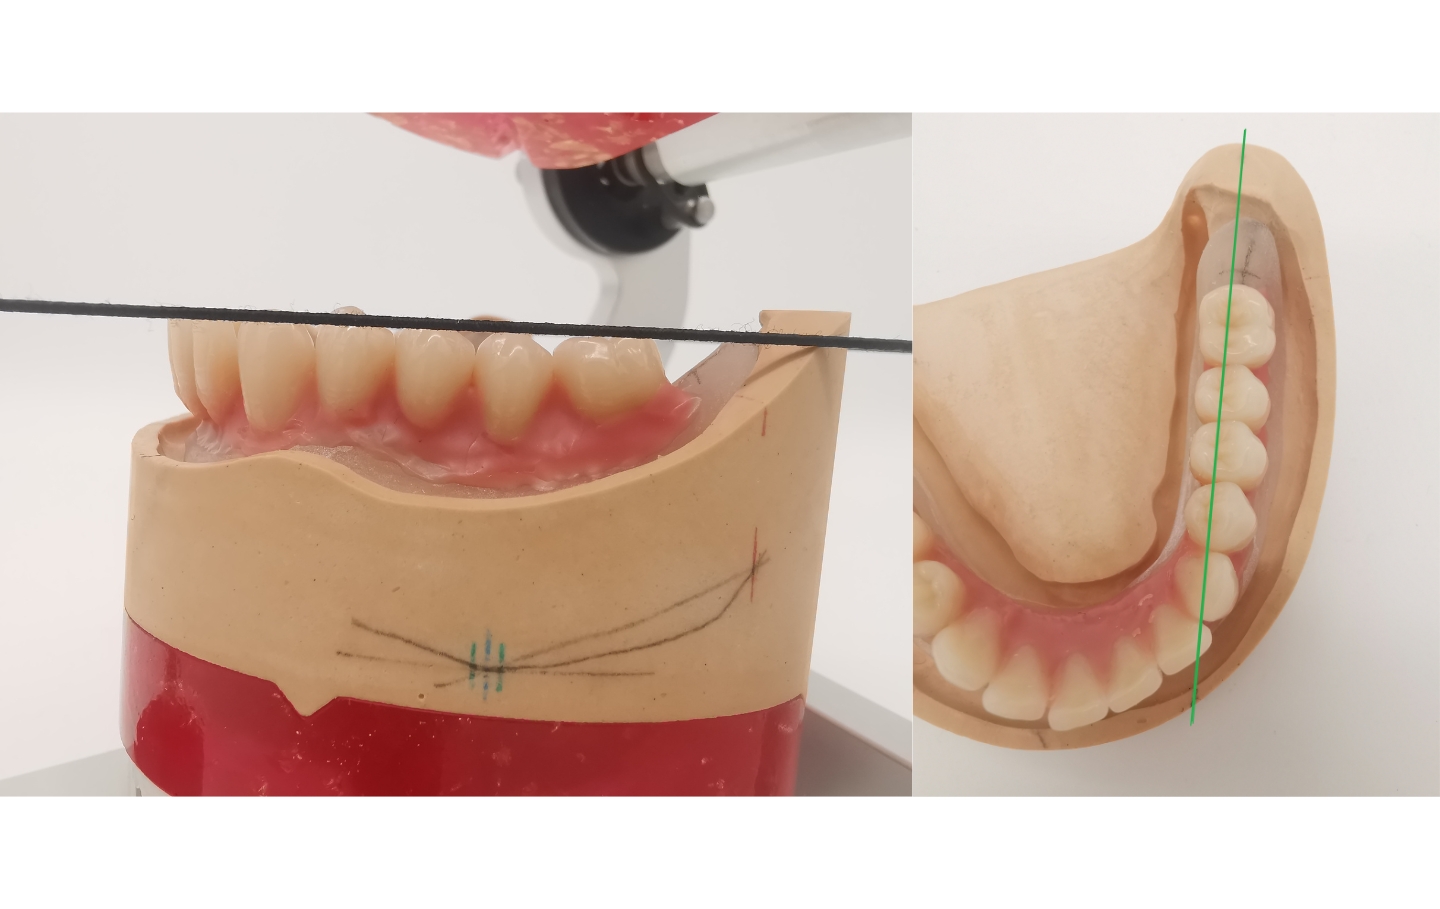
Model analysis
The model analysis initially requires some time, but significantly increases the quality of the results. For instance, jaw relationships, the position of the plane of occlusion and mid line of the maxilla can be determined with the aid of model analysis. The results of the model analysis enable a precise tooth setup according to static aspects, taking muscular balance into account. The procedure according to P. Lerch has proven itself and is also applied in this case.
Static lines
After marking the papilla incisiva and the center of the model as an orientation guide, the positions of the first premolars in the maxilla and mandible are marked.
- In the maxilla, the canine is located at the level of the first large palatal fold, one premolar width to dorsal of the first premolar.
- In the mandible, the positions are marked in extension of the buccal frenulum attachments.
The retromolar triangles in the mandible or the tuber in the maxilla are outlined and bisected sagittally and transversely with a line. The points of intersection are connected to the marked positions of the first premolars (Fig. 6). The resulting lines form the basic static lines and are marked in red.
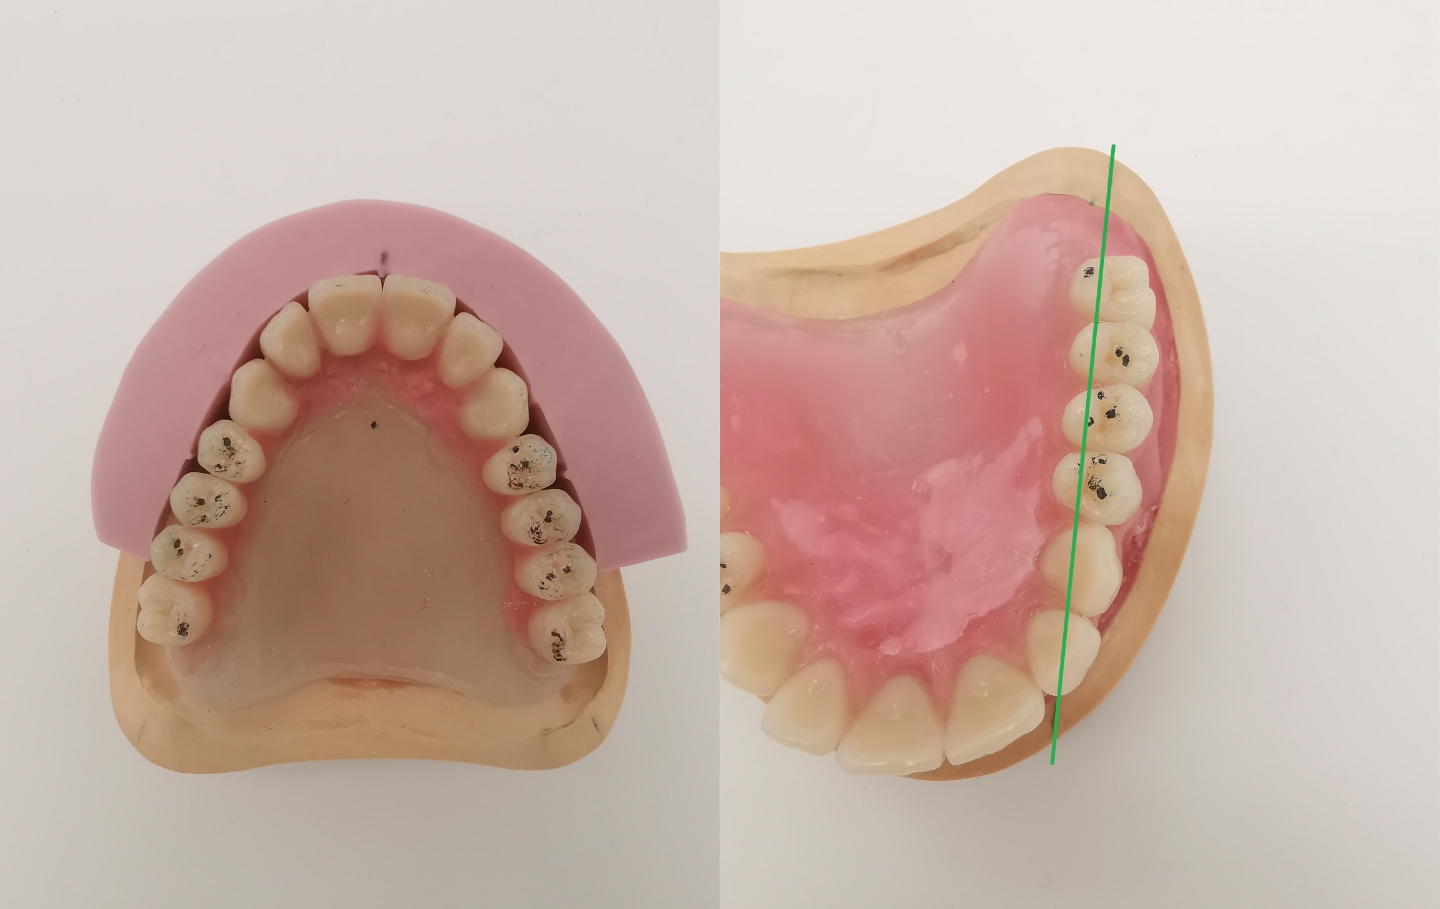
Inner and outer contours
The inner and outer contours indicate the tolerance range of the basic statics and create the setup area for the teeth (Fig. 7).
- In the mandible, the intersection points of the transversal bisector line are connected with the position of the first premolars when contouring the retromolar triangles. The line passing through the lingual point represents the inner correction (green), while the line passing through the vestibular point represents the outer correction (blue).
- In the maxilla, the outer correction runs along the vestibular fold and the inner correction as the connecting line of the plica pterygomandibularis and the position of the first premolars.
The markings are extended dorsally at right angles to the occlusal plane. The overlapping area (intersection area) forms the setup area.
Alveolar ridge contour and main masticatory center
The contour of the alveolar ridge is determined with the aid of a profile compass. This is guided at right angles to the model side from mesial to distal to transfer the alveolar ridge contour of the mandible to the side of the model. The main masticatory center is defined by a tangent parallel to the occlusal plane through the lowest point of the alveolar ridge contour (Fig. 8). The point of contact of the tangent marks the main chewing center and can be identified by a vertical line on the model side. In addition, a tolerance range is marked by vertical lines on both sides of the model at a distance of about 1 mm. As a rule, the first molar of the mandible lies within this tolerance range.
Stop line
A line is drawn through the main chewing center point at an angle of 22.5° which extends to dorsal. The second intersection of this line with the alveolar ridge line can be marked with a vertical line and transferred to the model margin perpendicular to the occlusal plane. This marking forms the stop line and thus the most distal point at which a tooth may be in occlusion (Fig. 9). Setting a tooth behind this line can cause the mandibular denture to slide ventrally (protraction).
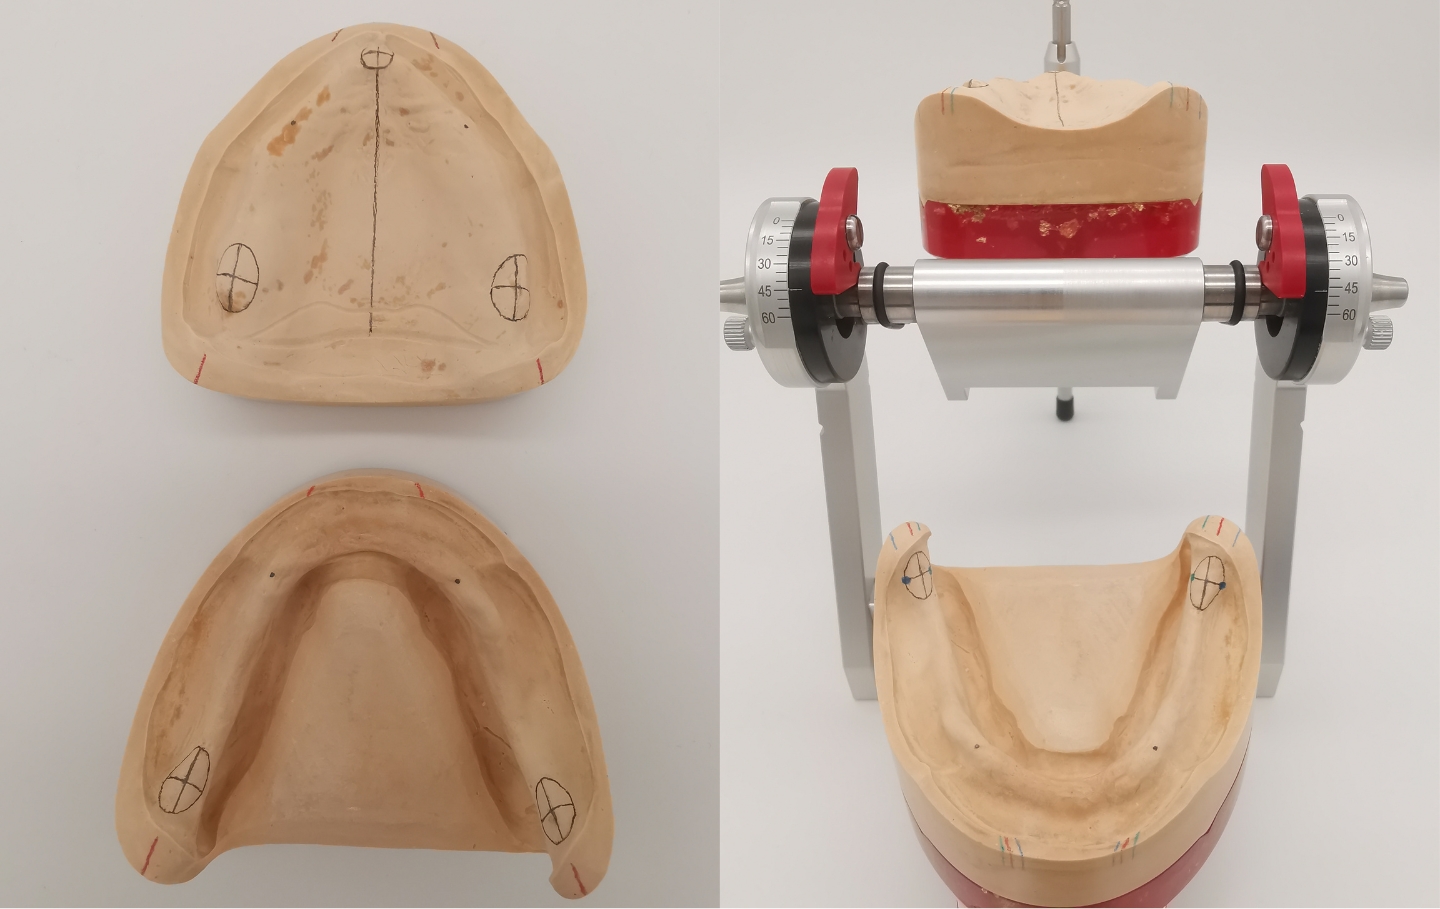
Fig. 6 (left): Marking of the static lines and the retromolar triangles or tuber
Fig. 7 (right): Marking the inner and outer contour lines for evaluating the setup area
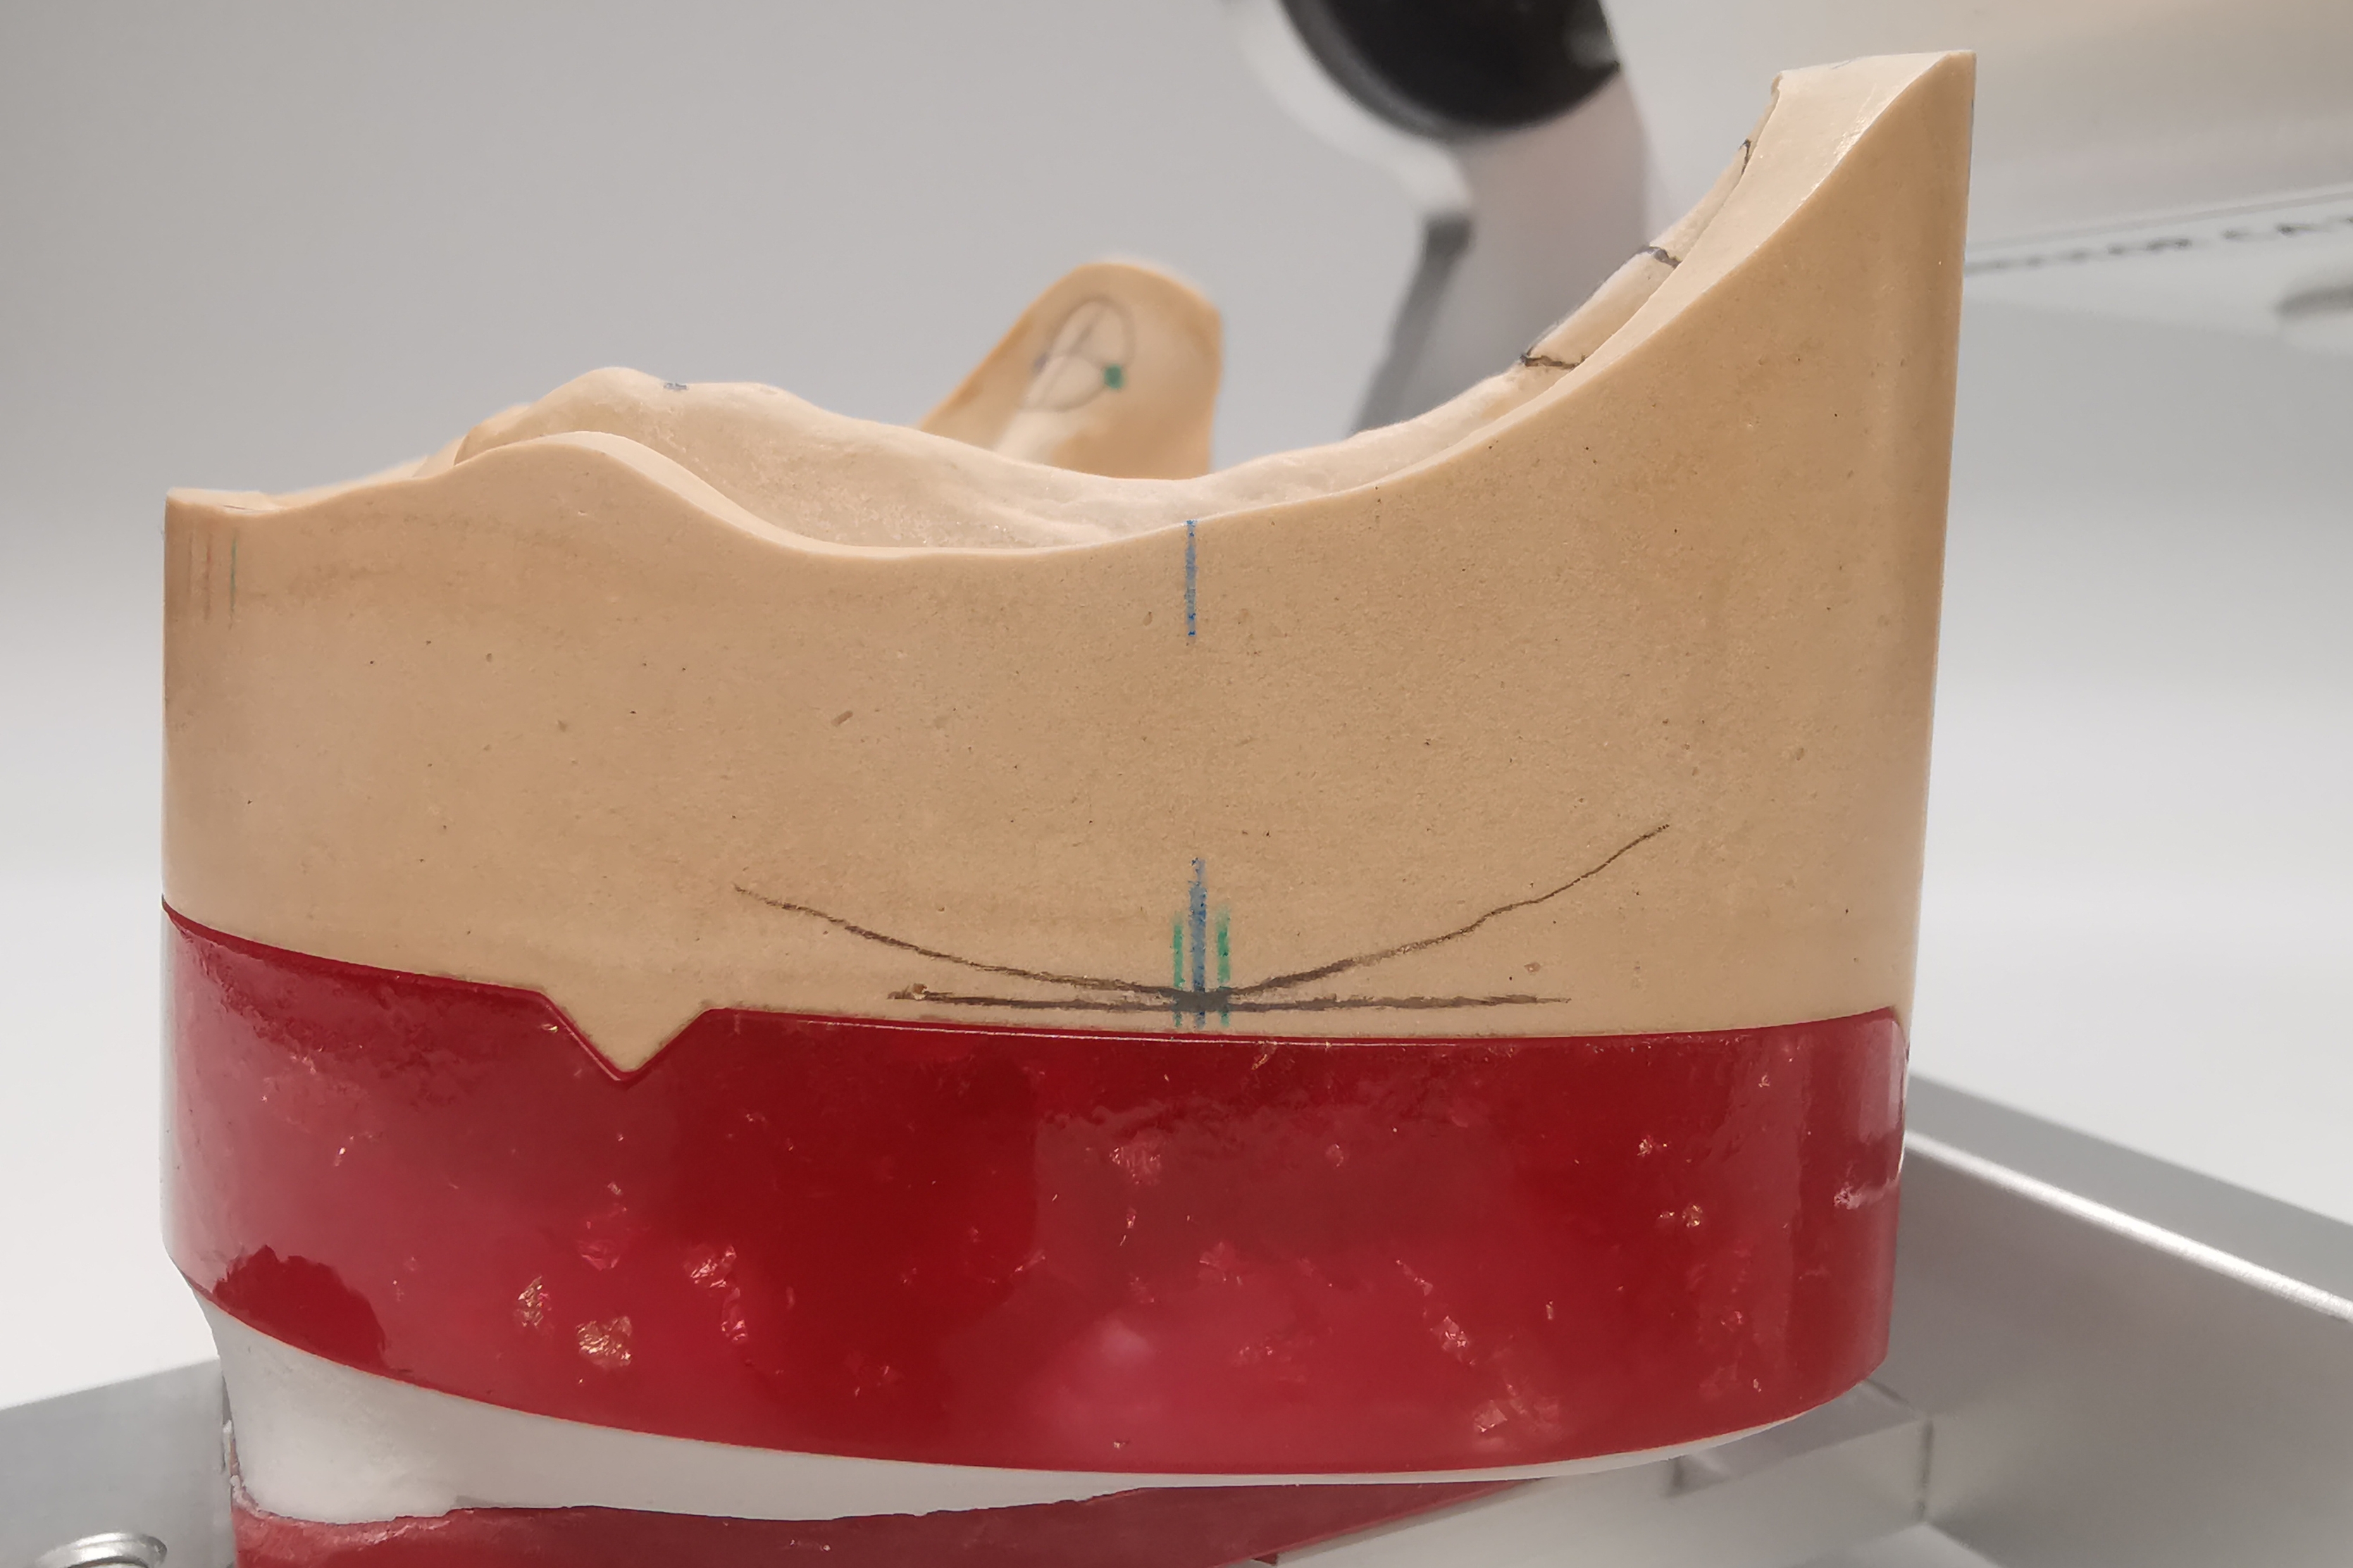
Fig. 8: Alveolar ridge contour on the outer side of the model and main chewing center in the mandible (blue)
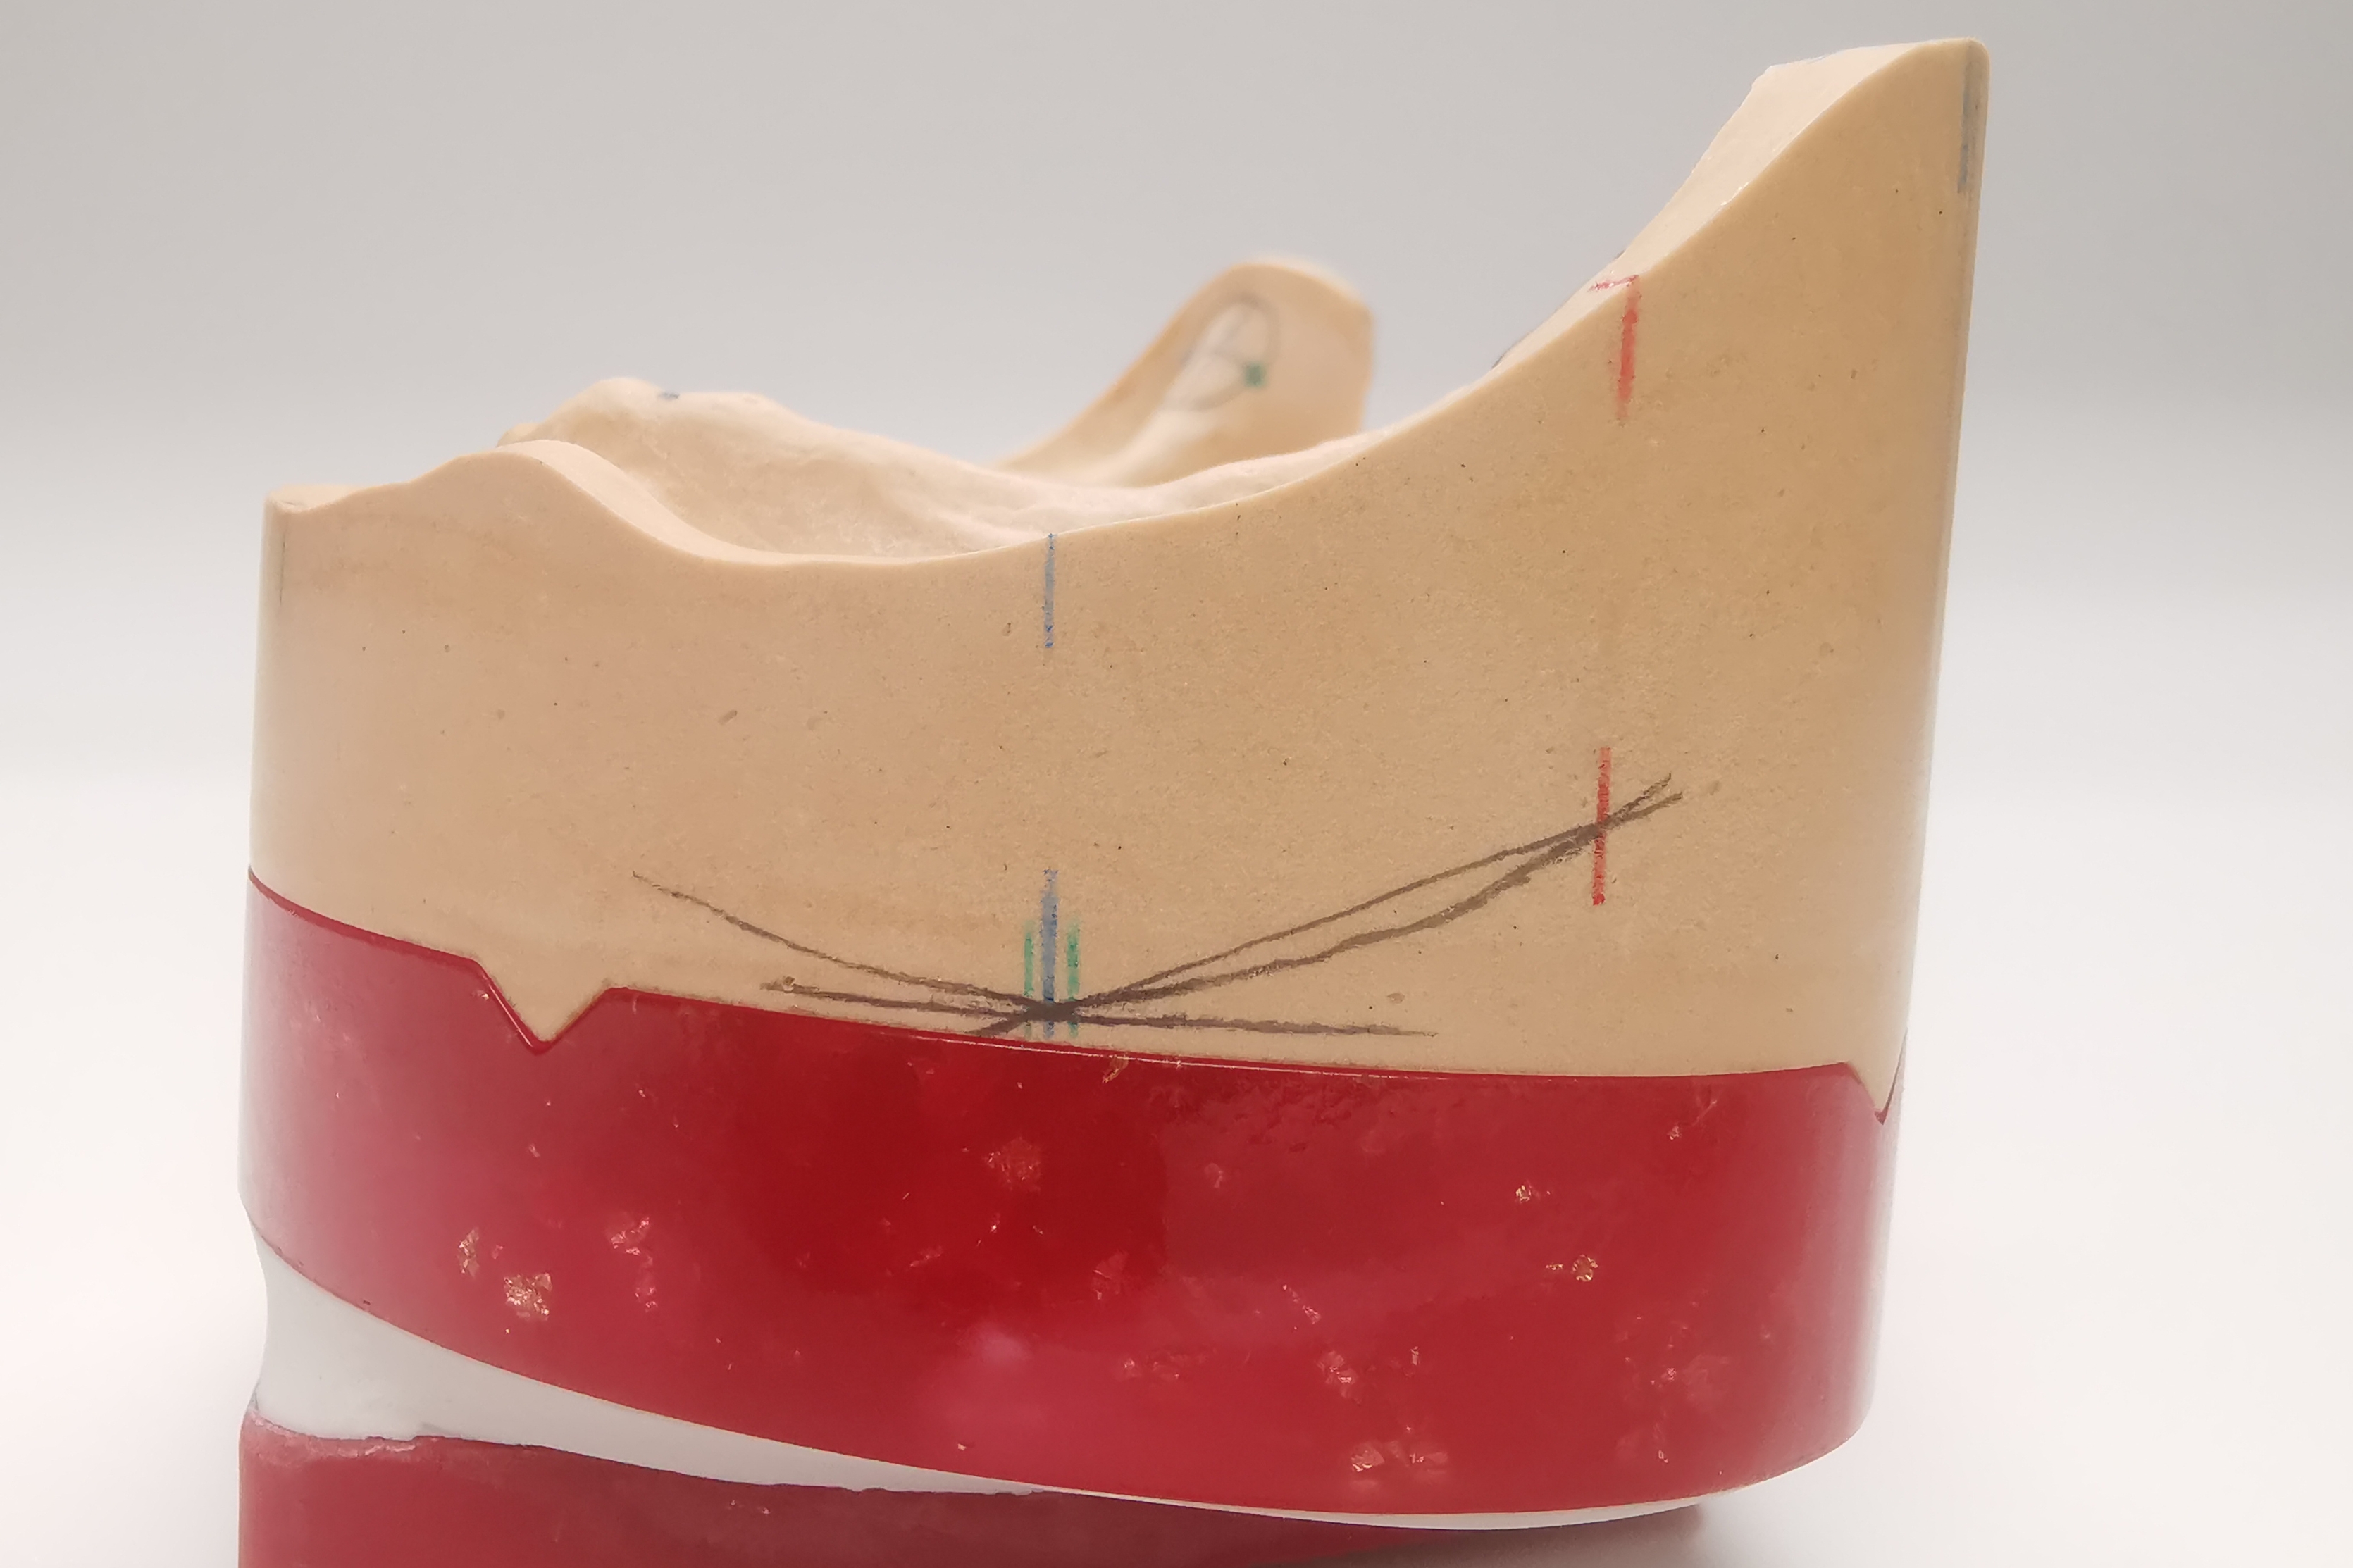
Fig. 9: Marking of the stop line (red line)
Setup of the teeth
Maxilla anterior teeth (PhysioSelect TCR, Candulor)
The information from the analysis is put together like a puzzle when setting up the teeth and the ideal tooth positioning is evaluated. The bite key provides a rough guide for positioning the teeth. Attention must be paid to ensure that the labial surfaces of the teeth touch the silicone matrix (bite key) (Fig. 10). According to the Gerber theory, the central incisors and canines are set up at equal lengths - approximately 0.5 to 1 mm above the occlusal plane. The lateral incisors are slightly shorter. The tooth axes exhibit slight mesial inclination.
Mandible anterior teeth (PhysioSelect TCR, Candulor)
Teeth 32 on 42* are set up oriented to the occlusal plane, whereby a small tolerance is possible due to a slightly nested setup (Fig. 11). The canines can be positioned minimally above the occlusal plane (approx. 0.5 mm). When positioning the teeth to labial, the sagittal step must be taken into account (overbites). As the lower anterior teeth do not play a supporting role in functional loads and should only exhibit slight sliding contacts in protrusion, an individual setup is possible.
Posterior teeth in the mandible (BonSelect TCR)
In the posterior region, the focus is initially on the lower teeth, since their position is important for the articulation contacts (Fig. 12a and b). The first premolars take on the main guidance function and are set up with an inclination of about 10° distally and 1 mm above the occlusal plane. The second premolars are at the level of the occlusal plane and are inclined to distal by approximately 5°. As there is no space for two molars dorsally, the first molar is replaced by a third premolar. For an harmonious curve of Spee, the molar is tilted slightly to mesial. The mesiobuccal cusp of the molar is level with the occlusal plane, while the distobuccal cusp stands 0.5 mm above the plane.
Posterior teeth in the maxilla (BonSelect TCR)
The upper posterior teeth touch the silicone key with the buccal surfaces (Figs. 13a and b). Again, the position of the first premolars is important as these teeth, together with the lower first premolars, provide the main guidance. They are set up at the level of the occlusal plane and inclined about 10° to mesial. The palatal cusps are located in the fossa of the lower first premolars. The second and - in this case - third premolars are treated in the same manner. The molars in the maxilla are slightly inclined to distal and only tangent the occlusal plane with their mesiobuccal cusps, whereby the distobuccal cusps lie slightly above. The main contacts are located on the mesiopalatal cusp of the molars.
- The buccal cusps are out of occlusion and at some distance from the lower buccal cusps so as not to restrict articulation movements.
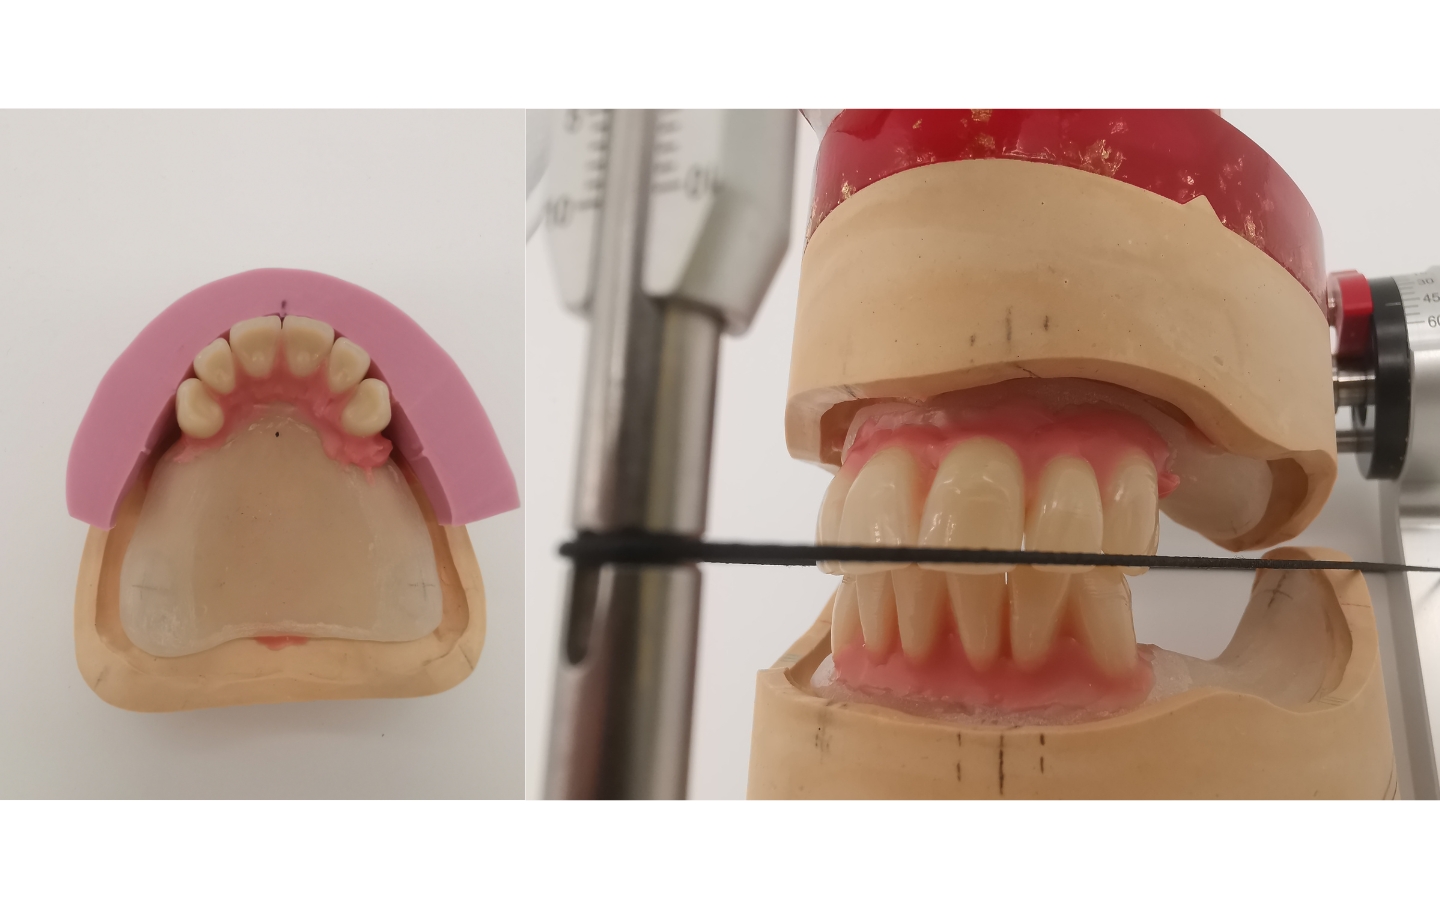
Fig. 10 (left): Setup of the upper anterior teeth with silicone matrix
Fig. 11 (right): Setup of the lower anterior teeth with slight nesting
Figs. 12a and b: Setup of the posterior teeth in the mandible taking into account the information from the model analysis (e.g. base static line passes through central fissures)
Figs. 13a and b: Setting up the posterior teeth in the maxilla with silicone key and checking the profile of the basal static line to the central fissures
Grinding in occlusion and articulation movements
Grinding-in of the occlusion begins with checking the contact points and carefully grinding interfering contacts (check on support pin). The main contacts are located on the palatal or mesiopalatal cusps in the maxilla and in the central fossa in the mandible. The aim is to achieve two to three points per tooth, evenly distributed between the left and right tooth rows (Figs. 14a to c).
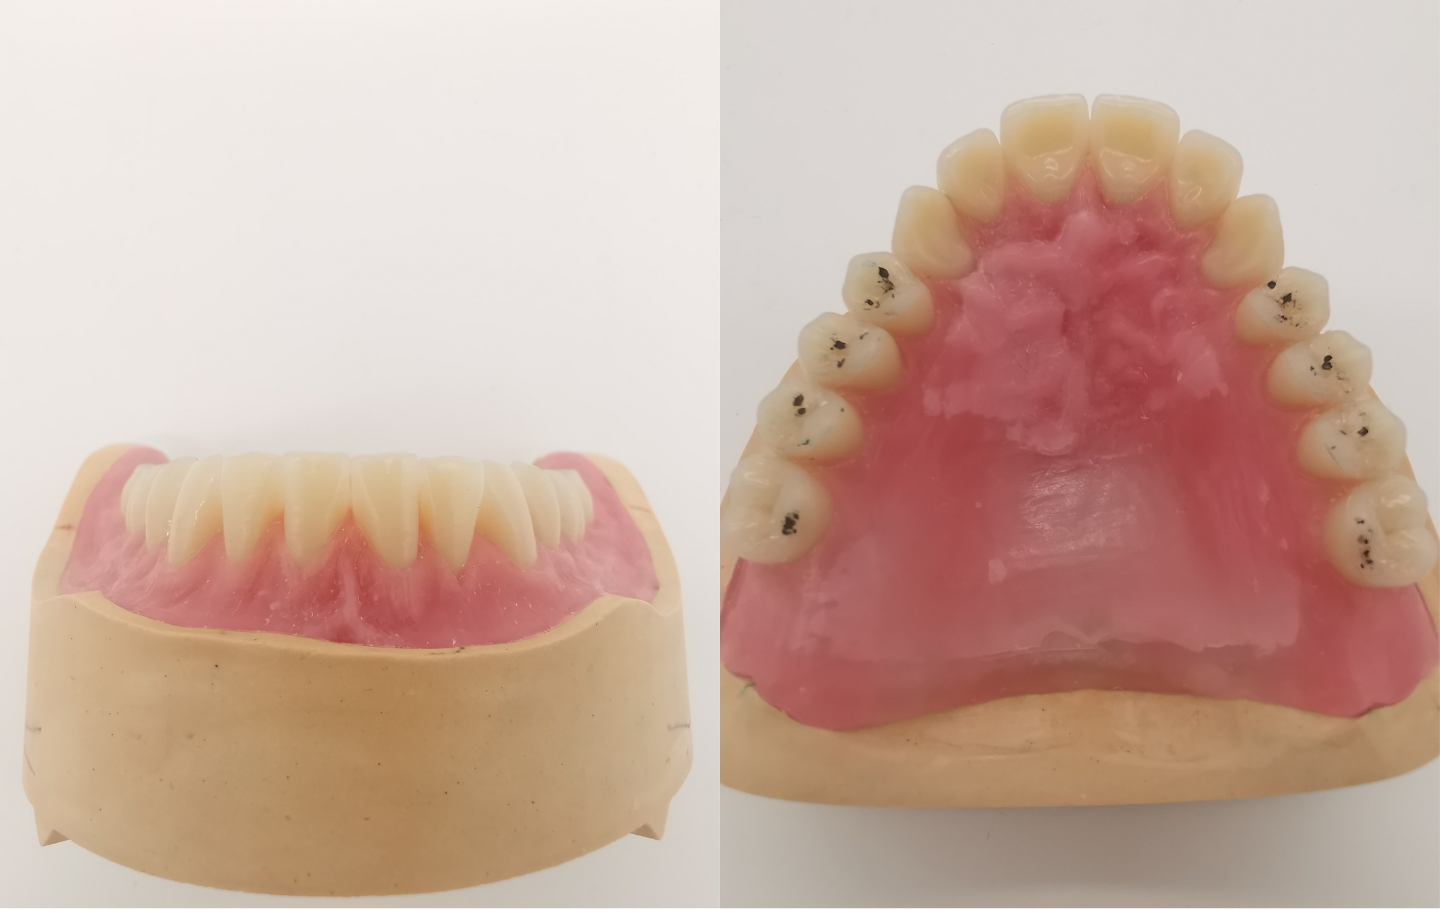
Modeling the denture body
Careful design of the denture body in the mandible is important to compensate for the lack of suction effect (flabby ridge) by means of a muscle-gripping design (Figs. 15a and b). Buccinator supports are modeled to provide a counter abutment for the musculus buccinator, while the lip shield labially provides an abutment for the musculus orbicularis oris. The lower denture is modeled lingually in such a manner that the musculus mylohyoideus and the tongue nestle against the denture body in the rest position. In addition, palatal folds are designed on the maxillary denture to provide orientation for speech and assist with food comminution.
Figs. 14a to c: Checking and grinding in the articulation movements with colored occlusal foil. Gerber setup: main guide contacts on posterior teeth, anterior teeth only in sliding contact, canines do not guide.
Figs. 15a and b: Muscle-gripping design of the denture bodies and creation of palatal folds
Finishing of the dentures
The transfer of wax dentures into resin is performed with the cold press technique (PolyMaster, Candulor). The advantage is that the model can be blocked out without the wax melting. By pressing the resin into the PolyMaster, a high accuracy of fit of the dentures is achieved. In addition, the denture body can be customized with lighter and darker resins as well as intensive shades before inserting the base material (Candulor 34). Prior to inserting the models into the PolyMaster, silicone matrices are fabricated and perforated at the cusp tips as well as incisal edges to provide selective support for the teeth (Fig. 16). The lower part of the flask is filled with super hard plaster and the model is pressed into the plaster. After 20 - 30 minutes, the lid of the PolyMaster can be removed (Fig. 17). The teeth are provided with retention notches basally, sandblasted and bonded into the matrices with instant adhesive (Fig. 18). The vibrating line etching provides a tight seal between the denture base and the palate and maximizes the suction effect and denture bearing (Fig. 19).
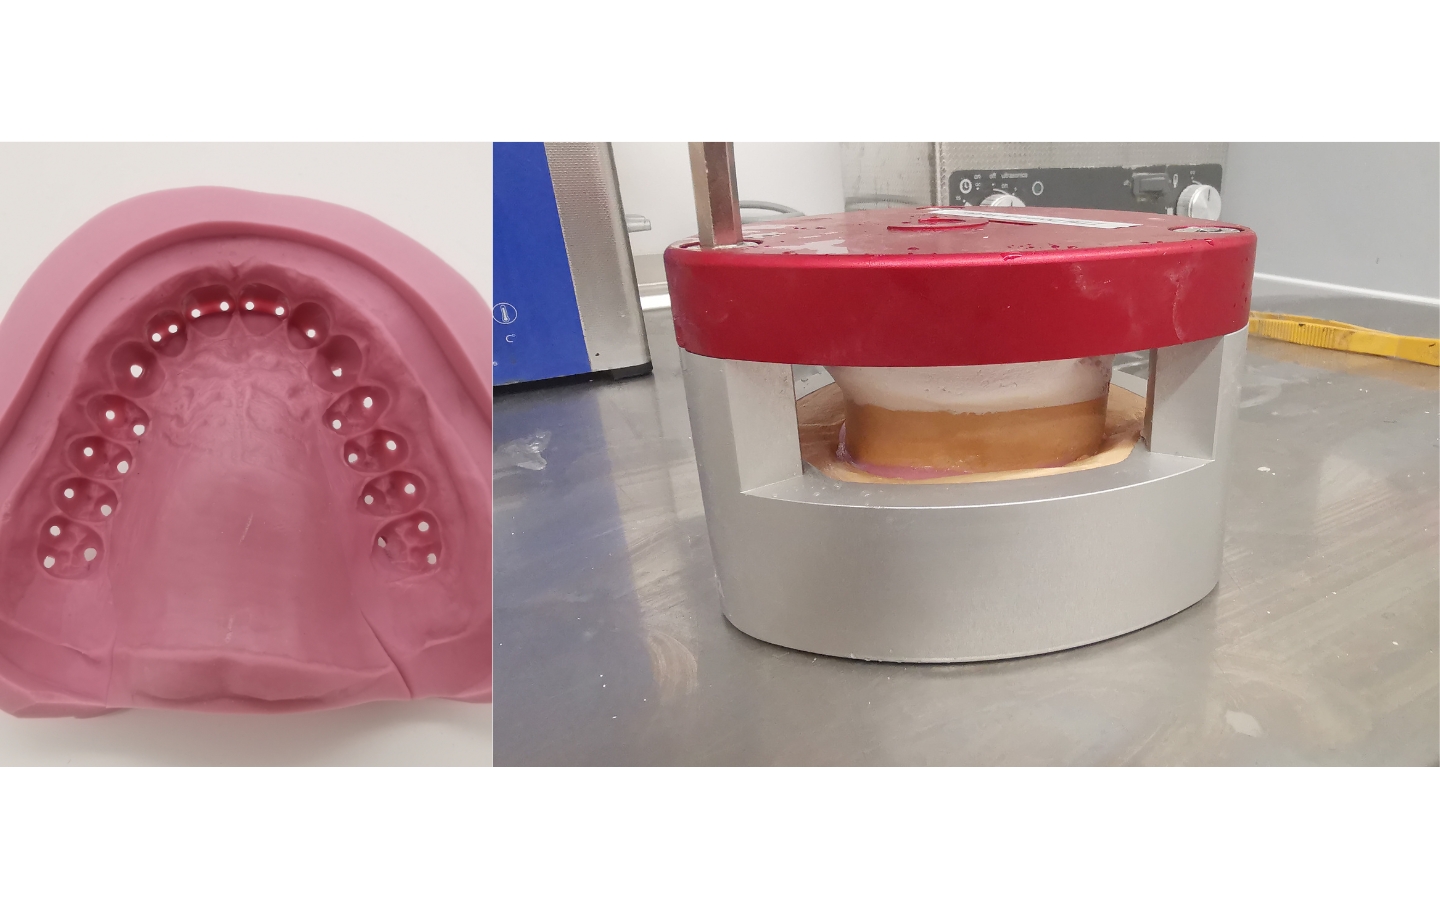
Fig. 16 (left): Silicone matrix (Shore hardness 65 - 75) with perforations at the cusp tips
Fig. 17 (right): Models placed in the PolyMaster (cold press)
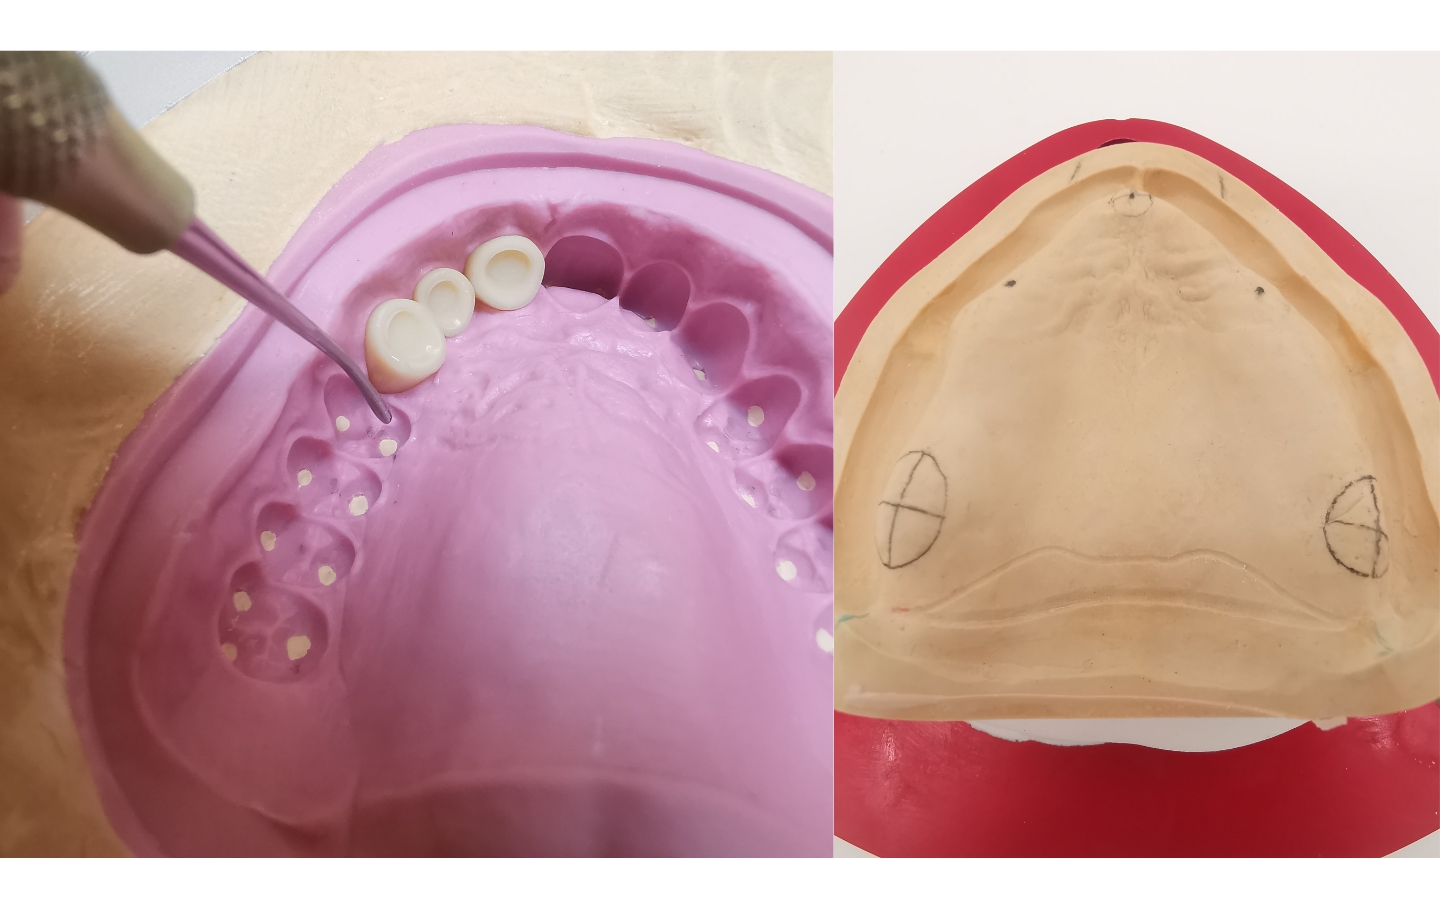
Fig. 18 (left): Bonding of teeth into the matrix
Fig. 19 (right): Vibrating line etching on the maxillary model for a powerful suction effect
After the models have been wetted and insulated and the teeth have been fixed in the matrix, the resin polymers are prepared (Fig. 20). To provide natural esthetics, individualization and intensive color materials should be used in addition to the base material (Candulor 34) (Figs. 21a and b). The teeth are wetted with monomer and the individualization materials are applied followed by the base material (Fig. 22). After screwing the flask closed, polymerization is performed for 20 - 25 minutes at 40 °C water temperature in the pressure pot.
- Candulor 34: base material
- Candulor 53: thin gingival portions or raised areas (alveolar mounds, palatal folds)
- Candulor 55: more strongly perfused gingival parts (papillae, deeper mucosal areas)
- Red and blue intense stains: suggestion of fine veins
- White intensive stain: imitation of leukoplakia region 35
After devesting the dentures, occlusion and articulation are checked; the support pin is set to zero (Fig. 23). This is followed by the removal of the dentures from the models. Tooth necks and proximal spaces are reworked and the marginal areas as well as the areas for muscle-gripping are optimized. The dorsal prosthetic margin of the upper denture is shortened to the vibrating line and both dentures are carefully polished (Fig. 24). Here, special attention is paid to the occlusal surfaces so as not to lose the occlusal points and ground facets.
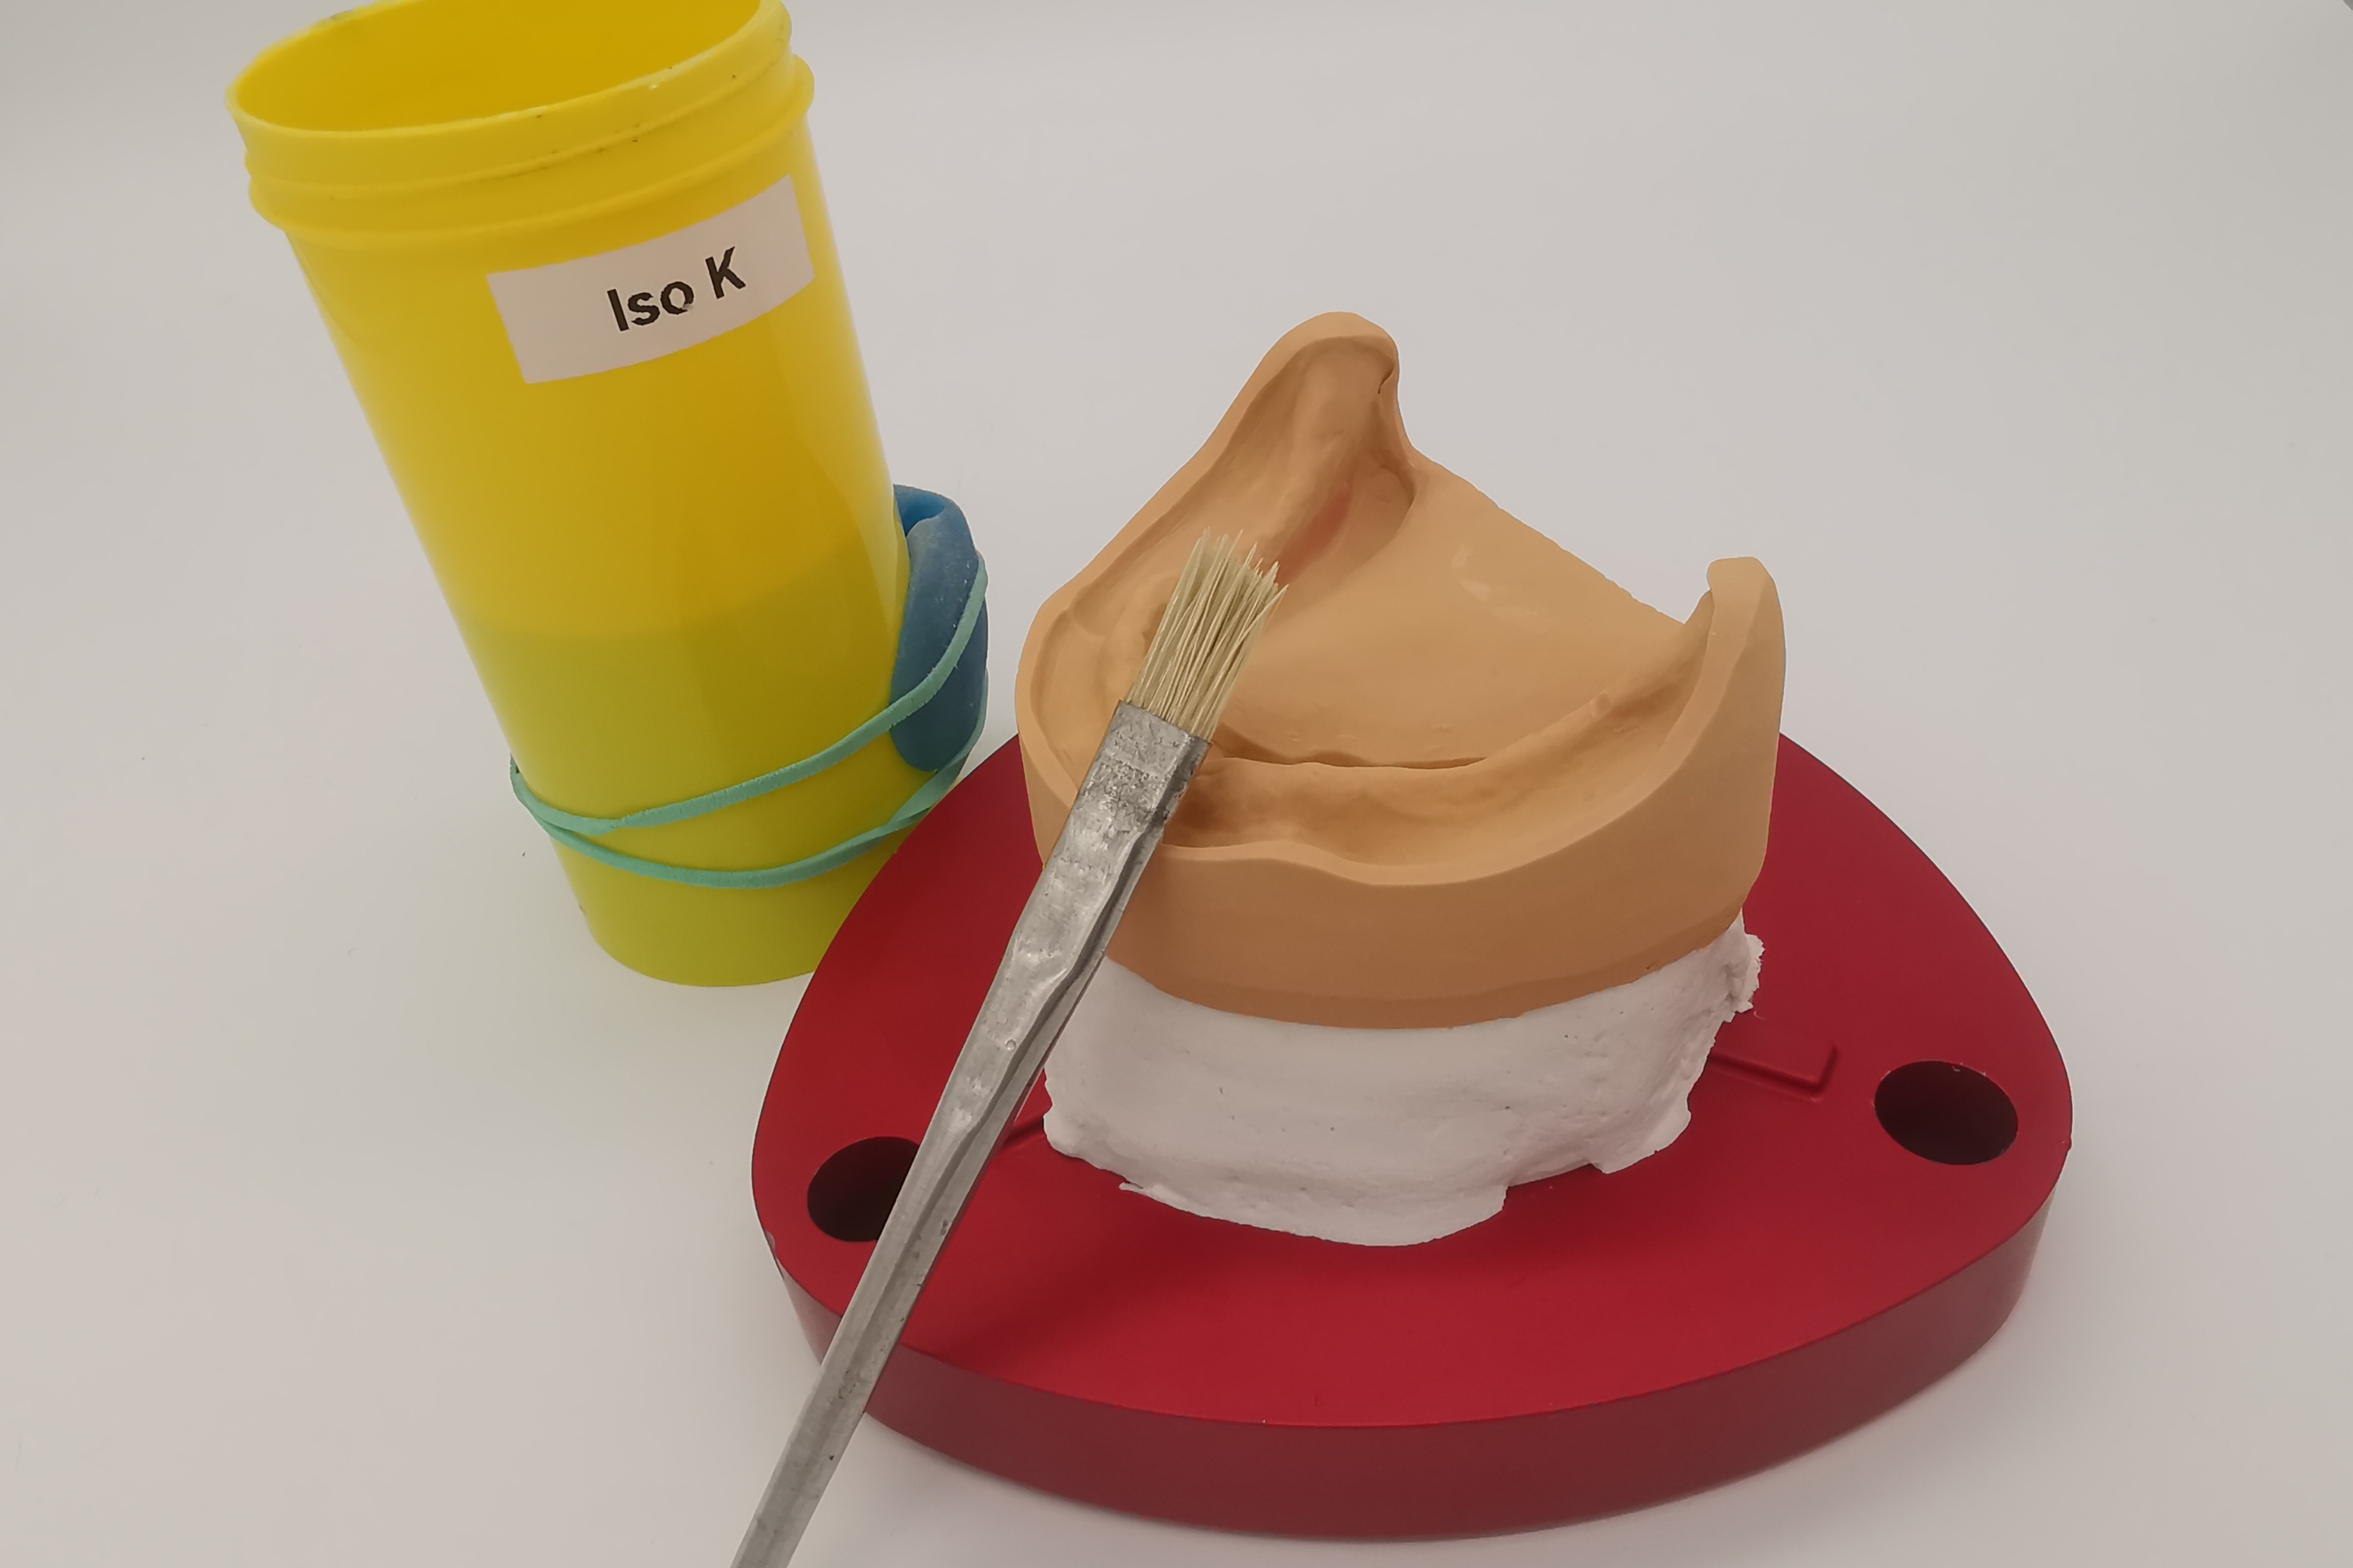
Fig. 20: Thin coating of the models with alginate insulation (Iso-K) without forming puddles
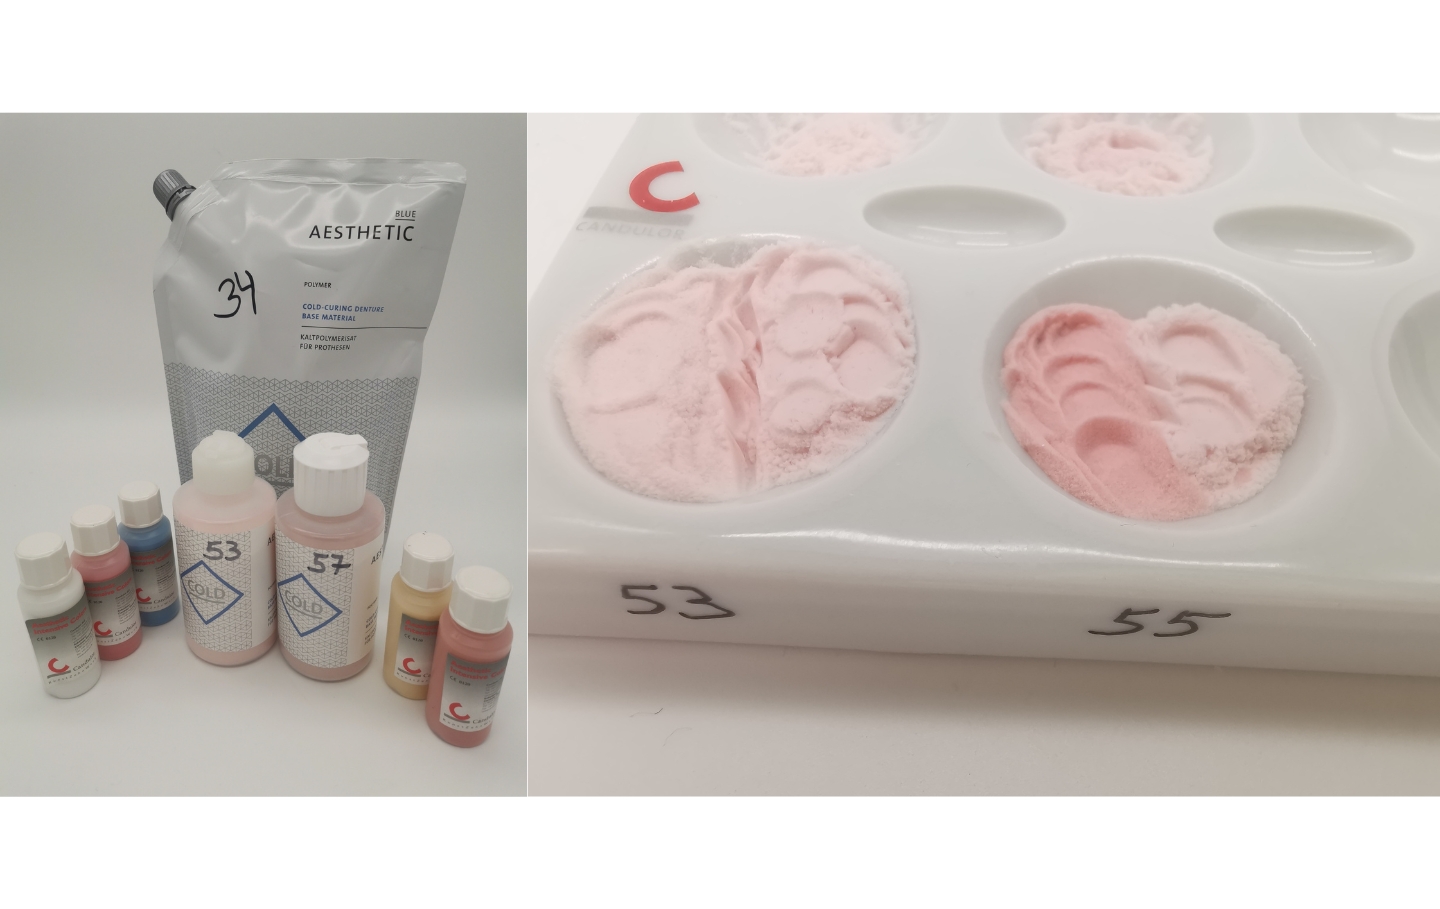
Figs. 21a and b: Individualization of the red esthetics using various resins from the Candulor range. Mixing the polymers 53, 55 and intensive stain powder (ratio 1:1) with the base material 34
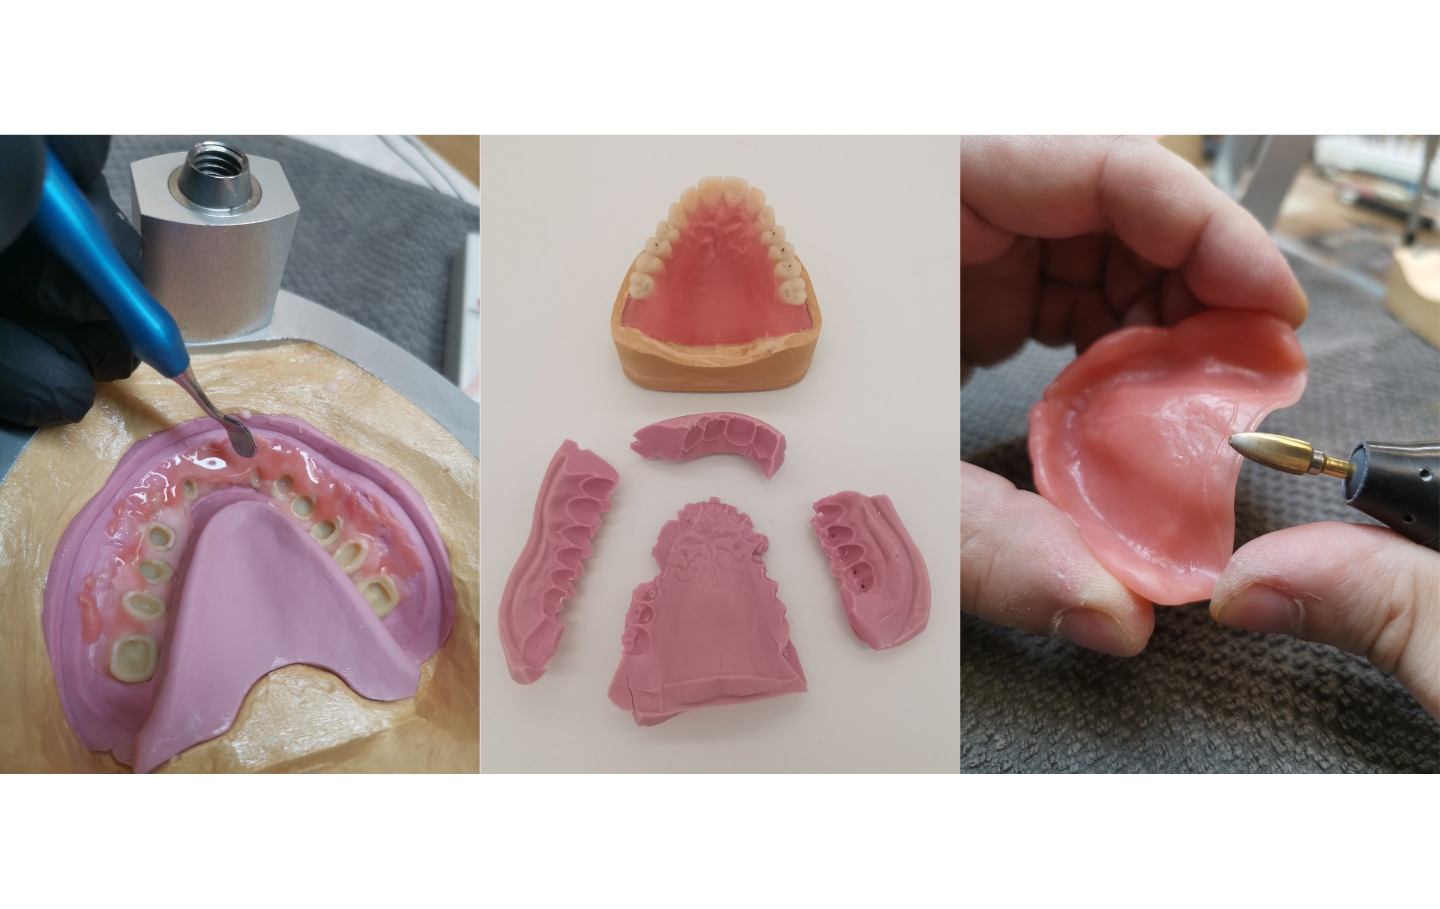
Fig. 22 (left): Application of the individualization materials followed by filling with the "dough" base material
Fig. 23 (center): Devested denture prior to removal from the model (check of articulation movements)
Fig. 24 (right): Finishing the denture bodies paying attention to sensitive areas, e.g. the vibrating line
Individualization of the dentures
To provide the dentures with more naturalness and liveliness, the teeth should be individualized. The denture bodies are covered with wax. This serves to protect the already polished gingival portions. The labial and buccal surfaces of the teeth can then be conditioned and designed with characterization materials (Optiglaze Color Sets, GC), e.g. ground facets, enamel cracks, imitation of leukoplakia (Figs. 25a and b). To add the finishing touch to customization, the lower denture is furnished with a gold inlay at the level of the molar (Fig. 26). After final polishing and cleaning of the models as well as dentures, the work is ready for handing over (Figs. 27a and b).
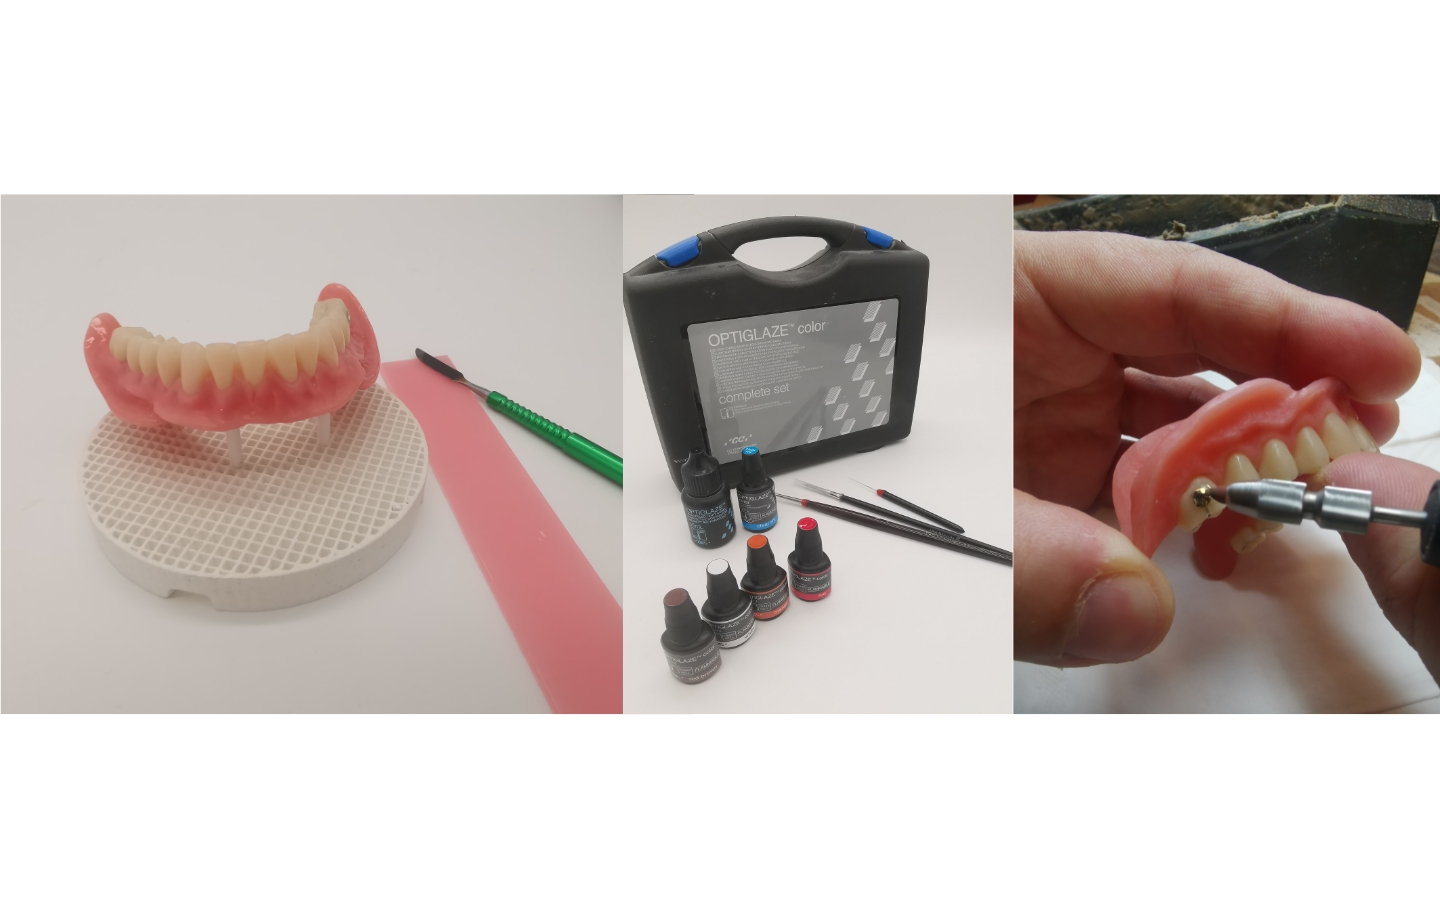
Figs. 25a and b (left, center): Individualization of teeth with stains and characterization materials
Fig. 26 right): Polishing of the gold inlay
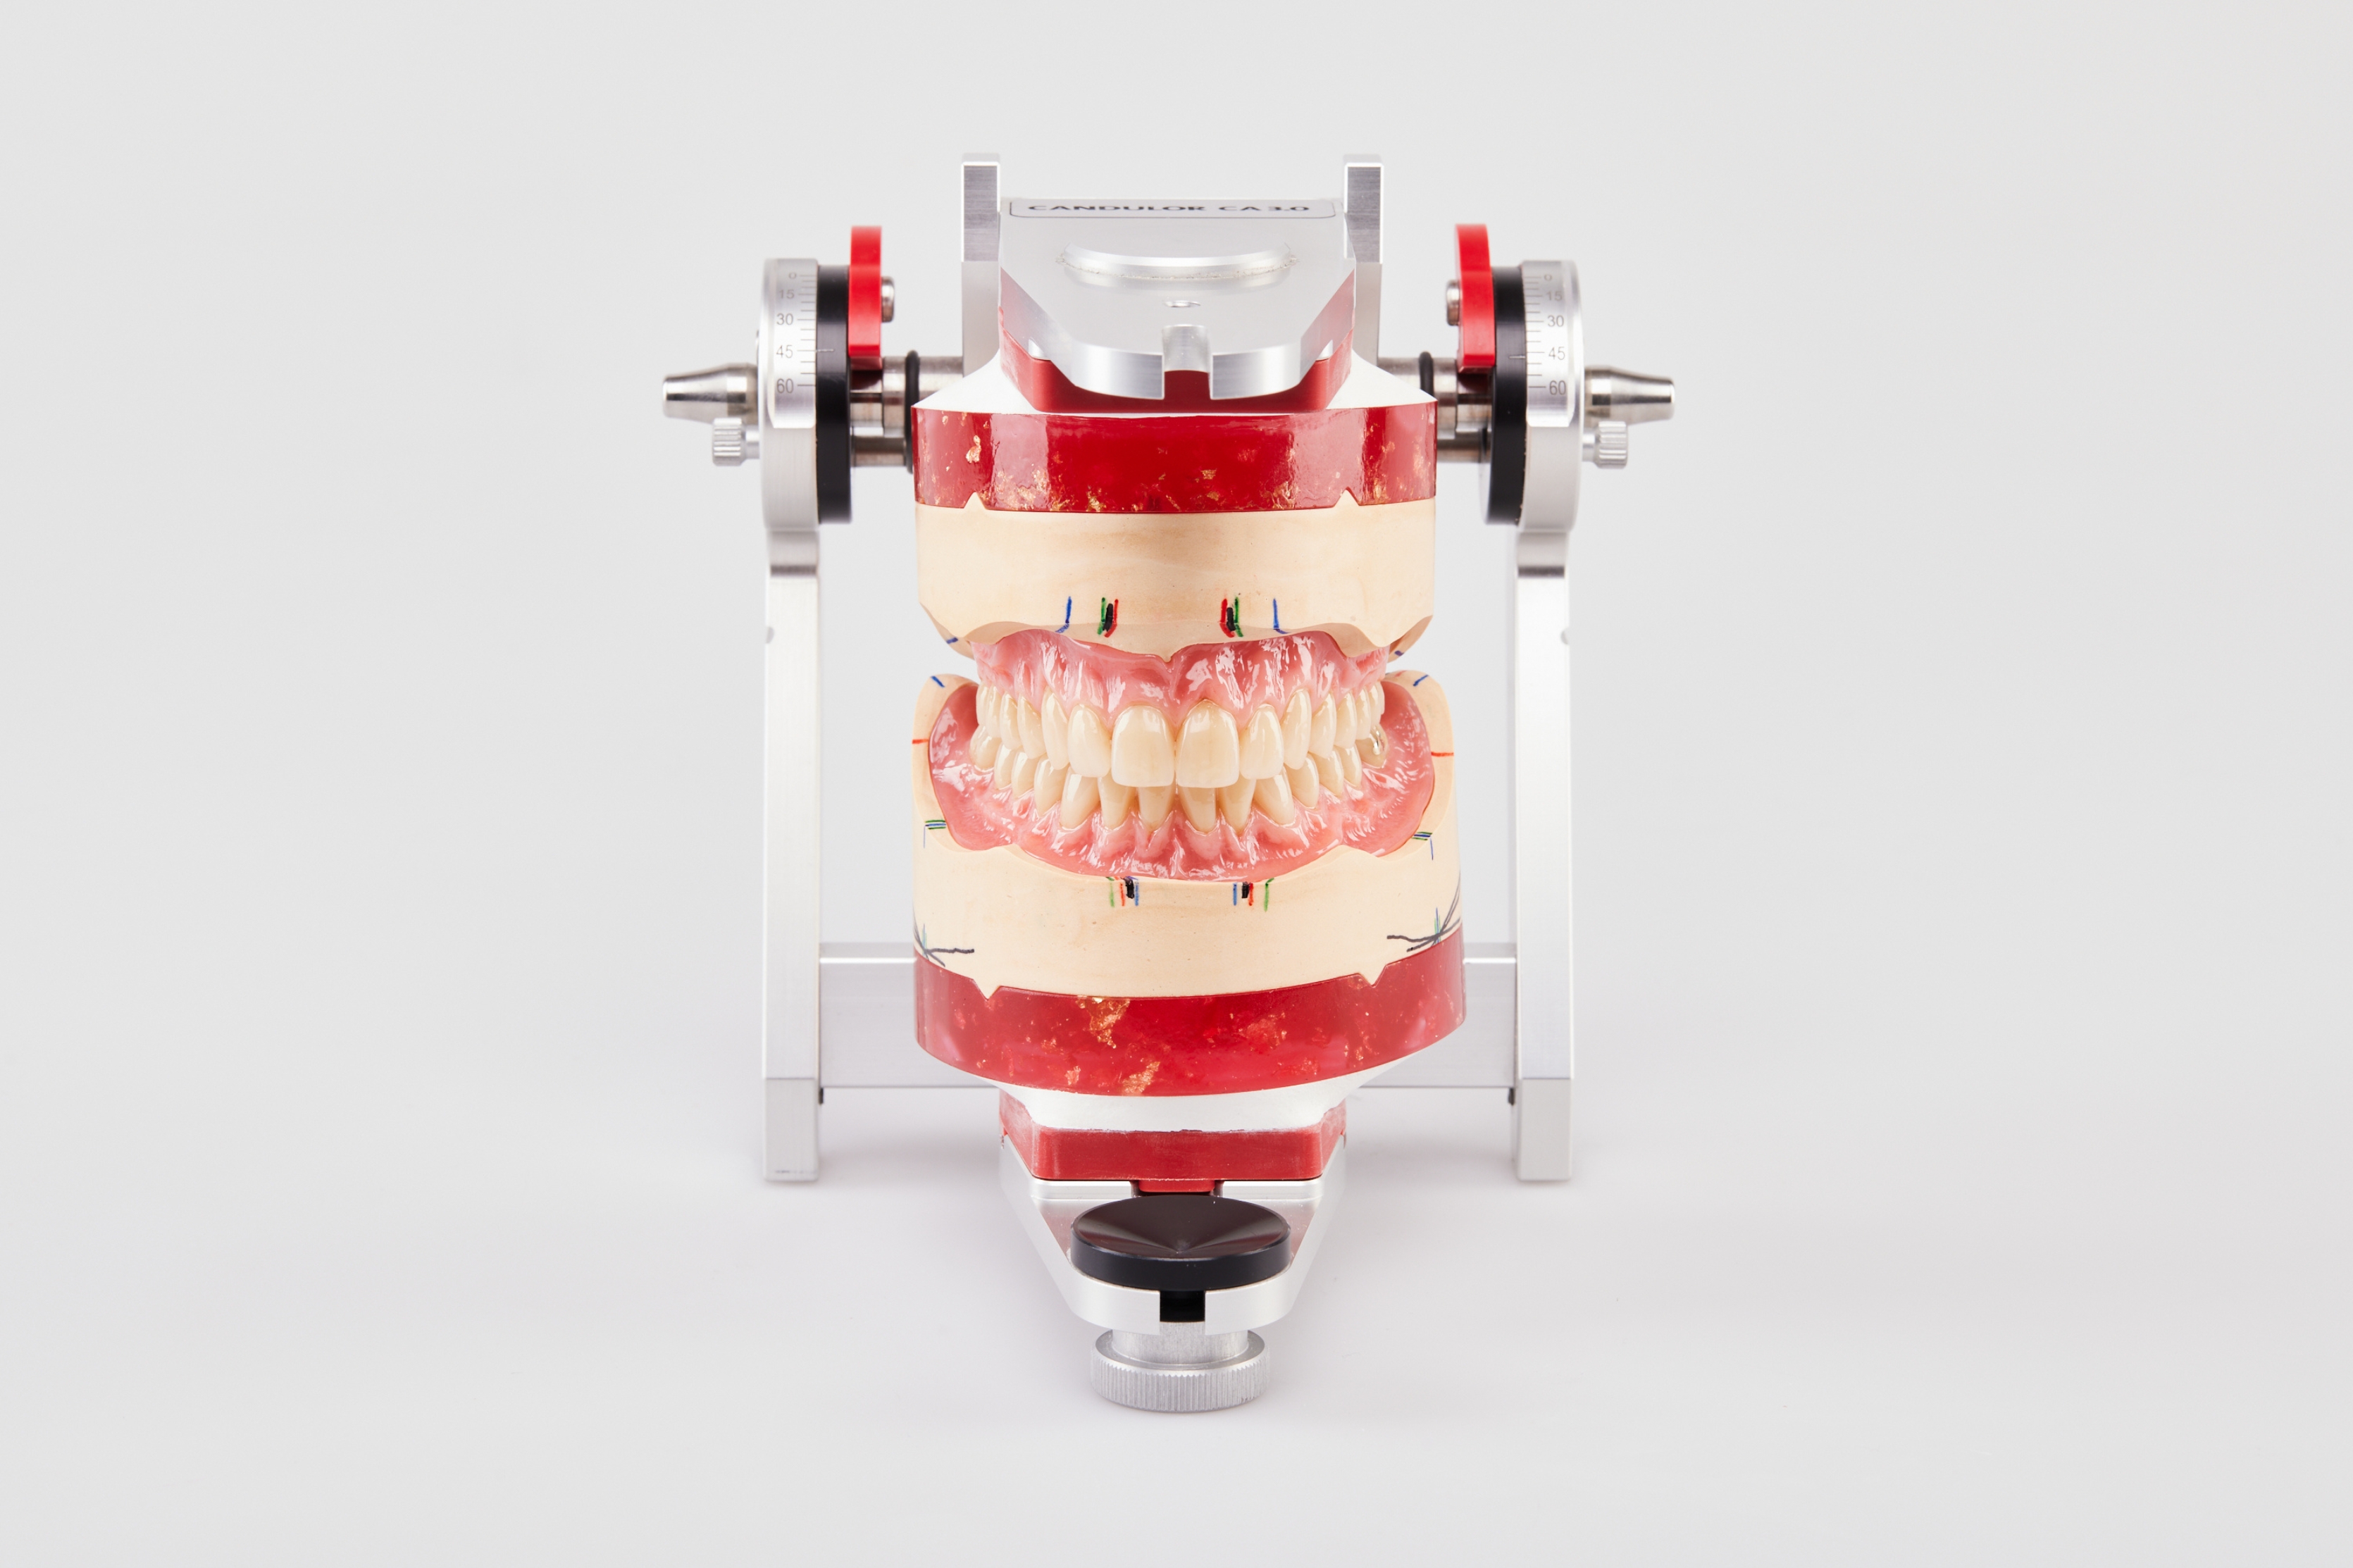
Figs. 27a: The finished dentures in the articulator (competition entry)
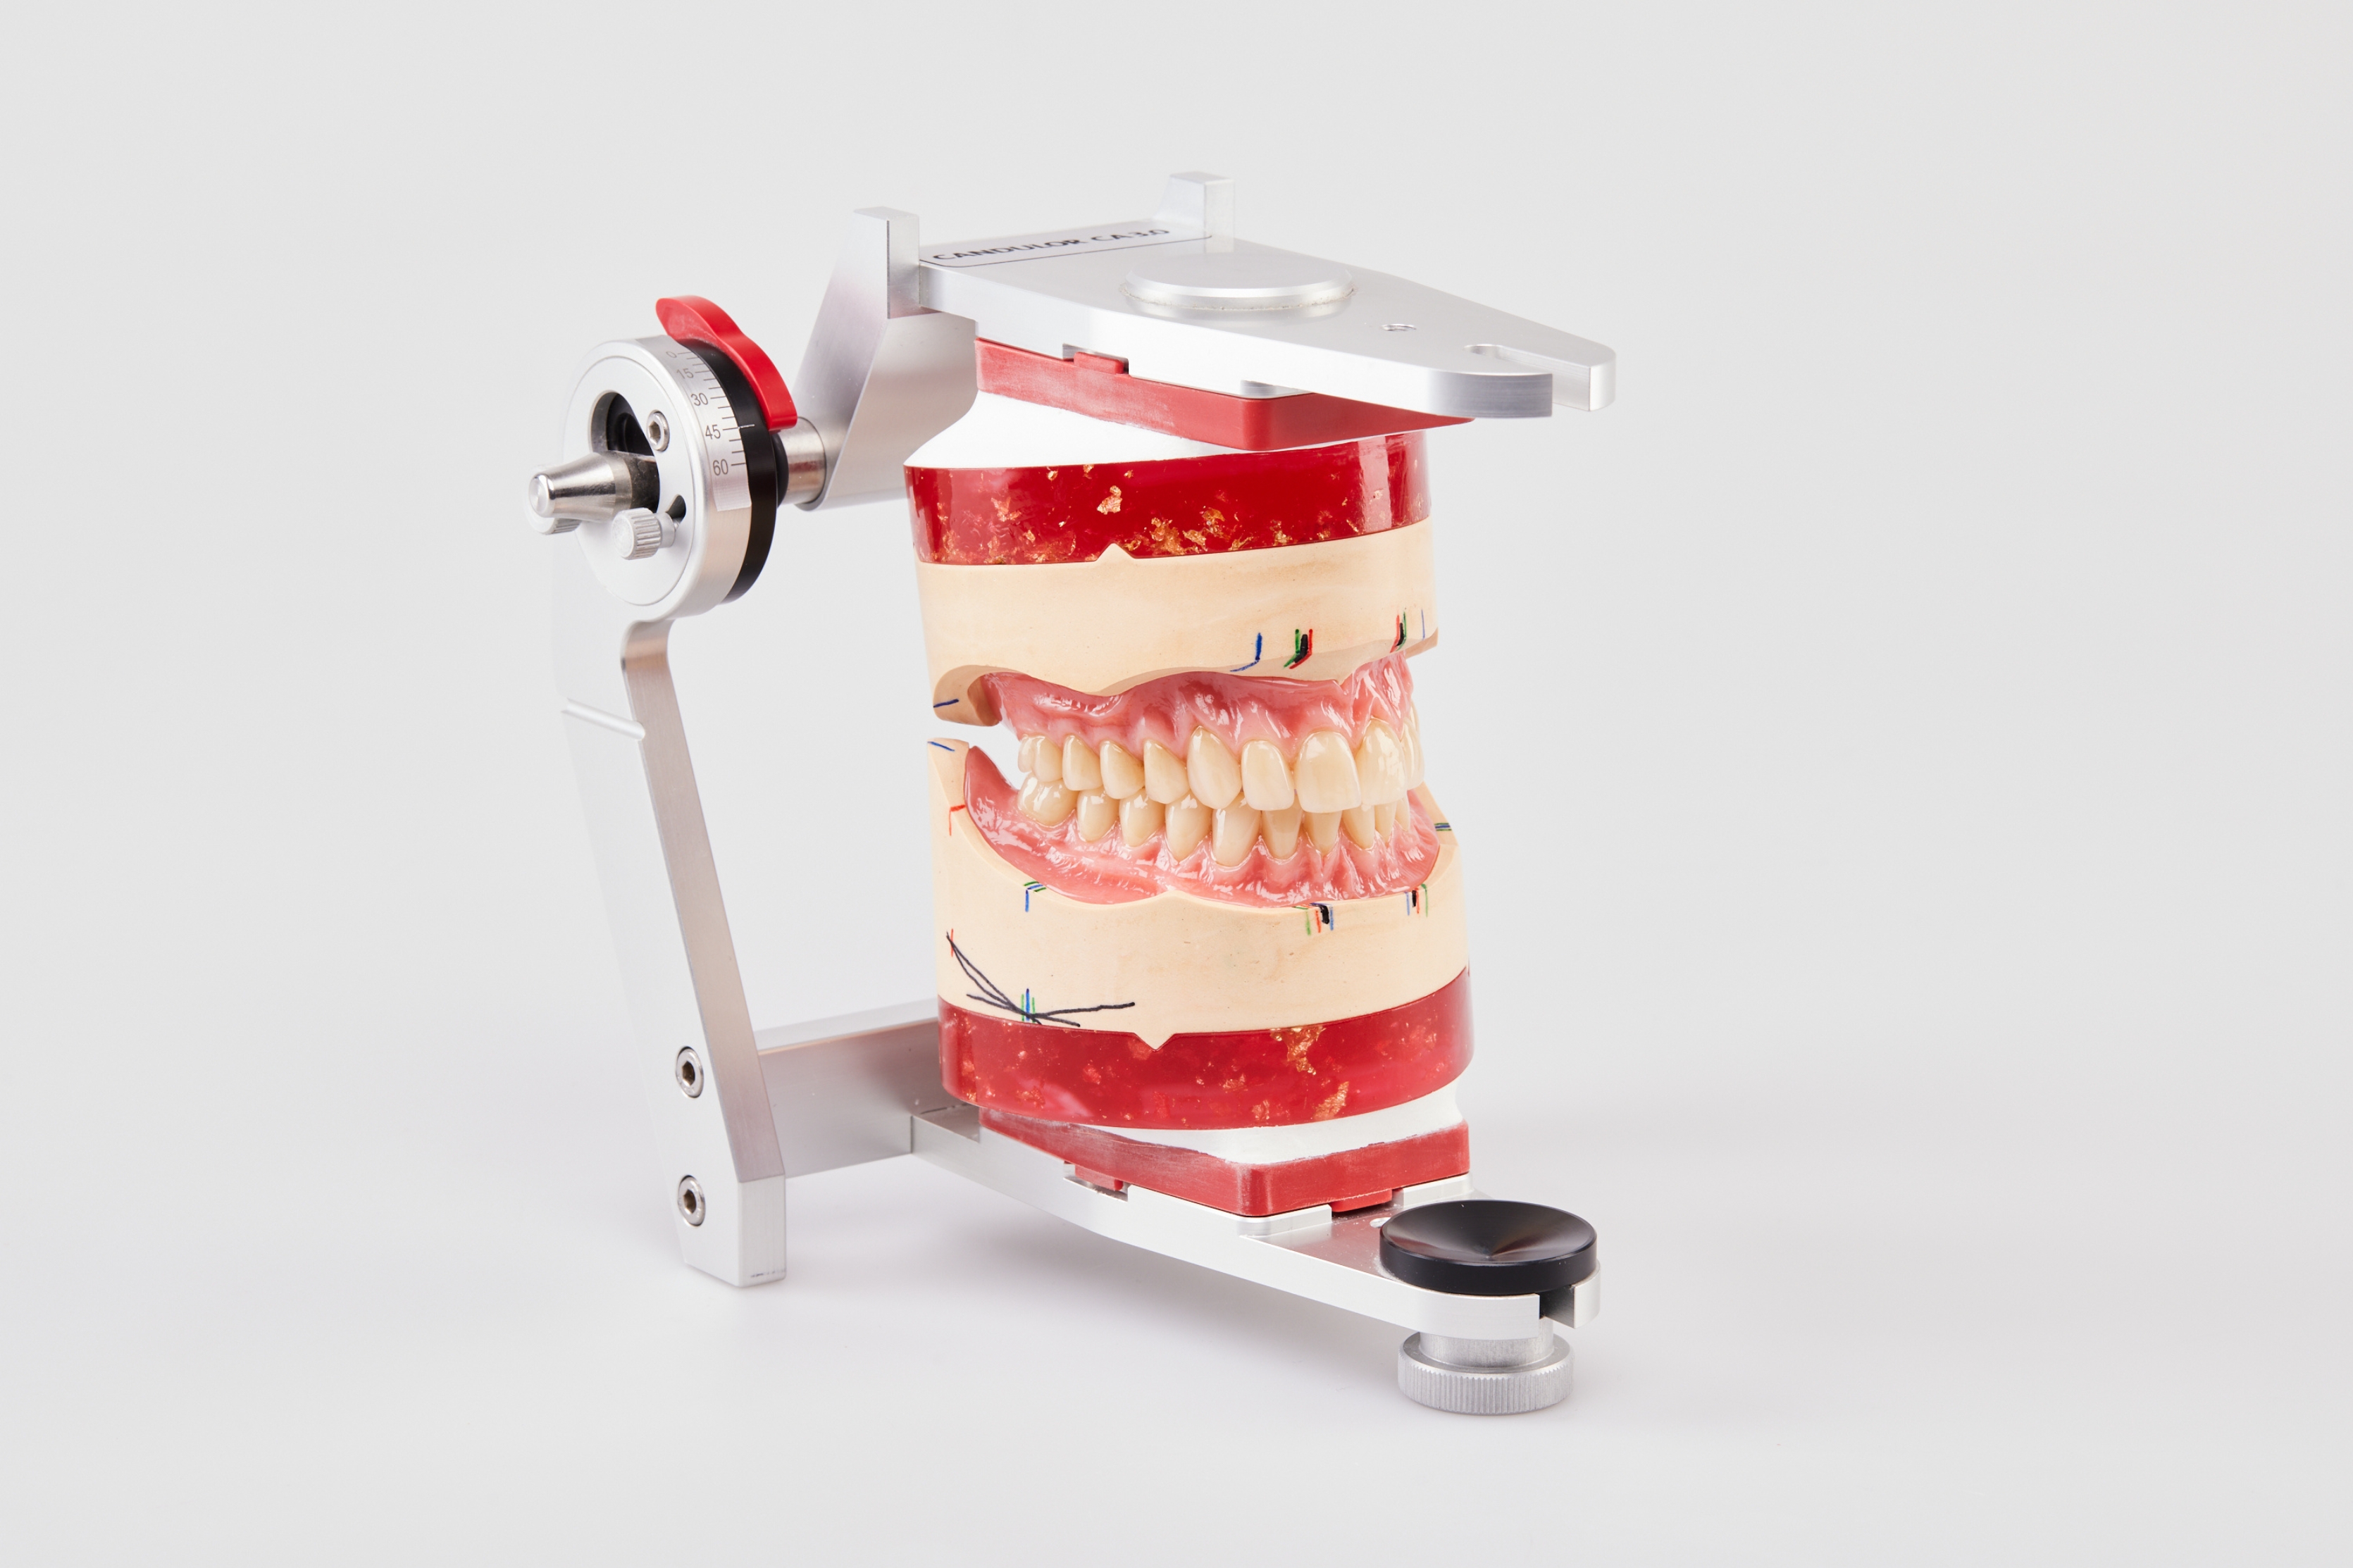
Figs. 27b: The finished dentures in the articulator (competition entry)
Conclusion
Although dental technology is becoming increasingly digitized, full denture prosthetics currently remain handcrafted work. Esthetic, functional and individual aspects require the craftsmanship and creativity of the dental technician. The challenge is to uphold these skills in a digital age. Despite increasing digitization, the knowledge of proven criteria and the skills of analog processes form the basis for solid full denture prosthetics. Cooperation within the dentist-laboratory team as well as an understanding of the individual needs of the patient remain indispensable for a successful result and long-term patient satisfaction.
"As I am serious about my craft and the passion for dental technology that comes with it, participating in KunstZahnWerk has been a goal of mine for a long time. I am incredibly proud and grateful that I was now not only able to demonstrate my skills, but even won first place. The competition has motivated me to continue improving my skills and to keep challenging myself. In particular, KunstZahnWerk has once again made me aware of the relevance of craftsmanship in dental technology." Sebastian Guttenberger, Pirk
* In this article we refer to the dental scheme: FDA (Fédération Dentaire Internationale / DIN EN ISO 3950:2016-09).
MATERIALS
Articulator
Candulor Articulator CA 3.0 (CANDULOR)
Tooth lines
PhysioSelect TCR and BonSelect TCR (CANDULOR)
Denture base material
AESTHETIC BLUE (CANDULOR)
Individualization of the gingiva
AESTHETIC Intensive Colors (CANDULOR)
Characterization materials teeth
OPTIGLAZE Color (GC)
Flask
PolyMaster (Candulor)
Insulation plaster-resin
Iso-K (Candulor)
Silicone (matrix)
Monosil (HLW Dental)
Super hard plaster
Rocky Mountain (Class 4)
Polymerization light
Bluephase (Ivoclar)
Alloy (gold inlay)
Aurumed Norm (Deutsche Aurumed Edelmetalle)


The Polymaster is a polymerization device for the pouring/pressing technique using cold-curing polymers.
Learn more
Who is…?

2014
Apprenticeship examination (Chamber of Crafts Regensburg)
2014-2016
Employed dental technician (Zahntechnik Hierold, since 2018: H2 Dental)
2019-2020
Master Class Munich
2020
Award of the title of Master and the title of "Bachelor Professional"
2020
Received the Bavarian State Government's Master Craftsman Award for outstanding performance in the master craftsman's examination
2020-2022
Employed dental technician (H2 Dental)
2022
Employed dental technician (Zahntechnik Hierold)